Closed-circuit televisions (CCTVs), also called video magnifiers, have been around for decades, and since their development, few major changes have been made to their physical design. Of course, some improvements have been made, and new features, such as line markers, auto focus, and improved color, have been added, but most are still large, heavy desktop models that cannot be carried around. The problem is that people are increasingly on the move and want to take their computers and magnification with them. Laptops enable people to take their computers wherever they go; they can even be used with screen-magnification software, but what about CCTVs?
CCTV manufacturers are working to provide people with portable options for full-feature CCTVs. While this idea is not new, it has been gaining increased momentum, resulting in a greater number of portable, laptop-compatible CCTVs that people with low vision can now more readily benefit from.
This article evaluates the PC Mate from Clarity and the ClearNote from Optelec, and future articles in this series will evaluate similar products, including the MagniLink Student from Low Vision International, the i-Stick from OPTRON Assistive Technologies, and the OPTi Verso from Freedom Vision. All these products are laptop compatible, weigh less than 5 pounds, have a rotating camera that allows for near and distance viewing, and have the ability to take a "picture" of an image and save it to the computer. They also allow a student to sit in different areas of the classroom and read sections of the chalkboard on a laptop screen; a professional to sit at the back of a conference room and watch a presentation on a laptop screen; and a nature lover to watch birds from a kitchen window or from a picnic table at a local park, seeing everything up close on a laptop screen.
These types of video magnifiers are all great in theory, but how well do they work in practice? Let's take a closer look.
To help potential buyers make an informed purchase, this series of articles provides highlights of the products' positive attributes, as well as areas that could be improved. Since this type of assistive technology can be quite expensive, it's important to be as knowledgeable as possible about your options before you make a choice.
The PC Mate and ClearNote that are evaluated in this article and the other video magnifiers that will be evaluated in future articles in this series can all be connected to a laptop, desktop, or stand-alone VGA monitor. Since most people who purchase one of these products will use it with their laptops, I chose to use a laptop to evaluate them. I used an IBM ThinkPad running Windows XP Professional Service Pack 2, with a Pentium M 1.86 GHz processor with 1 GB of RAM. I also used ZoomText 9.0 Magnifier/Reader in conjunction with the video magnifiers.
To conduct these evaluations, I set up the products at my desk and used each one for approximately one week to do my daily office work. This way, I learned firsthand the characteristics of each product. Each video magnifier that I examined was evaluated in four main areas: print and on-screen documentation, minimum requirements and product design, software installation and setup, and features.
The Clarity PC Mate
Print and On-Screen Documentation
The Clarity PC Mate comes with a Quick Start Guide; a more detailed Instruction Manual; and the Clarity Capture Software CD, which contains an electronic version of the printed documentation. The Quick Start Guide gives only basic information about the product, its features, and its setup. In fact, it may be confusing because it does not provide enough information about the product. The guide is also printed in 11-point font, which is much too small for most people with low vision to read, so it will do them little good when trying to set up the product.
The Instruction Manual is printed in 16-point font and is presented in a spiral-bound booklet. Although this font size is larger than normal print, it doesn't reach the American Printing House for the Blind's guideline of at least 18-point font for print that is intended for people with low vision. The Basic Setup Instructions section of the manual shows dialog boxes that illustrate the installation process, but the diagrams are too small for most people with low vision to see, thus rendering them of little use. On the other hand, the descriptions of the PC Mate's features in the Instruction Manual are fairly easy to understand.
There are some issues with the on-screen documentation, though. First, the documentation's text doesn't automatically come up in large print, so you must activate your screen-magnification program to access it, but the screen-magnification program must be turned off when you use the PC Mate as a video magnifier. Second, the Quick Start Guide comes up in PDF (portable document format) in normal-size print; therefore, the larger you make it with a screen-magnification program, the more illegible it becomes, although it can be read aloud to you with screen magnification/screen-reading software, which is good.
The two most significant problems with the documentation both in print and on-screen are the lack of information and explanations of the items in the Clarity Capture software menu and the lack of instruction on how best to use the PC Mate in conjunction with screen-magnification software, both important issues. A list of some hot keys in the Quick Start Guide is about all you get when it comes to explaining how to use the software.
You have to activate and deactivate your screen-magnification software continually through hot keys when you switch to another application; use on-screen menus to change settings, such as reconfiguring hot keys; or want to capture images and save them to your computer. Anyone who uses a video magnifier also needs screen magnification, so this issue needs to be addressed in the documentation. You cannot have a screen-magnification program active while you use the PC Mate to enlarge an image because it magnifies the already-magnified image on the screen. Thus, it becomes pixilated and blown out of proportion. This fact is not mentioned in the documentation.
Minimum Requirements and Product Design
According to Clarity, to use the PC Mate with your laptop, you must use Windows XP or greater and have at least two USB ports.
The PC Mate camera has four large tactile buttons—Power, Contrast, Zoom, and Mode—that give you access to many of the product's features. The camera is designed for both desktop and distance viewing. When you use the camera for desktop viewing, it is usually best to position the camera about 9 inches above the item and have the camera lens positioned over the camera opening. When you view objects at a distance, the camera is to be turned toward the distant object, and the lens covering the camera should be rotated out of position. When the camera is positioned for distance viewing, the four control buttons rotate out of view, and you then use a remote control to operate the product. The remote control has the same four large, tactile button controls as does the camera, so using the remote does not require you to learn anything new, but this design could be improved. When there is an additional small piece of equipment, such as the remote control, there is a greater likelihood of losing it, damaging it, or having the battery run down when you need it. Better positioned buttons on the camera, or the ability to access the Power, Contrast, Zoom, and Mode features through the keyboard—or both—would be better.
The camera is connected to an adjustable arm that fits into your choice of two bases: a round suction mount or an arm-mount plate that slides under the bottom of your laptop. The suction mount is most likely the best choice for most people. It gives you the ability to customize the product to meet your needs because you can move it around your work area to accommodate writing tablets, large books, or newspapers. The arm-mount plate slides under the edge of your laptop and causes the camera to be positioned very close to the laptop, leaving little room for placing documents under the camera. It may be suitable for writing short notes in a meeting room situation, but not much more.
The PC Mate is powered through two USB ports, drawing all its power from your laptop. As tested with the IBM ThinkPad with a fully charged battery, it could sustain continuous use for two hours. Without connection to the PC Mate, the laptop could be used for three hours. In addition, if your laptop has only two USB ports, you must purchase a USB hub if you want to attach another device, such as an external keypad.
The fact that the PC Mate is powered through your laptop is helpful, because you only have to worry about one battery. The trouble is that it draws a good deal of power from the laptop. It would also be an improvement if the two USB port connections were redesigned to require only one.
Software Installation and Setup
The software installation and initial setup of the PC Mate are not difficult to perform if you have screen-magnification software running. To install the Clarity Capture software, you simply insert the CD and follow the prompts on your screen. The screen-magnification software will enlarge the prompts to make them readable to people with low vision, and when the installation is complete, it can be turned off with hot keys, so you can use the CCTV.
The Instruction Manual walks you through the setup of the camera and describes the methods of both desktop and distance viewing. The setup section of the Instruction Manual also provides a chart to explain how to position the camera if you are using the set of additional lenses that is available from Clarity for $50. These additional lenses can extend the magnification range of the PC Mate up to 90x.
The PC Mate is easy to transport from place to place. When you get to your destination, you simply connect the camera arm to your choice of two mounts, connect its two USB cables to your laptop, start the computer and screen-magnification program, click the Clarity Capture icon on your desktop, and press the Power button on the camera, and you are ready to go.
Features
Many of the features of the PC Mate can be accessed by pressing the Mode button on the camera. Pressing the Mode button will cycle you through the full-color, black-and-white, and inverse viewing modes, and pressing F3 will cycle you through the artificial color choices. Double clicking the Mode button will give you access to the advanced features of Line Markers, Masking, Media Mode, Manual Focus, and Lighting.
When you use Line Markers, "Markers" is displayed in the upper-left corner of the screen. The lines on the screen are adjusted by using the Contrast and Zoom buttons. This can be a helpful feature to keep your place while you read a text document or write on unlined paper.
When you use the Masking feature, "Mask On" appears in the upper-left corner of the screen. This feature casts a shadow over a selected area of the screen, which can be useful in several situations, including reading lines of text.
When you use the Electronic Media Mode, "Media On" appears in the upper-left corner of the screen. This electronic media feature will improve the quality of pictures when watching television and computer-driven overhead projectors and looking at a computer monitor screen with the PC Mate.
When you use Manual Focus, "Focus" appears in the upper-left corner of the screen, and you use the Zoom Button to adjust the focus manually. This feature can be beneficial when you view three-dimensional objects under the camera or when you write by hand.
Through the Mode Button, you will also find the Lighting feature. According to the Instruction Manual, the default color setting for the product can cause a slight reddish cast to your pictures in some lighting environments, although this cast was not observed during testing. The Lighting feature should allow you to change this cast to be more pleasing. You have three lighting choices—L1, L2, and L3—which can be accessed by pressing the Zoom button while in the Lighting feature.
Aside from accessing features through the Mode Button, double clicking the Contrast Up arrow will give you access to the Focus Lock feature. When you use this feature, "Focus Lock" appears in the upper-left corner of the screen. This feature works well for handwriting because it keeps the focus on the paper and does not allow the camera to focus on your hand or the pen.
Pressing Ctrl-C or F5 enables you to take a "picture" of an image and save it to your computer. This is a great feature that students and professionals alike will appreciate. As mentioned before, the problem is that there is no explanation of it in the Instruction Manual, nor is there any explanation of how to use the items in the Clarity Capture software. These are important features of the PC Mate and need to be explained better.
What Would Make it Better
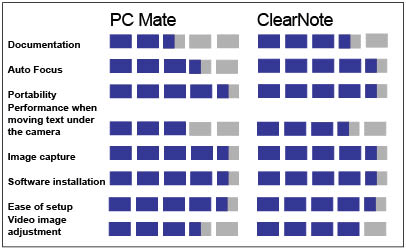
The Clarity PC Mate could be improved in four main ways: (1) by improving the documentation, (2) by improving the responsiveness of the Auto-Focus feature, (3) by improving the quality of the display while moving text under the camera, and (4) by improving the quality of the display while using inverse mode and artificial colors for handwriting.
All documentation for the product should be provided in at least 18-point font, and both the print and on-screen documentation should include detailed information on using the Clarity Capture software and how best to use the product with screen-magnification software. In addition, if the camera is not at the appropriate distance from the object you are viewing, it will not auto focus properly. If this situation occurs, you must manually adjust the camera to a position either closer to or farther from the object. The Auto-Focus feature ought to do just that, and you should not need to have to help it by adjusting the height of the camera manually.
Also, when you move a page of text under the camera, the display on the screen becomes pixilated and is distorted to the point of being almost illegible. You have to move the page slowly for this not to happen. This is a problem that can decrease your work efficiency. Another display issue arises when you attempt to write on lined paper under the camera. In the inverse and artificial color modes, the lines on the paper disappear or become difficult to see even after you adjust the contrast. Full-color and black-on-white modes are the best choices for handwriting, but even then, a slight shadow is cast by your hand, which can be distracting while you write.
The Bottom Line
The Clarity PC Mate is a definite step in the right direction when it comes to the newer generation of CCTVs. The product is lightweight; provides up to 60 times magnification; has a rotating camera for near, distance, and self-viewing; and has the ability to capture an image and save it to your computer.
After you spend some time getting used to the product, you will find it to be a valuable tool. The PC Mate connected to a laptop does not, however, completely replace the large desktop CCTV. I would not recommend it to someone who does a considerable amount of text reading—that task should be done with a large CCTV—but for magnification on the go, it is an option to keep in mind.
The Optelec ClearNote
Print and On-Screen Documentation
The Optelec ClearNote comes with a Hardware User Manual and a Software User Manual, both of which are printed in 18-point font and are presented in spiral-bound booklets. A list of hot key commands, printed on a separate sheet in bold 14-point font, is included with the documentation and serves as a quick reference tool. The ClearNote software CD also contains an electronic version of the print documentation.
The Hardware Manual, called Manual 1, describes all the physical attributes of the product, including the buttons on the camera arm and how they work, and provides instructions for connecting the ClearNote to your laptop and information about near and distance viewing. The Software Manual, called Manual 2, describes how to install the ClearNote software and how to use the functions of the software, including image capture, and gives a complete list of hot keys and their related functions.
The ClearNote software CD also contains an electronic version of the documentation. As with the on-screen documentation with the Clarity PC Mate, it comes up in normal-size print, and you must use hot keys to turn on your screen-magnification program to read it and then turn it off to use the ClearNote as a CCTV. Also, like the Clarity PC Mate, the ClearNote software does not give any information on how best to use it in conjunction with screen-magnification software.
The list of hot key commands, which is printed separately from the manuals, is a good idea that could be made better. This list should be printed in at least 18-point font and could be made into a double-sided copy to accommodate the larger print. Laminating this list would make it more durable and would ensure that it would be better preserved for future reference.
Minimum Requirements and Product Design
According to Optelec, your laptop must be running Windows XP and have at least one USB port. Optelec lists a 2.4 GHz processor as a laptop requirement; this is a tall order for most people. A laptop with this speed is an expensive, high-end model, and when purchased with the ClearNote would add up to quite an investment.
The camera arm has six tactile buttons—External Light, Viewing Modes, Semi Colors, Increase Magnification, Decrease Magnification, Auto Focus—and the On/Off switch. The ClearNote is designed for both desktop and distance viewing. The camera is mounted on a stationary L-shaped arm, and the height of the camera does not need to be adjusted. For desktop viewing, the camera is turned down to face the object or text, and the lens should be positioned to cover the camera opening. For distance viewing, the camera should be pointed toward the distant object, and the lens covering the camera opening should be rotated out of position. Unlike the Clarity PC Mate, there are no buttons on the camera itself; the buttons are located on the camera's arm and remain stationary and always in view, so a remote control is not needed.
The ClearNote's camera arm fits into a connection block at the side of a 9.5-inch by 15.5-inch base plate. When a laptop is used, the laptop sits directly on the base plate and holds the ClearNote in position. The actual camera is mounted on an arm that extends about 11.5 inches to the right of the base plate. The ClearNote cannot be repositioned when it is used in conjunction with a laptop.
The ClearNote can be powered by its rechargeable internal batteries or its AC adapter and draws no power from your laptop. The fully charged batteries can last for up to five hours of continuous use. The recharging process takes approximately four hours. The battery life will not take a student or professional through a typical day without needing to be recharged or plugged into the AC adapter. There is no way to tell how much battery life you have left on the ClearNote, so you need to carry the AC adapter with you "just in case."
The ClearNote connects to your laptop through one USB connection that is used only for video, not for powering the product. This USB cable and the AC adapter attach to the left side of the connector block. Making these connections on the connector block can be awkward, especially the first few times you do it, because you have to stick the cables back into an open end and feel for the actual connection spots. These connection spots cannot be seen, and you have to guess where they are. This connection method needs to be improved to make the product easier to set up.
Software Installation and Setup
The software installation and initial setup of the ClearNote are not difficult to perform if you have screen-magnification software running. To install the ClearNote software, you simply insert the CD and follow the prompts on your screen. The screen-magnification software will enlarge the prompts to make them readable to people with low vision, and when the installation is complete, it can be turned off with hot keys, so you can use the ClearNote's camera. The user manuals also walk you through the setup of the camera and describe the methods of both desktop and distance viewing.
The ClearNote is fairly easy to transport from place to place. When you get to your destination, you connect the camera arm to the connector block on the base plate, connect the USB cable to your laptop (and the AC adapter to the ClearNote, if necessary), start the computer and screen-magnification program, click the ClearNote icon on your desktop, move the Power switch to On, and you are ready to go.
Features
In addition to the increasing and decreasing magnification buttons, there are three main features that are accessed through buttons on the camera arm: the Viewing Modes, External Light, and Auto Focus On/Off; the rest are accessed through hot keys on the keyboard.
Pressing the Viewing Modes button will cycle you through three reading modes: (1) Full-Color Photo mode, which shows items and text in their natural colors; (2) Reading mode, which displays text in an enhanced contrast with black letters on a white background or your choice of a variety of semicolor combinations; and (3) Negative Reading mode, which reverses the chosen high-contrast background and foreground color combinations.
By pressing the External Light button, you can increase the amount of light on your desktop viewing area, which may be of help in lower lighting situations. By pressing the Auto Focus button, you can turn auto focus on and off. Turning Auto Focus off will improve the display when you write or look at three-dimensional objects because it keeps the focus locked.
Using hot keys, you can access other ClearNote features, including increasing and decreasing brightness, contrast, color saturation, and hue. Any of these changed image settings can be reset to default values by pressing Ctrl-R. The ClearNote software also enables you to capture images and save them to your computer, and there is a Freeze Video feature that can be activated by pressing Shift-F12.
What Would Make it Better
The Optelec ClearNote can be improved in three main ways: (1) by improving the connector block's design to allow you to connect the product to your laptop and AC adapter more easily, (2) by improving the quality of the display while moving text documents under the camera, and (3) by improving the quality of the display while using semicolors for writing on lined paper.
The left side of the connector block, where the AC adapter and USB cable attach to the ClearNote, is in need of a better design. It is difficult to find the connection spots, which are tucked back inside the connector block, and anyone with limited manual dexterity may be unable to make the connections.
Also, when a page of text is moved under the camera, the display on the screen becomes pixilated and is difficult to read. You have to move the page slowly for this not to happen. This is a problem that can decrease your work efficiency. Another display issue arises when you attempt to write on lined paper under the camera. In the inverse and semicolor modes, the lines on the paper become difficult to see even after you adjust the brightness and contrast. The full-color and black-on-white modes are the best choices for handwriting.
The Bottom Line
The Optelec ClearNote is a sturdy, portable, auto-focus CCTV that is designed to be connected to a laptop computer. It provides up to 46 times magnification and gives you several choices of viewing modes, including semicolors. It also enables you to capture an image and save it to your computer, which is a great feature.
Using the ClearNote efficiently requires learning several hot keys, but with practice, you can do so. There are some cable-connection issues that could be improved, and I would not recommend it for large amounts of text reading, a task that is better left to large CCTVs, but it is a solid step forward in improving portability.
All Things Considered
After a thorough evaluation of both the Clarity PC Mate and the Optelec ClearNote, I can say that they have different strengths and some of the same weaknesses. Overall, the Optelec ClearNote seems to be the better product. It has more features, such as the external light source, and more ways to customize the viewing of images. Although it is still not great, the ClearNote has a better display of text moving under the camera and works better when it is used for handwriting, although these two aspects of the ClearNote need improvement.
One important feature that should be added is a battery-life indicator. As it is, there is no way to tell how much battery life you have left in the ClearNote, so you always need to carry the AC adapter with you to make sure that the battery does not run down. The auditory beep that you hear when you press a button on the camera arm is also a nice feature that, along with the better functioning auto focus, shows that it is more of a precision device, making it worth the extra $100.
An Important Side Note
If you are in the market for a laptop-compatible CCTV, it is imperative for you to check with the CCTV manufacturer to find out what the laptop requirements are before you buy the product. As a rule, higher-end laptops with a high processor speed are required to work in conjunction with a CCTV. Your current laptop may not be sufficient. This is an important point to consider because you may need to buy a new laptop along with the CCTV. Doing so will likely double your investment, putting the cost at about $5,000.
If the CCTV manufacturer does not list the laptop requirements and processor speed with its marketing information, ask, and get a specific answer. It is better to be safe than sorry!
Manufacturer's Comments
Optelec
"Thanks to end-user remarks we have changed the connector block. Units with a modified connector block will be in production in May/June.
"In addition to connecting to a PC, the ClearNote also has a VGA output so it can be used as a stand-alone unit connected to an off-the-shelf VGA monitor. The base plate now functions as a reading surface. The functionality is slightly less than with a PC connected, but quite effective: zoom in/out, auto focus, mode (positive, negative, full color), semi-colors, and a light. The ClearNote comes with a pre-defined set of hotkeys, but the user can set virtually any key combination by editing the settings file (clearnote.ini). Version 5 (in beta testing) will also have a menu with 'buttons' next to the shortkeys. M, for mirror mode, on the keyboard enables the ClearNote's self-viewing feature."
****
View the Product Features as a graphic
View the Product Features as text
****
View the Product Ratings as a graphic
View the Product Ratings as text
Product Information
Product: Clarity PC Mate.
Manufacturer: Clarity USA, 2222 Park Place, Suite 1C, Minden, NV 89423; phone: 800-575-1456; web site: <www.clarityusa.com>.
Price: $2,595.
Product: Optelec ClearNote.
Manufacturer: Optelec USA, 321 Billerica Road, Chelmsford, MA 01824; phone: 800-828-1056; web site: <www.optelec.com>.
Price: $2,695.
