Full Issue: AccessWorld December 2014

An Overview of OS X Yosemite for the Mac

On October 16, 2014, Apple released OS X Yosemite for Macintosh computers. This new operating system has many new features and some bugs. Some of the most highlighted features include the ability to make and receive phone calls on the Mac, iCloud Drive (similar to Dropbox but with cheaper pricing plans), and Handoff, where you can work on a document on an iOS device and then work on the same document on a Mac.

This article assumes that you know how to use a Mac. The VoiceOver key combination Control + Option will be written as VO. If you are having difficulty with Yosemite, remember that Apple has tech support staff members who have been trained to assist VoiceOver users. The special phone number to reach trained tech support is 877-204-3930. If you have accessibility issues you can e-mail Apple at accessibility@apple.com.

iCloud Account

iCloud has two new features in Yosemite: iCloud Drive and Family Sharing. Both can be set up and accessed through the iCloud tab in System Preferences. If you haven't set up an iCloud account, you might want to consider doing so, especially with Yosemite's new features.

iCloud Drive

iCloud Drive lets you back up your Contacts, Reminders, Documents, Photos, and more to the Cloud. There are several different pricing plans available. iCloud Drive can also be set up and managed through your iOS device. Before saving content to the Cloud, consider which information you are comfortable saving there.

Family Sharing

Family Sharing lets up to six family members share iTunes, iBooks, and Apps. Although they do not have to be on the same Apple ID, only one designated credit card can be used for payment. This feature can also be set up from your iOS device.

Handoff

As part of Yosemite, Apple introduced Continuity, which allows the user to move between iOS devices and the Mac. Handoff lets you start work on a Mac or an iOS device and then continue it on another. For example, you can start an e-mail on your iPad and finish it on your Mac. In order to use Handoff, your Mac must have Bluetooth 4.0 (also called Bluetooth low energy or Bluetooth LE) and your iOS device needs to be an iPhone 4s or later or an iPad 3 or later. The Mac must be using Yosemite and the iOS device needs to be using iOS 8.1 or later.

Setting Up Handoff

The Mac and iOS device need to be on the same Wi-Fi network in order to use Handoff.

In System Preferences on your Mac do the following:

  1. Check the iCloud tab and make sure that you are signed into your iCloud account.
  2. Go to the Bluetooth tab and make sure that Bluetooth is enabled.
  3. In the General tab, check the box that allows Handoff between iOS devices and your Mac.

On your iOS device do the following under Settings:

  1. Turn on Bluetooth.
  2. Make sure you are logged into the same iCloud account as that on your Mac.
  3. Under General/Handoff & Suggested Apps, activate the Handoff switch.
Using Handoff

With Handoff, if you start an e-mail on your iPhone and want to continue it on your Mac, have the e-mail open on your iPhone and bring the iPhone near the Mac. I found it worked best if they were in the same room. On your Mac, Command-Tab through the open apps and you'll hear "handoff" and the name of the iOS device you are using. The e-mail will be there on the screen. If you start the e-mail on the Mac and want to finish it on the iPhone, have the e-mail open. Go to the iPhone's locked screen. In the lower left corner there will be the name of whichever app is being used for Handoff. In this case, it will say Mail. Double tap on the app name and the e-mail you've been working on will now be open on your iPhone. Another option is to go to the App Switcher on the iPhone. Flick left and after VoiceOver says "Home," you will hear the name of the application using handoff. Double tap on it and the document will open.

Making and Receiving Calls on Your Mac

Continuity makes it possible to use the Mac as a speakerphone for both receiving and making phone calls.

Setting Up Calls

Both the iPhone or iPad and the Mac must be signed into the same Apple ID and iCloud accounts. Bluetooth must be enabled on both devices and the iPhone and Mac must be in Bluetooth range and on the same Wi-Fi network.

On the Mac, open FaceTime and go to Preferences/Settings and make sure the iPhone Cellular Calls option is checked. On the iPhone/iPad, go to Settings/FaceTime and make sure the iPhone Cellular Calls option is checked. The Mac's internal microphone is selected by default. If you have a separate microphone for the Mac the sound quality will probably be better. If you don't have a microphone, the internal microphone does work well.

Making a Call

Initiate a call by opening FaceTime and check the "Audio" radio button. Move right to locate the search box and enter the name, e-mail, or phone number of the person you want to call. Go right once more to the results table. Locate the correct result and press the spacebar. A menu will appear. The first option refers to the iPhone and can be ignored. Go to the second option, which will be the number of the person you want to call. Press the Enter key. Once you are done with your call, go right to the "End" button.

Receiving a Call

The iPhone will start ringing a few seconds before the Mac makes its incoming call sound. If the caller has a custom ringtone, it will not be heard on the Mac. A FaceTime window will automatically open and by default you'll be placed on the "Accept" button. Activate the button and start talking.

Command Dictation

Starting with OS X Mavericks, it was possible to dictate text without an Internet connection. In addition to having the computer type what you speak, with Yosemite you can also issue many voice commands through a new feature called Command Dictation. This is in addition to the regular dictation option.

Setting Up Command Dictation

In System Preferences, go to the Dictation & Speech tab and select Dictation. Make sure the Enhanced Dictation box is checked. If it's your first time using Enhanced Dictation, a small program will download automatically. Next, go to the Accessibility tab and check the Dictation option in the Accessibility Features table. Go right to the "Commands" button and activate it to view a list of commands, including commands for opening an application, closing an application, deleting text, and pressing the Return key. You can even create your own commands.

Press the Function key twice to activate Dictation Commands. Another way to view Command Dictation options is to press the Function key twice and after the chime say, "show commands." There is a bug in Yosemite where after issuing a command, VoiceOver will stop speaking, but the command will be executed. Wait about 15 seconds and VoiceOver should start speaking again.

Safari

A welcome feature of Safari is the ability to use the arrow keys and other navigation keys that are used in apps such as TextEdit and Mail. For example, typing Command + Up Arrow will bring you to the top of a webpage and typing Command + Down Arrow will take you to the bottom of the page. If there are two links on a line, VoiceOver will announce both links rather than saying they are on two separate lines, as some Windows screen readers do.

If Safari gets stuck and arrow keys do not work, enter a VoiceOver command such as VO + Right Arrow and then try the arrow keys again. This should fix the problem. If VoiceOver loses focus during headings navigation, try a VoiceOver navigation command and then go back to the arrow keys. Also, when entering text in an edit box and using capital letters, VoiceOver may say "New Line" even though the Enter key was not pressed. This is a VoiceOver bug and a new line does not appear. If you are stuck in an edit box, use a VO navigation command to get out. The Favorites bar is not present by default. Bring it back by typing Command + Shift + B or by going into Safari's View menu and selecting Show Favorites Bar.

iTunes

iTunes has again been changed with a new OS. Version 12 has a different layout than version 11. Prior to Yosemite, you could have iTunes 11 set up like iTunes 10 by typing Command + Option + S. This command brought up the Sidebar which had iTunes displayed like iTunes 10. Unfortunately, this feature is no longer available. iTunes 12 has some major differences and it may take some time to get used to them.

By using VoiceOver navigation commands, especially VO and the Left and Right Arrow keys, the new layout can be explored. There is now a different sequence of buttons. The player controls at the top of the iTunes window are still the same. After that a Store Account popup appears. Activating this option will bring up a list of options including Wish List and Purchased.

The next item is the search box for searching your iTunes library. After that come four radio buttons: Music, Movies, TV Shows, and More. Next come five radio buttons related to whichever option was chosen in the first set of four radio buttons. For example: selecting the Music radio button will make the following five buttons available: My Music, Playlists, Match, Radio, and iTunes Store. If the My Music option is selected, a popup will open presenting several options for sorting. Explore the entire menu by using the VO keys with arrow keys. Be sure to select the option you want. If necessary, go into the Column Browser through the View menu and select which song attributes you want displayed. Once your selections have been made, move right to view the table. What is displayed will depend on your selections. Depending on your choices you may be able to Tab and Shift + Tab between categories. For example, I can do this between the artists in my library and the songs for a particular artist. Make sure to interact with the music table to move through the songs list.

Syncing your iOS Device With iTunes

If you don't want to make any changes to what is synced to your device then just connect the device to the computer and iTunes will sync automatically. You can also connect the phone, open iTunes, go to the file menu and select Devices and finally choose Sync.

Once your device is connected there will be a button naming the device. It is located after the "More" radio button. Select the device and go right until you hear "Playlists." This is a list of the various categories on your device including Summary, Apps, and Music. After making a choice, go left to the scroll area to manipulate content.

The Object Replacement Character Bug

Programs such as TextEdit, Pages, and Amadeus Pro have a feature in their file menu called "Open Recent." Now, when reviewing the list of recent files in the menu VoiceOver says the words "Object Replacement Character" prior to the file's name. There's a thumbnail image before each file's name and VoiceOver is reading this as "Object Replacement Character." Locating the files with the Finder is one way to get around this extra verbiage.

iBooks

Yosemite fixed many accessibility issues with iBooks. iBooks is now accessible on the Mac. You will need to sign in with your Apple ID and Password.

Mail

When attaching a file to an e-mail, VoiceOver will no longer speak the actual name of the attachment. Instead you'll hear something like "Attachment Image." If you want verification that you attached the correct file, bring up the contextual menu and open the attachment. When you receive an e-mail with an attachment the actual file name will be spoken.

Sounds for Volume Change

By default in Yosemite there are no sound effects when the volume is adjusted. To change this, go into System Preferences/Sound/Sound Effects and check the box that says "Play feedback when volume is changed."

Pages

Unfortunately, Pages has lost some accessibility with Yosemite. The button next to each paragraph style in the paragraphs table is no longer accessible. Another issue is that Pages is reading a section break as a page break

Conclusion

Overall, Yosemite's new features and updates make upgrading a good choice. It may take some time to learn all the changes and all the new features so don't try to do everything in a day.

Comment on this article.

Echo Sense Network Glasses: Remote Vision for the Blind

With the introduction of the Apple Watch and other smart watches from Google and Samsung, the buzz around "connected" eyeglasses such as Google Glass has subsided considerably. Work on these devices is still being done, however, and recently I had the opportunity to demo a pair of smart glasses that have been developed to assist the blind in orientation mobility, and other tasks where a bit of long-distance sighted guidance may be of help. Echo Sense Network Glasses allow individuals with visual impairments to stream both audio and video related to their environment via a cell data connection. This stream can be accessed online by a sighted guide, who can communicate in real time with the glasses wearer, offering descriptions, navigational guidance, and other useful information.

The Echo Sense Equipment

The Echo Sense unit I tested ran on an HTC One S Android phone using AT&T. Service is also available on T-Mobile.

The HTC One S was housed inside an oversized, Otterbox style case, with a belt clip on the back and an extra power pack to enable up to ten hours of video streaming. Talkback is disabled while the Echo Sense software is running, but most essential smartphone commands can be issued by pressing the physical Volume Down button, then speaking the appropriate command.

The Network Glasses are wrap-around style sunglasses. The version I tested was black with dark lenses, but other frame colors and lens opacities are available, and partially sighted users can order a pair with prescription lenses installed. A video camera and microphone are mounted above the nose bridge, but the housing is smooth and flat with no awkward protrusions.

There are two cable connections between the phone and the glasses. The first is the USB power/data connection, which attaches to the left arm of the glasses, fairly near the hinge. The second is an audio cable, which connects to a jack on the right arm and leads to a thin "ear tube." This is a thin wire that slips into your left or right ear and allows you to hear the person monitoring your session without blocking environmental sounds such as local conversations or passing traffic.

The glasses weigh 35 grams—heavier than standard glasses but not uncomfortably so. The cables running between glasses and phone felt a bit awkward, especially since there were two separate cables connected to opposite sides of the frames. Perhaps a future version could combine these into a single cable.

The Echo Sense video stream and two-way communication are facilitated by company servers that can only be accessed on computers running Google Chrome with the VLC video plugin.

Getting Started with Echo Sense

From the user's side, starting up an Echo Sense session could not be much simpler. With the software running, I inserted the USB cable and the phone responded by speaking, "Welcome to Echo Sense Network Glasses." I then connected the audio cable, put on the glasses, and placed the ear tube in my right ear. I pressed the Volume Down button, and was prompted audibly to speak a command. "Help," summons a list of Echo Sense commands. "Video" prompts the reading of a disclaimer message, after which the glasses' video begins streaming.

The unit's audio played surprisingly clearly through the ear tube, but at first we could not get the remote audio stream working correctly. Eventually we discovered this was because of my AT&T signal, which is very poor in my town.

Indeed, when I stepped outside onto my front porch the audio problems resolved and I could hear Echo Sense VP of Business Development Haden Etheridge, who was assisting me with this trial, clearly. It was time to take a walk. Before we head out, though, let's take a quick look at the other end of the session.

Monitoring an Echo Sense Session

As mentioned, the sighted monitor of an Echo Sense session uses Google Chrome with the VLC video plugin on a microphone-equipped PC or Android smartphone. The monitor logs on to the Echo Sense website to view the Navigation Screen and to communicate with the user. The Navigation Screen contains two panes, one showing the live stream and a second showing a Google Map view of the immediate area, which can resolve down all the way to Street View.

At any time, the monitor can click on a map position, obtain the GPS coordinates and send them to the phone. This will begin a turn-by-turn navigation session with audible announcements. The user can also call up a GPS session with the "Navigate" voice command, and request directions to a particular address, or to a location such as "the nearest Starbucks."

Other useful Echo Sense commands include the following:

  • Introduction: offers a welcome message to the Echo Sense.
  • Controls: describes the phone's physical controls and buttons.
  • Connections: describes the physical connections between the phone and glasses.
  • Charging: describes how to charge the unit and warns not to leave glasses connected during charging.
  • Video: begins video streaming.
  • Exit: ends video streaming.
  • Receive Calls: with this option enabled, you can answer incoming calls by pressing the Volume Down button.
  • Call: allows voice dialing to one of your contacts.
  • End: ends your current call.
  • Text: enables you to compose and send a text message.
  • Check Text: reads your last text.
  • E-mail: enables you to compose and send an e-mail.
  • Check E-mail: reads new e-mails.
  • Brightness: changes the phone's brightness.
  • Contrast: changes the phone's contrast levels.
  • Battery: reports battery status.

Navigating with Echo Sense

I live a few blocks from a combination fast food restaurant/gas station/convenience store, and I decided this would make an excellent destination for my Echo Sense test walk. So with the video and audio stream both up and running, I grabbed my cane and headed off.

I could hear Etheridge speaking clearly in my right ear as I walked along the sidewalk, and he could not only see ahead of me, but also a wide swath of my periphery. "White car passing to your left," he announced at one point as the vehicle had barely passed me. However this was where the poor quality of my network connection began to affect the link. The link grew a bit sluggish, and as I walked Etheridge began announcing objects such as bushes and cross street curbs as upcoming when I had just passed them.

I paused my walk and asked Etheridge to report when he saw me raise my hand in front of the glasses. A full five-count passed between the time I raised my hand and the time I heard his "now" reply. A one-second lag had turned into a five-second lag. I do not think this problem would have been nearly so pronounced had we been using a Verizon phone, since their LTE coverage in my area is excellent. Even so, this was only a minor problem since if the area had been unfamiliar, I could always have stopped for directions such as "Your way is clear to the corner, but a car is parked in the crosswalk."

Usually when I go for a burger I take a detour and approach the building from the rear. Otherwise I have to cross a wide parking lot, gas pumps, and a picnic area. Wearing the Echo Sense I decided to take the direct route. Etheridge was able to guide me perfectly with clock headings, avoiding both parked cars and the gas pumps. I was even able to shorten my trip somewhat by cutting across a path of grass.

At this point the network lag was only about two seconds. Etheridge directed me through the store—"There's a potato chip rack on your right, a man in a blue shirt about to pass you on the left"—and directly to the restaurant counter. The counter was a bit too far away from the menu board for Etheridge to read remotely, but the glass did provide sufficient resolution for him to take a snapshot of a print menu and read it. And after I made my purchase I held up the change and Etheridge verified it was correct.

Granted, I could have accomplished all of these same tasks using my iPhone with FaceTime, or an Android phone running a Skype video call. But that would have required both hands, one for the phone and the other for my cane. I do use FaceTime occasionally if I need help identifying a package of meat from the freezer or something else, but my wife reports this can be quite frustrating because I either am pointing the phone off to one side of the item or moving it so fast, it can make her dizzy. With the camera in the glasses, I suspect this sort of task would be much easier with the Echo Sense.

A User's Story

Since my Echo Sense experience was limited to a single session, I spoke with South Florida web entrepreneur Michael Arbitman, who has been using an Echo Sense system for nearly a year. Michael uses Echo Sense to help ensure he's taking the correct medications. "My mail-order pharmacy won't put them in different bottles, and after a lifetime of finger pricks my fingers aren't sensitive enough to read braille." Michael also uses his Echo Sense glasses to direct him to nearby restaurants and read the menus, and last December he was able to use the glasses to shop alone at a mall with the remote help of his wife and friends, who all use Android phones to offer assistance. "I tell the Echo Sense phone to call my wife, my best friend, or another family member and it takes less than 20 seconds to start the link," he reports.

Conclusions

The Echo Sense package costs $2,995, including the glasses, phone, battery pack, and case. This price includes two years of Echo Sense service—phone charges are separate. After that service is $30 per month. T-Mobile discounts this price to $25, which can be tacked onto your monthly bill.

I asked Etheridge if the company had considered organizing a network of volunteers who might be available for monitoring sessions, since not everyone is going to have a friend or family member available on demand. He replied that they are hoping to include a call desk for brief monitoring session work as part of the plan sometime in the future, but I suspect there is a Catch-22 here: until there are enough users, the company will likely not be able to afford the extra personnel, but without the extra personnel they are going to have a much harder time building the customer base enough to afford the increased staffing.

I enjoyed my Echo Sense experience, but for myself it wouldn't be practical to find someone to monitor my travel before I go to the doctor, or to the burger joint for a shake. I do envision other cases, like those below, where Echo Sense would be a valuable tool

  • A blind individual whose job involves a lot of travel to unfamiliar locations would have a much easier time locating office doors, convention booths, and hotel elevators and room numbers if someone back at the home office could offer a few minutes of visual guidance.
  • A newly blind senior living alone could become more independent if a family member could log in and help him read his mail or carry the trash to the curb remotely instead of physically traveling to his home. Children and other out-of-town family members could also more easily participate in the process.
  • New students usually receive mobility and orientation training at their new schools, but large university campuses can be intimidating, with travel paths that are not always logically laid out. The availability of remote guidance could go a long way to lower a student's already high stress level, especially since it is only after the semester begins that the student truly learns all of the places where he or she will wish to travel.
  • Mobility instructors could potentially become one of the major users of Echo Sense. After training an individual in cane or dog use, how much more confidently could the client transition to independent travel if he or she could borrow a pair of Echo Sense glasses for a few weeks? Perhaps the company should consider an agency discount. Who knows how many temporary users would then wish to become Echo Sense customers?

Product Information

Product: Echo Sense Network Glasses
Price: $2,995
Available from: Echo Sense, 855-833-0300, info@echo-sense.com

Comment on this article.

Ending the Year on a High Note

Lee Huffman

Dear AccessWorld readers,

Last month AccessWorld served up its best holiday gift-giving ideas for people with vision loss. In the November issue, Deborah Kendrick gave some great ideas in her article, AccessWorld 2014 Holiday Gift Guide: Great High- and Low-Tech Ideas Under $100, and Janet Ingber provided information on popular shopping websites in her article, AccessWorld's 2014 Online Shopping Guide.

There is still time to get the shopping done, so if you missed these articles, you can follow these links or, as always, you can select the "Back Issues" button to check out any past online issue of AccessWorld.

If you happen to be doing some cooking this time of year, you may want to take a look back at Deborah Kendrick's November 2010 review of the Directions for Me website, Website Evaluation: Directions for Me, a Gift to People Who Can't Read the Box. This article may help take the guesswork out of preparing those holiday meals by having package directions available at your fingertips, and it may even have the manual for that gift you are hoping to get over the holidays.

If you find yourself needing a break from all the pre- or post-holiday festivities, you may want to consider a stop at the local movie theater. As you can read in last December's article from J.J. Meddaugh, audio description technology in movie theaters is becoming increasingly available. Relying on a friend or family member or imagining what might be happening in the film is no longer necessary. It's now possible to become completely immersed in the theater experience and enjoy films on an entirely new level. So sit back, relax, and take a break from the holiday rush.

To end the year on a high note, so to speak, the American Foundation for the Blind is proud to announce that the free AccessWorld app has now been downloaded over 4,500 times; the newly launched CareerConnect app, also free, has been downloaded over 600 times; and AFB's note-taking app for the iOS platform, AccessNote, has been downloaded over 4,000 times. AccessNote is now free and can be found in the Apple App Store. Look for a free Android version of AccessNote in the Google Play Store early next year!

The AccessWorld team wishes you a happy and healthy holiday season. We look forward to bringing you the latest in tech news in the coming year!

Best regards,
Lee Huffman, AccessWorld Editor-in-Chief
American Foundation for the Blind

Letters to the Editor

Dear AccessWorld Editor,

Reviewing your October employment issue and Joe Strechay's article, 2014 Employment Resources for People Who Are Blind or Visually Impaired, I was reminded about one barrier that hinders our employment. Even though not all jobs require technology, most do, and many jobs require that users work with specific software.

But unless your career only has you working with Microsoft Office, you might encounter some rude surprises. Software gets updated all the time, and something that used to work with screen readers [may no longer do so], while another program might suddenly become fully accessible. It is difficult to find out in advance if the software you'll need in a work environment is accessible. Though I'm currently happily employed, I was seeking work last year, and repeatedly told employers I had no idea if their software would be accessible to screen readers.

For two examples: a set of tools from LogMeIn.com is frequently used in customer service and support. I never obtained any official information about its accessibility, but luckily was able to find friends who reported it did not work with screen readers. On the other hand, a skilled and experienced access technology advisor assured a group of us that OmniPage version 17 was completely inaccessible. Since I efficiently use OmniPage 17 on a daily basis with several screen readers, I was horrified that this misinformation might affect job-seekers' futures. But where could I write up the tips and tricks on how I easily accessed OmniPage? There was no portal where I could contribute my knowledge.

Also, unlike whether a building entrance has a ramp, screen reader access isn't a black and white situation. As an advanced JAWS user, I find I can navigate many sites that flummox beginners. But the flip side of this situation is that, if some technology seems impossible for me to access, I have few resources to turn to for assistance.

I believe some agency needs to create a clearinghouse, probably as an ongoing blog, that would continuously update the community of the state of access for various packages used in the workplace. The AppleVis community site does a great job with Apple-related apps, but we need an equally comprehensive site for Android and Windows.

Thank you,

Deborah Armstrong

Dear AccessWorld Editor,

I am becoming increasingly disappointed in the lack of innovation creeping in to all modern screen readers. I've used screen readers since the 1980s and JAWS since 1994. I also know NVDA and WindowEyes.

Each new release brings a plethora of features, but these programs' underlying ability, to read the screen, becomes ever more compromised.

For example, take the Windows 7 action center. The words "solve PC issues" and the number of messages appear in the system tray when Windows detects a problem about which the user should be informed. You simply right-click to open the action center, a control panel applet that lets you deal with the issue.

But the important content, the message, is not shown by any screen reader. A user can arrow and tab through the action center, and use a mouse cursor and other review navigation to read its screen, but the actual problem description messages do not appear anywhere.

Numerous other examples include the Java updater, Windows Media player, the add-in managers for Firefox and Internet Explorer, and Adobe's tools for updating its products. With all this commonly-used software, it is next to impossible to simply review the screen to figure out how to use the package.

Today, it's likely that a program I purchase or download is not accessible. Using a screen reader mouse cursor or other review methods, I'll find only graphics on screen and little or confusing text. Pressing the Tab key will take me from one unlabeled button to another, and pressing arrows or F6 will result in irrelevant or no feedback.

Back in the 1980s, screen readers also fought for market share. They fiddled with whether to say "period," "full stop," "decimal point," or "dot." They had different ways of entering review mode and exploring the screen. But the real innovation came when ASAP began to automatically and intelligently read what users needed, like pop-up boxes.

Thirty years later, screen readers continue waging feature wars. And we still strive to prove our independence to the sighted: our ability to be productive employees, partners, and volunteers. We work closely with sighted coworkers, friends, and family who use these packages; we want to be just as productive as they are.

Whether it is a malware detector, recipe index, Bible-study tool, software to pay bills, my scanner's TWAIN driver, software for a new multi-function printing device, my employer's help desk application, the software that came with my new DVD writer, or even a Windows utility, the likelihood that I can explore the screen to discover how it works diminishes with each new screen reader update.

I understand screen reader developers can't possibly create scripts, apps or add-ons for all the software packages out there. I also understand most software seems to ignore Windows standards these days. But I'd trade in all the accessible Skype replacements, intuitive web hotkeys, add-ons that read my battery charge, and scripts that track my UPS packages for the simple ability to read any screen, any time, with any software.

Maybe the screen reader vendors need to start building hooks in to the actual tools developers use to write their increasingly inaccessible software. Or maybe these vendors need to help us publicize the inability of some software developers to follow standards. Perhaps we users simply need more training, not on how to surf accessible pages or use Microsoft Office, but how to work with software that, under the hood, might actually work better with a screen reader than we first believe.

Is it possible screen reader developers are focusing on area code lookup, table layers, quicker access to settings, NFL scores, voice profile improvements, custom labels, place markers, virtual ribbons and speech and sound schemes because they are easier to implement than improvements in actual screen reading? I won't become more independent whether it's voiced as "period," "dot," or "decimal point," and neither will many of these new features make much difference in the long run.

Are the current off-screen models now out of date, and is that why I can't simply explore modern software's windows to learn how to use them?

Screen readers are becoming elaborate palaces built atop shaky foundations.

Sincerely,

Deborah Armstrong

Dear AccessWorld Editor,

I bought the KNFB Reader several weeks ago and it does indeed live up to the hype. I could no longer get a new driver for my flatbed scanner and decided that [KNFB Reader] was the best way to go.

Sincerely,

Chris Peppel

Dear AccessWorld Editor,

Thank you for the information on Texas Computers for the Blind.

I appreciated the opportunity to update my resource list for computer users with visual impairments, which was noted on LinkedIn by my connection Ronald Schultz.

I currently have two vision-impaired students in my New York City senior-citizens center computer class, and this will help me encourage the Center director to consider installing accessibility [aids] for these learners.

Many thanks,

Liz Scott

Dear AccessWorld Editor,

I was pleased to see the letter from Mr. Earle Harrison regarding his tremendous satisfaction with the Accomplish Global CashManager program for his business accounting needs. His testimonial is illustrative of the fact that, as blind consumers, we not only have choices as to which screen reader to utilize, we also have choices amongst accessible accounting programs that offer varying ranges of features to meet our needs and preferences.

Personally, I've used QuickBooks for Windows, versions 3 through 2012 Pro, sans scripts with Jaws for 20 years. With the exception of the 2013 version, QBW was sufficiently accessible, and the 2014 version of QBW is the most accessible feature rich accounting package I have used to date.

In 2009, I was introduced to the team at Accomplish and agreed to [distribute] trial copies of the CashManager program at a national convention for people to review and offer feedback to Accomplish. It was like a breath of fresh air to find a company that was willing to work to meet the needs of blind and visually impaired customers. At the time, I gave serious consideration to switching programs, but for me, QBW offered access to features I was unwilling to relinquish.

Now in 2014, we have Intuit committed to access along with Accomplish Global. As consumers, we actually have some choices open to us. And, as consumers, we need to thank these companies for their efforts, demonstrate our support by purchasing their products, and challenge them to expand features and insure their commitments to accessibility for all consumers.

Respectfully,

Richard P. Kelly

Dear AccessWorld Editor,

The following may be of interest to lower income people who are blind who may wish to buy an inexpensive accessible cell phone and get 250 free minutes per month along with unlimited texting.

After reading about the Kyocera Verve accessible phone from Sprint in the June 2014 issue of AccessWorld, I started the long, arduous task of researching the possibility of being able to use this phone as a free phone with one of the Life Line carriers that offer 250 free cell phone minutes per month for those with low incomes and for those receiving energy assistance. To make a long story short, here is how I now have an accessible phone [and a free plan consisting of] 500 minutes per month for the first four months and 250 minutes per month thereafter, along with unlimited texting:

I bought the Kyocera Contact from Best Buy for $20 (it is also available from Target and Radio Shack). This phone is Virgin Mobile's Paylo brand phone, rebranded from Sprint's Kyocera Verve phone (described in the June issue of AccessWorld).

Then I called one of the Life Line carriers for my area (Wisconsin), Assurance Wireless, and had them send me an application. You can also print out the application from assurancewireless.com. After getting some help to fill out the printed application, I sent it off to Assurance Wireless. After I was approved, they sent me a free phone, which I then activated with sighted assistance. Then, I called their customer service and had them port over the telephone number from my free phone to my accessible Kyocera Contact phone. Now, all that is left is to learn from the online User Guide how to more fully use the talking menu features in my new talking phone.

Regards,

Ted Larson
AccessWorld News

AFB Leadership Conference 2015

Registration is now open for the joint 2015 AFB Leadership and Arizona AER Conference (AFBLC), which will take place at the Renaissance Phoenix Downtown Hotel, April 9–11, 2015.

AFBLC attendees are eligible for a special hotel rate of $179/night. Please visit the Marriott reservations page or call 1-800-309-8138 to book your room today.

The American Foundation for the Blind annual Leadership Conference covers the most pressing and relevant topics in the field of blindness and offers many opportunities to learn from the best and brightest minds in our field, make new connections, and reunite with old friends while earning ACVREP and CRC CEUs.

The AFBLC attracts established and emerging leaders in the blindness field. Conference attendees include technology experts, corporate representatives, university professors, teachers of students with visual impairments, orientation and mobility instructors, rehabilitation professionals, and parents. They come from diverse organizations and institutions spanning the public and private sectors, including school districts, schools for the blind, Veterans Administrations, hospitals, private agencies, and universities.

The 2014 AFBLC attracted over 440 attendees from 39 states and 8 countries.

X1 Talks: Comcast Launches Industry's First Voice Guided TV Interface

Comcast announced the industry's first voice-enabled television user interface, a solution that will revolutionize the way its Xfinity TV customers, especially those who are blind or visually impaired, navigate the X1 platform. The "talking guide" features a female voice that reads aloud selections like program titles, network names, and time slots as well as DVR and On Demand settings. The feature will be available to all X1 customers in the next few weeks.

About 19 million US households have at least one member with a disability and according to the US Census there are 8.1 million people with a visual disability. In 2012, Comcast hired Tom Wlodkowski as Vice President of Audience to focus on the usability of the company's products and services by people with disabilities.

The talking guide "speaks" what's on the screen as the viewer navigates the "Guide," "Saved," "On Demand," and "Settings" sections of X1 and includes details like individual program descriptions and ratings from Common Sense Media and Rotten Tomatoes that help viewers decide what to watch. Future versions of the feature will include functionality within the "Search" section of X1 and additional personalization settings like rate of speech.

"The talking guide is as much about usability as it is about accessibility," said Mr. Wlodkowski. "We think about accessibility from the design of a product all the way through production and this feature is the result of years of work by our team including customer research, focus groups and industry partnerships. For people like me who are blind, this new interface opens up a whole new world of options for watching TV."

X1 customers will be able to activate the talking guide on their existing set top box by tapping the "A" button twice on their remote control. The feature also can be turned on via the "accessibility settings" within the main settings menu. Click here to see how it works.

Next year, Comcast plans to partner with service organizations and nonprofits to create awareness in the disability community of Voice Guidance and other accessibility features that offer a more inclusive entertainment experience.

The talking guide is the latest in a series of innovations created in the Comcast Accessibility Lab. In addition to voice guidance and one-touch access to closed captioning, Comcast created an online help and support resource for Xfinity customers looking for information about accessibility-related topics. The webpage includes an overview of accessibility products and services, support for third-party assistive devices, information related to Braille or large-print bills and the ability to connect with accessibility support specialists.

The company also has a service center specifically dedicated to customers with disabilities. Comcast's Accessibility Center of Excellence is based in Pensacola, FL, where a team of specially trained care agents handles about 10,000 calls each month.

International Disability Award to be Given to Senator Tom Harkin on the Occasion of His Retirement from U.S. Congress by U.S. International Council on Disabilities (USICD)

On Tuesday, December 2, 2014, the Eve of the International Day of Persons with Disabilities, the U.S. International Council on Disabilities (USICD), the convener and leader of the coalition to ratify the U.N. Convention on the Rights of Persons with Disabilities, hosted its gala at the U.S. Institute of Peace on the National Mall.

The U.S. International Council on Disabilities honored Senator Tom Harkin (D-IA), another life-long disability rights champion. Senator Harkin is retiring from the U.S. Congress after 40 years of service. Senator Tom Harkin is the leading advocate for disability rights in Congress. He was the Senate author of the landmark Americans with Disabilities Act (ADA) in 1990. On working on the ADA, Harkin states:

Working on the ADA, I heard stories from individuals who had to crawl on their hands and knees to go up a flight of stairs, who couldn't ride a bus because there wasn't a lift, and who could not even cross the street in a wheelchair because there were no curb cuts. Before the ADA, millions of Americans were denied access to their own communities—and to the American dream.

Harkin was responsible for numerous pieces of legislation that embedded the four goals of the ADA throughout American policy—from transportation to housing to education to health care—he made certain that people with disabilities were included when legislation was being drafted, and that these individuals were part of the decision making when laws were being implemented.

USICD previously honored Senator Bob Dole in 2012. The award given Tuesday established the Dole-Harkin award for advancing disability rights globally.

Professor Gerard Quinn, Director of the Centre for Disability Law & Policy National University of Ireland (Galway) was also awarded for his global advocacy of the rights of persons with disabilities. Professor Quinn has served in prominent positions representing human rights as well as elder and disability rights with the Council of Europe, European Union, Irish Human Rights Commission, UN Office of the High Commissioner for Human Rights, Geneva, and many other bodies. USICD is honoring Professor Quinn for his outstanding global work in the field of persons with disabilities.

Their Excellencies the Ambassadors of Ireland and Malta, as well as high-level diplomats from Delegation of the European Union to the U.S. and the Embassy of Slovenia attended. The event was also attended by Congressional Members, policy makers, and members of the disability community.

USICD extends special thanks to its corporate sponsors: JPMorgan Chase, Platinum Sponsor; other corporate sponsors: AT&T, IBM, Wal-Mart, US Chamber of Commerce, Mitsubishi Electric America Foundation, Alston Bird, LLP. Additionally, National Organization on Disability, Easter Seals, and, The Viscardi Center also sponsored the gala.

Corinne Grousbeck Named Chair of Perkins Board of Trustees

Corinne Grousbeck, a longtime advocate for people who are blind and one of New England's best-known philanthropists, has been named chair of the Perkins Board of Trustees. She was appointed unanimously by fellow Board of Trustees members at their annual meeting, held November 3, 2014, on the campus of Perkins School for the Blind.

"I'm incredibly honored that after 10 years of serving on the Board that my fellow Trustees have the confidence to elect me their next chair," Grousbeck said. "I'm thrilled to help Perkins develop innovative new strategies to achieve our mission."

Grousbeck succeeded Frederic M. Clifford, a former financial services executive, who served as chair since 2008.

As chair, Grousbeck will help steer Perkins' five divisions—Perkins School for the Blind, Perkins Products, Perkins International, Perkins Library and Perkins eLearning—on a course to continued success. She will work closely with Perkins CEO & President Dave Power, a former business executive in the technology industry.

Grousbeck has been an active part of the Perkins community since 1995, when her son Campbell began attending Perkins School for the Blind. He graduated in June 2014. She was a driving force behind Perkins' 17,000-square-foot Grousbeck Center for Students & Technology, the centerpiece of the school's push to integrate technology into every aspect of students' lives. Funded by a gift from the Grousbeck Family Foundation, and inspired by Campbell and his schoolmates, it opened in 2011.

Grousbeck co-chaired the annual Perkins Possibilities Gala for nine years, served as a member of the Perkins Board of Trustees for a decade and headed the Trust Board, which raises funds for Perkins. In addition to her work with Perkins, Grousbeck has served in a leadership role for other local nonprofits, including the Isabella Stewart Gardner Museum and Boston Children's Hospital. She formerly served on the boards of Lovelane special needs horseback riding program in Lincoln, MA, the Boston Children's Hospital Trust Board where she was vice chair and Cradles to Crayons as a founding board member. She is currently a director on the Massachusetts General Hospital Leadership Council. In 2011 Grousbeck received the New England Women's Leadership Award for Community Service.

Grousbeck holds a BBA from the University of Michigan. She has worked professionally as a marketer, advertising executive and brand strategist for Procter and Gamble, Saatchi & Saatchi, Gemvara, Inc., and others.

Perkins reaches more than a million people each year in 67 countries providing education, services and products to help people who are blind or deafblind build more productive and meaningful lives. Founded in 1829 as the first U.S. school for the blind, Perkins advances its mission through its five divisions: School for the Blind, International, Library, eLearning, and Products. Learn more at www.Perkins.org

2014 Louis Braille Touch of Genius Prize for Innovation is Now Accepting Applications

The Louis Braille Touch of Genius Prize for Innovation was developed to inspire innovators to continue the promotion of braille literacy for blind and deafblind people worldwide. The Touch of Genius Prize for Innovation is provided through support from National Braille Press and The Gibney Family Foundation.

National Braille Press invites individuals, groups of individuals, or companies who have developed an innovative and accessible product in one of the following categories:

  • Professional software and apps
  • Educational software and apps
  • Gaming software or apps that promote tactile and braille learning
  • Braille or tactile-related hardware

Louis Braille was an innovator—and this award seeks to identify and inspire future innovation. Potentially, the award process will inspire new strategic directions for National Braille Press. The project must demonstrate some aspect of tactile literacy for blind people and promote Braille literacy or access to information.

Applications must be received by January 7, 2015. For more information and to download the application, please visit www.touchofgeniusprize.org or contact Ximena Ojopi at xojopi@nbp.org or at 617-266-6160, ext. 412.

National Braille Press invites you to apply for the opportunity to win up to $20,000!

U.S. Army Medicine Civilian Corps Recognizes International Day of Persons with Disabilities 2014

The Civilian Corps of the US Army Medical Command (MEDCOM) recognizes Wednesday, December 3, as the International Day of Persons with Disabilities as they continue encouraging people with disabilities to seek employment with MEDCOM.

In 1992, the United Nations decreed December 3 as the International Day of Persons with Disabilities in an effort to encourage global understanding and awareness of issues affecting persons with disabilities. This year's theme is "Sustainable Development: The Promise of Technology." The theme emphasizes the role technology plays to help create a working environment for employees with disabilities.

Ms. Maria Rodriguez, the Army Medicine Civilian Corps' Disability Hiring Manager, highlights the importance of using assistive technology. "Assistive technology may help employees with disabilities to overcome challenges they may encounter in the workplace. We encourage individuals with disabilities to explore career opportunities with the Civilian Corps. MEDCOM is committed to helping persons with disabilities receive reasonable accommodations to perform their jobs."

The Civilian Corps continues to support the Department of Defense's goals and objectives for hiring persons with disabilities. The Civilian Corps asks that people please visit www.CivilianMedicalJobs.com for more information.

FCC Announces Formation of Disability Advisory Committee and Seeks Nominations for Membership

Deadline for membership nominations: January 12, 2015

On December 2, 2014, the FCC announced the formation of the Disability Advisory Committee (DAC), and is seeking nominations for membership. The Committee will provide a vehicle for consumers and other stakeholders to provide feedback and recommendations to the FCC on a wide array of disability issues. The new body will enable the FCC to keep pace with evolving communications accessibility issues.

Individuals or organizations interested in serving on the Committee should visit www.fcc.gov/disability-advisory-committee for information on the nomination process.

Links to the Public Notice:

Word Format
PDF Format

Links to the News Release:

Word Format
PDF Format
Text Format

For additional information, contact E. Elaine Gardner, the Designated Federal Official for the Disability Advisory Committee, at 202-418-0581 ( Elaine.Gardner@fcc.gov), or call the ASL Consumer Support Line, at 1-844-432-2275 via videophone.

The Mountbatten Braille Writer Learning System from HARPO: Good for Children of all Ages

The Mountbatten Braille Writer Learning System (MB-LS) from HARPO is a device, roughly the size of a computer printer, that helps children learn braille. It's much more than just a braille embosser, boasting many advanced features including a music player and the ability to use Nemeth code. HumanWare is the exclusive dealer for the MB-LS in the United States.

From the Mountbatten website:

"Literacy skills are basic to all learning, and learning is fundamental to every child's success. The MB Learning System has been designed for children who need braille. It is a fun and inclusive introduction to braille literacy and provides a solid foundation for a lifetime of learning. It is suitable for the very first stages of braille instruction through high school and beyond. With its exceptional flexibility and range of functions, the MB Learning System is a solution for meeting ever changing educational and teaching goals. It contains tools that are simply not offered by more traditional devices.

  • Reinforces recognition of braille characters—utilizing speech output to enable and promote experiential learning.
  • Allows pre-braille activities and play for young children long before they are physically able to use traditional mechanical braille writers.
  • Develops technology and braille as Life Skills—concepts of using files and editing documents are introduced at a basic level, all in the context of learning braille.
  • Introduces organizational concepts such as planning and time management—using the built-in clock and diary functions. Removes attitudinal barriers by taking the "mystery" out of Braille—sighted teachers, peers, and family can connect a regular PC keyboard and write in braille.
  • Assists with inclusion and participation—the student's work is displayed on the Mimic screen.

Literacy through braille opens up the world of communication and expression—essential for living successfully. Braille fulfills needs that cannot be addressed by verbal and audio methods. The MB Learning System is the ideal platform for launching children into the world of braille literacy."

Specifications

The unit's dimensions are 4.5 inches by 9.44 inches by 17.7 inches. It weighs 10.3 lbs. There are two serial connections, one parallel connection, Bluetooth SMART connectivity, and USB and PS/2 ports.

Features

A QWERTY keyboard can be connected to the MB-LS. The MB-LS can emboss on standard copier paper, labels, and thicker braille paper. There is a graphics maker setting and the unit can also be used as a music player and editor. The keyboard has a light touch so young children can use it. There is internal memory for file storage. The MB-LS can connect to a PC via a USB port.

The MB-LS can be used with an AC power or with its internal rechargeable battery.

What's in the Box

The box contains the MB-LS, a print version of the user guide, an envelope containing 20 lb. paper, print stickers for the keyboard, a CD with software for transferring files to and from a PC, a USB cable, and a two-piece AC adapter.

Getting Help

HumanWare provides phone support for the MB-LS at 800-722-3393. Other help includes a PDF copy of the user guide and training videos. There is also a help feature on the unit. Additional material is available on the Mountbatten Brailler website. Visit the Resources and Downloads sections of the site. the user guide includes helpful and useful instructions for the main functions of the device

Layout

The Power switch is located on the lower left front of the keyboard. When turned on, the brailler will speak a greeting and say whether it is in Learn Mode or Advanced Mode. It will also say "Mimic Not Found," unless you have a Mimic display connected. The Mimic is a small display that is available separately. It displays in text whatever is written in braille.

The Keyboard

The MB-LS keyboard layout is somewhat different than that of a standard Perkins Brailler. For example, on the Perkins there are three keys on one side, a spacebar in the middle, and three keys on the other side. On the MB-LS, the six keys used to create braille dots are in the middle of the keyboard. They are oval shaped and are arranged in a slight curve. Each dot key is flat in the middle with a ridge on the outside.

To the left of the dot keys is another oval key, but this one has ridges on the top surface. This is the Backspace key. The Enter key is similar and is located to the right of the dot keys. With your fingers on the dot keys, you can reach the Backspace and Enter keys with your pinkies.

Between and slightly below the two sets of dot keys is a small, smooth button. This is the command key. With your fingers on the dot keys, the New Line key will be under your left thumb and the Space key will be under your right thumb. These keys are smooth and not quite rectangular. The Tab and Back Tab keys are at the top right and top left of the keyboard respectively.

Embossing Area

At the back of the keyboard is the embossing area. There is a ruler for measuring paper. Just behind the ruler is the embossing head. After the head embosses a character, it moves one space to the right. The paper lever for inserting paper is to the far right.

The MB-LS has a reading table, a small flat piece of metal behind the embossing head that holds the paper when you want to read it. Above the reading table is the paper bail, which is a round bar with rollers that hold the paper. The paper bail is not required when embossing single sheets, so it can be removed and replaced as necessary. Attached to the reading table are left and right margin adjusters. Paper grip wheels are in the front of the margin adjusters. To the left side of the embossing head is the paper advance knob. It is recessed and feels like a wheel on its side. Use this knob to adjust the top edge of the paper.

Left Side

Closest to you is the headphone jack followed by the jack for the AC adaptor. The next object is the speaker.

Right Side

The port closest to you is the USB port. It is used to connect the MB-LS to a PC. The next port is used to connect a Mimic display. Only one of these ports can be used at a time.

The Back

On the back, there is another serial port used for sending or receiving information via a device with a serial port. There is also a port for a PC keyboard (PS/2 type.)

Using the MB-LS

By default the MB-LS is in Learn Mode. All keys are spoken as they are pressed. There are two ways to load paper into the machine, from the top or from the back. Either method works well. Both ways involve lifting the paper lever. When lifted, the MB-LS will say, "Paper lever up." Remove paper by lifting the paper lever and taking the paper out.

There is no need to perform a carriage return because the MB-LS does this automatically, a very convenient feature. However, if you want to start a new line before the end of the previous line, press the New Line key.

Issuing Commands

The MB-LS can perform a long list of commands. It's not possible to remember them all, but fortunately there is a list in the user guide. Almost all commands begin with the Command key, followed by typing a combination of keys, and then typing the Enter key. For example, the Command key followed by the letter c, then the letter e, and finally the Enter key is the command to center text. This command is a toggle and is off by default.

The Command key is inactive by default. This prevents a beginning student from issuing incorrect commands. Activate the key by holding down the Tab, Back Tab, New Line and Space keys at the same time. This is a toggle, so typing those keys when the Command key is activated will turn it off. The MB-LS will say "Command on" when it's activated and "Command off" when it's deactivated

There is another type of command called a chorded command. These involve typing letters or numbers and the space key. For these commands, the command key is not used. An example of a chorded command is pressing the letter t and the space key at the same time, which will move one tab ahead. The MB-LS will say "Tab."

Using Different Paper

The paper that comes with the MB-LS is recommended and the unit is set up for this paper. The thicker the paper, the louder the sound will be when embossing. It is certainly possible to use heavier paper, such as standard braille paper. The impact force of the embossing head will need to be increased in order to emboss thicker paper properly. To increase the force of the embossing head, press the Command and Backspace keys simultaneously. The MB-LS will indicate that force is being increased. Type the Command and Tab keys simultaneously to reduce the force.

Speech

The MB-LS contains two different types of speech, recorded and synthesized. When in Learn Mode, the only option is recorded speech. When in Advanced Mode, the default is synthesized speech, but recorded speech is an option.

When recorded speech is being used, all keys, functions, and commands will be spoken. However, through commands it is possible to modify what the MB-LS is saying.

Synthesized speech in Advanced Mode allows for a greater degree of customization. Rate, pitch, amount of spoken punctuation and many more options are available. These options are in the speech menu which is activated by simultaneously pressing s, the Space key, and the New Line key. Although there is a speech menu, you will need to know which keys control which actions. For example, typing dot 5 will increase the speech rate while typing dot 2 will decrease it. Typing the letter p repeatedly will change how much punctuation is spoken.

Correcting Mistakes

The MB-LS will automatically erase an error. If you've typed a wrong letter, backspace once to get to it. Next, either type the correct letter or if you wanted a space instead of a letter, press the Space key. This feature works well.

Creating and Saving a File

The MB-LS contains enough memory to store approximately 600 braille pages. It is possible to type a file into the unit and then emboss it at a later time, but this is a multi-step process. First the embossing head needs to be turned off and a series of commands need to be entered. These commands are similar to what you would type to create a file and save it on a computer, but there are more keystrokes involved. Saved files can be appended, but the new text will be placed at the end of the file. Once the file has been created, it can be embossed by typing Command+E+M+B+ the file name and then the Enter key. Files can be deleted by typing Command+D+E+L+ the file name and then the Enter key.

The Editor

The Editor is an advanced feature that lets the user create, open, edit, and save a file. There is an extensive list of commands that can be used to navigate, edit, replace, move, and delete content.

Braille Translation

The MB-LS can receive information from a PC keyboard or computer and translate the information into braille. This is called Forward Translation. By installing MB-LS software on a PC, braille can be translated into print on the PC. Braille can also be printed to text on a compatible printer. This is called Back Translation. Forward Translation and Back Translation cannot be activated at the same time.

Before any of these processes can occur, a series of commands needs to be entered. First, braille translation only works when the MB-LS is in Advanced Mode. . By default the MB-LS will emboss in Grade 2 braille, but this can easily be changed to grade 1 braille.

Using a PC Keyboard

The MB-LS has a PS/2 port where a PC QWERTY keyboard can be attached. A keyboard with a USB connector will not work. To connect the PC keyboard, first make sure the MB-LS is off. The connecting port is on the back of the MB-LS on the right. Be careful inserting the PS/2 connector into the port as the pins are easily bent. Once the keyboard is connected, turn the MB-LS on.

To start the embossing process, type Command+F+E and the Enter key. Next, start typing on the keyboard. The MB-LS will not immediately start embossing. It will speak the letters as soon as you start typing. After 80 characters are typed, the MB-LS will start embossing. According to the manual, the reason for this is that the unit checks to ensure that all contractions and braille rules are written correctly. Keep typing while the unit is embossing. If you have finished typing, but the MB-LS hasn't embossed all you've typed, press the Enter key twice and the remaining letters will be embossed.

You can have your writing embossed in uncontracted braille. This is called Basic Forward Translation. Make sure the FE command has been activated and then type the command FB. When text is typed on the keyboard, it will be embossed in uncontracted braille, and each word will be embossed after the spacebar is pressed. The FB command is a toggle, so typing it again will exit this mode and go back to contracted braille. It is possible to enter the necessary commands on the keyboard rather than on the MB-LS.

All operations for working with the PS/2 keyboard and the MB-LS worked very well.

Using the MB-LS with a PC

Any file being sent to the MB-LS from a PC must be in text format. Before connecting the PC to the MB-LS, install the included MB-Comm software on the PC. A braille file can be sent to a PC or to a supported printer.

MB-LS and an iOS Device: the MBMimic App

The free MBMimic iOS app can communicate with the MB-LS via Bluetooth and is designed for teachers who use the brailler with their students. I used the iOS version of the app on an iPhone 5 and found it to be accessible (there is an Android version of MBMimic, but I have not evaluated its accessibility).

When the app opens there are three tabs on the bottom: Active Users, Archived Users, and Mountbatten. The first tab lets teachers enter the names of students. The Archived tab contains information on previous students, and the Mountbatten tab is for communicating with the MB-LS. When the Active Users tab is selected, there is an Add button in the upper right corner. Activating this tab brings up edit boxes to enter a student's first and last name plus a display name.

MBMimic allows for sending files to the MB-LS and from the MB-LS to the iOS device. Another useful feature of the app is White Board. It can be found in the Mountbatten tab. Once the MB-LS and iOS device are connected and the White Board option is selected, whatever is typed on the iOS device will automatically be embossed on the MB-LS and whatever is being embossed on the MB-LS will appear on the iOS device. For an excellent podcast on using the MBMimic with the MB-LS, check out David Woodbridge's AppleVis Podcast.

Additional Features

The MB-LS has many other features including a calendar; the ability to make simple graphics; a music setting where the user can compose, edit, and play simple melodies; and both a basic and scientific calculator.

The Bottom Line

The MB-LS is a powerful, multifunction tool for teaching braille to a wide range of students. The MB-LS performed very well throughout the evaluation process. The number of different commands can definitely be overwhelming; a young student would probably need to learn a few commands at a time. The user guide does a very good job of explaining the many features of the MB-LS. The Mountbatten website contains some very useful resources such as lesson plans, learning activities, and information for parents and families.

Product Information

Product: Mountbatten Braille Learning System
Price: $4,495
Mountbatten Braille Writer
Price: $2,750
Manufacturer: Harpo
Contact: 800-722-3393

Manufacturer's Comments

For many years the Mountbatten has been a fun tool for very young children to be introduced to braille by "scribbling" dots, and to both auditorily hear and touch the dots as they learn to write braille. The Mountbatten's easy, electronic touch encourages preschool students to effortlessly enjoy writing braille. The Mimic visual display has evolved to a new Bluetooth feature that connects to the Mountbatten Mimic iOS app, modernizing the ability for students to interact and participate with their peers and parents. The app allows streamline switching between contracted and uncontracted and UEB Braille. The Mountbatten Learning System has many advanced features, including the editor, and serves as a perfect transition to a note taker as the student advances. There is also an optional carrying case that protects and makes transporting the Mountbatten easier. Thank you AccessWorld, for your very informative review.

Sincerely,
HumanWare

Comment on this article.

An Evaluation of the Orion TI-84 Plus Talking Graphing Calculator

Over the past few years, the fields of science, technology, engineering, and mathematics (STEM) have become hot topics among people with vision loss. Being visually impaired, I was delighted when I discovered that the American Printing House for the Blind (APH) and Orbit Research had formed a partnership to create an accessible version of the TI-84 Plus graphing calculator by Texas Instruments. This article gives the lowdown about this exciting, innovative product.

Physical Description

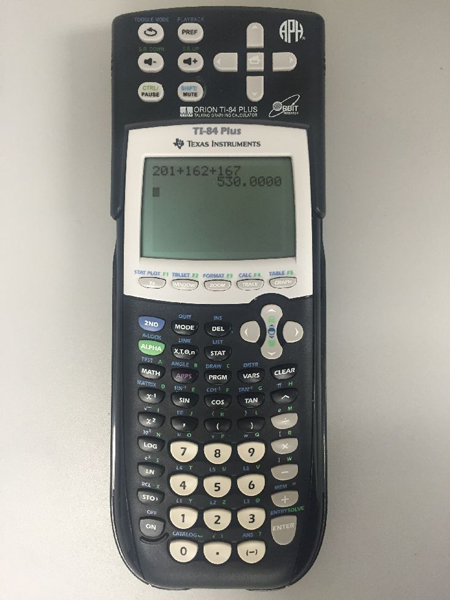
The Orion TI-84 Plus Talking Graphing Calculator is almost an exact replica of the Texas Instruments TI-84 Plus graphing calculator used by sighted students, except the Orion has an additional "add-on" component consisting of11 additional keys located above the calculator's display screen. The keys on the Orion are fairly easy to distinguish by touch, with variation from convex to concave for quick recognition. For even more tactile discernment a nib could be added to the 5 key on the number pad. The background and text of the keys vary in color, including white, black, grey, blue, and green. Some of these background/text pairings result in a high contrast scheme, such as the black text used on the white keys of the number pad, but others (like the blue text used to designate the second functions of keys), are more difficult to see. The text size used for the keys ranges from 7- to 12- point.

Photo of the Orion TI-84 Plus Talking Graphing Calculator

Caption: The Orion TI-84 Plus Talking Graphing Calculator

The Orion is 9.3 inches by 3.5 inches by 1 inch, and it weighs roughly twelve ounces. One quirky aspect is the device needs two power sources to be operational: the Orion's 11-key, "add-on" component's internal battery charges via an AC adapter, while the main portion uses four AA batteries. The calculator has one serial and two USB ports as well as an earphone jack. It has an LCD screen that is approximately 2.8 inches diagonally. While there is an option to change the contrast level of the screen (not much range here, though), the font size is fixed at approximately 12-point for calculations on the home screen and around 9-point for numbers along the XY axes of graphs. When purchased from APH, the Orion costs $599.00, which includes the calculator and its protective cover, batteries, USB cable, earphones, and user manuals.

Text-to-Speech

The Orion uses the synthetic text-to-speech (TTS) FonixTalk software from SpeechFX. Its quality is comparable to that found with the JAWS screen reader, with clarity similar to the JAWS default eloquence speech engine. There are options to mute; pause; change the volume, rate, and pitch of speech; and select different voices (male, female, young male child, young female child). You can navigate any of the text that's displayed on the screen by character, move to the beginning or end of a line, move up or down a line, or have all the lines read aloud. A peculiar aspect of the Orion is that the device has two arrow keypads, one located on the "add-on" component and one for the main portion of the calculator that often perform different functions. For example, when in the y=x pre-graph screen, the "add-on's" arrow keypad moves through the text of the equation you have typed, whereas the arrow keypad located on the main portion of the calculator allows you to move away from this text to change equation settings. One minor drawback of the audio is the limitations of the volume adjustment; its lowest setting is still fairly loud. Also, it would be useful if the volume were adjustable in smaller increments.

The state-of-the-art feature, of course, is the ability of the Orion TI-84 to convert the visual aspects of a graph into alternate mediums, one being audio, which is accomplished through the use of either speech or tones. While there are different screens for displaying a graph, the trace screen will be most often viewed by users with visual impairments because it allows you to navigate point by point on a scatterplot or along a line. When on the trace screen, you use the main portion's left and right arrow keys to move from point to point. If you are in speech mode, each press of an arrow will announce the point's coordinates, e.g., "x=4.1000, y=0.1234." If you are in tone mode, each press of the left or right arrow key produces tones of varying pitch as well as the absence or presence of "static," where the calculator both vibrates and emits noise. In tone mode, you can also have alerts played when the cursor crosses the X or Y axis. (In the Orion's settings menu, you can change the duration of tones, toggle X or Y axis crossing indicators, and toggle crossing gridlines indicators.) So basically, a tone tracing of a graph is where the cursor begins at the leftmost point and moves across the graph to the right, with the pitch of the tone indicating the vertical location of the cursor on the Y axis, and with static/vibration designating the cursor's position relative to the X axis.

Besides replication through audio, it is possible to produce print, tactile, or electronic representations of a graph, but you must first purchase the TI Connectivity Graph Link serial-to-USB cable in order to interface with a computer. Then, you have to download and install the free TI Connect software, which is accessible with screen reading or magnification. At that point, you can create and edit graphs on the calculator, connect to the computer, and open images of the graphs using Microsoft Paint or a similar program. Obviously, your embosser must be able to create tactile graphs and must be able to convert .BMP files.

An extremely important note: this calculator is most suitable to those who have a strong background in math, at least algebra 2 or pre-calculus. Also, there is a learning curve when it comes to interpreting graphs. Indeed, it is beneficial if you are already familiar with the visual characteristics that certain equations will inevitably produce when represented graphically—such as overall shape, number of times a given graph would cross the X or Y axis, and in which quadrant(s) a given graph would be located—in order to facilitate forming a mental picture as the cursor traces. For example, if you desire to find the zeros of a parabola that crosses the X axis twice, you must find each one individually; the calculator does not allow for their automatic, simultaneous display. Instead, you would have to enter the equation, hit the key to graph it, then go to the menu and select "intersection," which puts your cursor on a point. Then you would start highlighting the portion containing one of the parabola's crossings of the X axis by first moving the cursor left past the intersection, hitting the Enter key to reverse directions, then moving right to pass the intersection once again in order to locate the point in the middle of the screen, and then hit Enter again to hear the coordinates of this zero. Next, you would repeat this series of steps to find the second zero. For those new to graphing, I would surmise that it would be advantageous to study large print or tactile versions of graphs before progressing to the calculator.

Documentation and Getting Help

The Orion TI-84 ships with a quick start guide in braille and large (14-point) print as well as a USB thumb drive containing the full user guide and other information about the calculator, such as links to audio podcasts, the standard user manual for the TI-84 Plus, and examples of solving equations and creating graphs. This information can also be found on the APH website. One drawback is that you must view two manuals to learn about the calculator—one covers the standard TI-84 Plus calculator and the other covers the additional functions of the Orion "add-on" component. It would be more convenient if the information was combined and if the guide included more in-depth, step-by-step instructions for creating, navigating, and analyzing graphs.

A most state-of-the art and valuable feature is the calculator's powerful built-in help system. When you turn the calculator on, it's announced that "pressing the second key three times activates Help, and pressing three times again returns to normal operational mode." To get acquainted with the large keypad (around 45 keys along with their second functions), it is essential to use Help to assist in memorizing the layout and placement of keys. Once you activate Help, you just have to press a key to hear its name and description. Hit the second-function or alpha key and the former to hear its other use. Another novel, vital feature, which I used constantly, is screen sensitivity, which you can activate and deactivate on the fly. For example, when I had forgotten the location of the cosine and parenthesis keys as I was halfway through entering a long trigonometric equation, I activated Help in order to discover their whereabouts, and then I deactivated Help to resume typing.

The Bottom Line

I'm glad to see that APH and Orbit chose to adapt a mainstream product as opposed to creating a calculator "for the blind." This approach makes it easier for visually impaired students and employees to collaborate with their sighted counterparts, since they're all using the same technology. The popularity of the TI-84 also means that more tech support is available. I must also point out that I'm pleased to see the increase in interest in developing educational technology for people with vision loss who are planning to attend or are attending college or are of employment age. In the past, it seemed the trend was geared toward creating fun, creative products solely for preschool and elementary school age children, while neglecting other demographics. The Orion TI-84 Plus Talking Graphing Calculator absolutely broadens opportunities for people of all ages working in a variety of settings, from a high-school student learning about the unit circle to a NASA engineer researching the trajectory of a rocket.

Comment on this article.

A Review of Prodigi Duo, the Electronic Magnifier by HumanWare: When Desktop and Handheld Magnifiers Meet

HumanWare has a well-established reputation in the access technology industry for designing innovative software and hardware solutions that leverage the power of mainstream architecture. The BrailleNote that runs on the Windows CE operating system is one such example. The HumanWare Prodigi product line of electronic magnifiers also takes advantage of another platform, the ubiquitous Google Android operating system.

Prodigi is a feature-rich line of products for accessing printed materials. The cornerstone technology behind the Prodigi product line is an Android-based tablet customized for people with vision loss. The Prodigi product line offers all of the features of traditional electronic magnifiers—such as color inversion, multiple color schemes, and brightness adjustment—while offering additional features through its screen capturing and speech output capabilities. The following items are included in the Prodigi product line:

  • Prodigi Tablet: a handheld electronic magnifier with a 5-inch screen.
  • Prodigi Desktop: the stationary base that houses the Prodigi technology, but does not include the option of using the tablet as a stand alone, handheld electronic magnifier.
  • Prodigi Duo: includes the portability of the removable Prodigi Tablet and the Prodigi Desktop.

The Prodigi Tablet and Prodigi Desktop can be ordered with a 20- or 24-inch monitor, and offer some impressive touchscreen and touchpad capabilities. This review will focus on the capabilities of the Prodigi Duo.

Physical Design

Image of Prodigi tablet being removed from docking station of stationary base

Caption: Image of Prodigi

The stationary base of the Prodigi Duo has a modern design with a black and silver color scheme. The Prodigi tablet itself uses the same color scheme as the base, and is equipped with a 5-inch display. The tablet and stationary base contain about 6 hard button controls, including the Plus and Minus buttons, Power button, Read button, and Back button. The tablet's display is touchscreen-capable. To avoid confusion, it is important to be aware that the LCD monitor included with the stationary base is not touchscreen-capable. Instead, the stationary base at front and center is equipped with a 3.5-inch touchpad. Also included with the Prodigi Duo is a protective carrying case and portable reading stand for the Prodigi tablet, a USB recharging cable, cleaning cloth, and a DVD that contains the user guides.

The substantial surface space required for the stationary base needs to be taken into consideration, since it may not fit on smaller desks, or on desk designs that include an overhead hutch. The Desktop's footprint measures 21 inches deep and 14 inches wide. The adjustable monitor can be positioned between 17.5 inches and 22.5 inches in height from the desktop surface. The image capturing technology of the Prodigi removes the need for an X-Y table, thereby requiring less side-to-side movement.

The mount of the LCD monitor allows for a 5-inch vertical lift, and it also tilts forward and back, and swivels from side to side. This is an important feature, since neck and shoulder strain is often the end result of not achieving the correct height and angle in relation to the monitor. This versatility allows for the accommodation of individuals at different heights, and differing optimal focal points to the screen.

System Requirements and Software Installation

Updates to the Prodigi software can be downloaded using a Wi-Fi connection. The Prodigi Tablet needs to be plugged in when using this method. The software can also be updated while the Prodigi Tablet is in the docking station of the stationary base by downloading the software onto a memory stick, which can then be plugged into either one of the two USB ports located on the side of the base.

HumanWare acknowledges in the user guide that the updating process of the Prodigi is not very accessible for people with vision loss, and sighted assistance is likely needed since screen enhancement and speech output features are not available. Although the Prodigi is an Android-based tablet, the user interface of the Prodigi overrides almost all of the features that would otherwise be made available with most Android-based smartphones or tablets. For the most part, this is necessary and effective, streamlining the operation of the Prodigi software and allowing the software to be used the way it was intended. The downside is that the user is unable to modify any Android-based accessibility options like TalkBack screen enhancements when setting up a Wi-Fi connection.

Documentation

It appears that HumanWare has made a strong effort to ease the learning curve for the end user by including a number of well-written resources with the Prodigi Duo, including: a double-page set of instructions for safely packing and unpacking the base, an easy to follow three-page "Getting Started" guide, a detailed user guide for the stationary base, and a detailed user guide for the Prodigi Tablet. All of these materials are printed in 18-point font, and include well-placed, high contrast illustrations.

I was impressed with a series of 12 YouTube video tutorials on the HumanWare website, which offer step-by-step instructions. The videos include everything from unpacking the Prodigi Duo to exploring the deeper layers of the product's visual and reading options. The videos also provide the option of closed captioning for people with hearing loss, though the captioning process appears to have been automated using speech-to-text technology, so the captions do not always accurately reflect what is being spoken. Other than the questionable accuracy of the closed captioning contained within the videos, HumanWare is to be commended for offering such a solid set of multimedia tutorials for the end user. Users would have more luck finding these valuable tutorials if the user guides explicitly stated something to the effect of "Step-by-step tutorial videos available on the HumanWare website."

The Prodigi Duo software also includes an interactive wizard that provides an excellent overview of the Duo and its controls. The wizard also includes a series of exercises that customize the Prodigi Duo to reflect individual preferences regarding text size, contrast level, and preferred color schemes. One of the challenges with the wizard is that it is only available when the Prodigi is set to Standard mode, not the default Simple mode (these two modes are described in detail below). As a result, in order to get to the wizard it is necessary to know how to first switch it from Simple to Standard mode.

Set Up and Portability

When initially setting up the Prodigi Duo, I encourage you to make use of the accompanying documentation and online videos. The dual role of the Prodigi as a portable electronic magnifier, and its integration with the stationary base and its separate set of controls, will need to be clearly understood in order to use the system to its full capacity. The Prodigi Tablet is easily removed from the docking station of the stationary base by pushing apart the two latches that secure it in place. The user guide recommends the Prodigi tablet be charged for at least eight hours before its first use, and for four or more hours thereafter. The tablet can be charged in multiple ways: by placing it in the docking station, through its included power supply and USB cable, or through the USB port of a computer.

It takes approximately a minute and nine seconds for the Prodigi to boot up. When taking it out of sleep mode, it takes slightly less than two seconds for the Prodigi Tablet to become active and ready for use.

The included charging cable for the Tablet is not labeled with any recognizable marking to indicate which side is up. It would be easy for HumanWare to fix this by marking the cable with a high contrast bump/dot to indicate which side should face up. Doing so would make the process of plugging the cable into the recharge port much easier for individuals with low vision.

Features

The Prodigi Duo boasts a long list of features, including touch and tap interactions, OCR technology that allows for improved image quality and text-to-speech capabilities, and the ability to save and retrieve documents.

Touch and Tap Technology

The stationary base contains a touchpad located on its front panel that measures 3.5 inches diagonally. In most instances, using the touchpad is very intuitive. Using the common pinch and reverse-pinch gestures quickly and easily increases or decreases the image to the desired size. The touchpad also allows you to pan the viewable page by moving a single finger in the desired direction. HumanWare has integrated several customized gestures as well. For instance, toggling from Read view (which captures and converts the text of the page into an electronic format) to Live view (the traditional viewing mode) is achieved by swiping up and down using a single finger on the left side of the touchpad. Double tapping with a single finger will toggle speech on and off in Read view. Overall, the touchpad works well, although its 3.5-inch surface is a little small, and therefore somewhat restrictive, when carrying out gestures. As a point of reference, 3.5 inches is the same size as the screen on the iPhone 4/4s. The gestures are essentially the same when using the Prodigi Tablet as a stand-alone magnifier. However, carrying out the gestures using the 5-inch display of the Tablet provides a little more surface space.

Magnification

The Prodigi Duo offers a wide range of magnification. At the lowest level, 11-point text appears 1/8 inch in height. At the maximum level of magnification, which the Prodigi displays as 20 times, 11-point text is displayed at 2 3/4 inches in height. The magnification level is audibly announced, and the size also appears in large, high-contrast numbers near the bottom center of the screen. HumanWare has done an excellent job making this information accessible audibly and visually.

The Plus and Minus buttons on the right side of the stationary base control the level of magnification and are also essential for modifying some of the settings. Increasing the controls' physical size slightly and raising them approximately 1/8 inch more from the tablet surface would make them easier to identify via touch, and would align these controls more accurately with the center of the fingertip.

When using the Prodigi Tablet in conjunction with its small reading stand, 11-point text appears 1 5/8 inches in height at the lowest level of magnification and 2 1/2 inches in height at the maximum level of magnification. The Prodigi tablet uses the Plus and Minus controls located on its side to increase and decrease magnification. I found the positioning of these controls to be counter-intuitive. On other devices, such as smartphones and tablets, the Plus key is typically located above the Minus key. This is reversed on the Prodigi Tablet, with the Minus control on the top left, and the Plus control immediately below. Following industry standards in this regard would increase the transferable skills, and presumably decrease the learning curve, for smartphone or tablet users learning to use the Prodigi Tablet.

Quality of Image

Overall, the image quality is noticeably superior with the Prodigi Tablet when used in conjunction with the stationary base than as a portable magnifier. When using the stationary base, the camera is held in a fixed position at an optimal distance for page viewing, which makes for excellent image quality. The Prodigi Tablet creates a considerable amount of blurring of the image with movement. As a portable electronic magnifier, the Prodigi Tablet is therefore more effective at capturing images, as opposed to facilitating the reading of text that requires frequent panning from left to right.

As a desktop unit, the Prodigi Duo is highly effective at capturing and manipulating text displayed on a page. An X-Y table is not required, since the camera effectively captures the entire page from its fixed position. The image can then be processed using OCR to convert the displayed text into electronic text. The OCR conversion process takes approximately 10 seconds per page. The end result, which HumanWare refers to as Diamond Edge Text Technology, provides crisp, easy to read text at a size of your choosing. The downside to this process is that the OCR electronic conversion isn't 100 percent accurate, and is occasionally susceptible to errors, particularly with faint or decorative fonts, and with low-contrast text and background combinations.

Color Schemes and Contrast

As would be expected with a high-end electronic magnifier, the Prodigi Duo allows you to customize the background and foreground colors, as well as the contrast level and brightness of documents and images. It offers 16 color schemes to choose from. It also provides a brightness range from 0 to 100, and includes the contrast levels of positive (black text, white background), negative (white text, black background), and true colors.

Reading Options

The Prodigi Duo offers two interfaces: Simple and Standard. By default, the Simple interface is selected. The major difference between these interfaces is that the Standard interface allows more touch-based gestures, and a wider array of options. It will also perform an OCR scan of a page without being prompted, and gives you the option to save documents and images that can be retrieved at a later time.

The Prodigi Duo offers two viewing methods to access material: Live view and Read view. Live view does exactly what its name implies: it allows a person to access printed material that is placed on the reading tray in real time. Read view allows you to take a photo of the material on the reading tray by pressing the Read button located to the left of the touchpad, and then runs OCR on the captured image to parse and convert the viewable text into an electronic format. After the document is electronically converted, it can also be read using a high quality synthetic speech synthesizer. The Prodigi gives you the option of a male or female voice. The speech rate is also easily controlled using a left and right gesture on the touchpad.

A feature called Spot Reading allows you to isolate a specific section of the viewable page. When in Spot Reading mode, a rectangular-shaped lens with a bold red outline is displayed on screen. The lens can be positioned over any section of the page using the touchpad. After positioning the lens on the section of the page you wish to read, pressing the Read button will activate the OCR process and then display the text for the chosen section of the page on the screen.

Reading Mode Options

A powerful set of options that the Prodigi Duo offers is the ability to read printed material by line, page, or column. The names of these three methods are slightly misleading.

Reading by line allows an entire page of text to be displayed as a single line on the screen that scrolls horizontally while being highlighted and read aloud word by word. This can be a very useful feature for someone with field loss who may find tracking difficult.

Reading by page highlights and reads the document aloud while displaying the page as it appears on the base tray. This option displays more of a "true to form" representation of the actual page and its original layout.

Reading by column is not related to reading a column on a page, as its name might suggest. Instead, this method displays each line with a consistent left and right border, eliminating the need for side-to-side navigation.

Saving and Retrieving Documents

The Prodigi is capable of storing up to 100 documents, which can then be retrieved for future use. This can be especially beneficial when images are taken with the Prodigi tablet, and then viewed at a later time using the larger display of the stationary base

The Bottom Line

The Prodigi Duo represents one of the most sophisticated electronic magnifiers on the market today. HumanWare's offering of a feature-rich combination that offers a desktop magnifier and hand-held magnifier under one roof is an ambitious undertaking. The Prodigi Duo's greatest strength appears to be in its desktop magnifier's capabilities. The image quality, speech output, and formatting capabilities it provides via its OCR-based technology are impressive. The Prodigi Tablet as a hand-held magnifier is less impressive, since the image quality of the Prodigi is quickly compromised if there is movement involved. The Tablet's usefulness as a portable solution increases when it's deployed for brief spot-checking and image captures, or when the Tablet is used in conjunction with the portable reading stand for stabilization.

One of the most noteworthy features of the Prodigi Duo is the integration of the pinch and reverse-pinch gestures on both the tablet and stationary base. The majority of tablets and smartphones incorporate these gestures when viewing images and they represent an extremely easy and intuitive method for increasing and decreasing image size. Also, if a user already has experience using the gestures with a smartphone or tablet, applying them when using the Prodigi Duo is effortless.

HumanWare appears to be fully aware of the learning curve that the Prodigi Duo will present for some people, and should be commended for providing a wide array of resources and training materials for the Prodigi Duo. The user guides, high quality YouTube training videos available on the HumanWare website, and the interactive wizard provide the end user with a large number of resources for learning how to use the product effectively.

Product Information

Product: Prodigi Duo with 24-inch Monitor
Price: Prodigi Duo 20: $2,899; Prodigi Tablet: $999; Prodigi Desktop 20: $1,999
Available From: HumanWare, 800-722-3393, info@humanware.com

Manufacturer's Comments

Thank you for this positive review; Prodigi is a great step forward for people with vision loss and HumanWare is dedicated to continue innovating and developing the next generation of Low Vision magnifiers! We are receiving constant feedback and testimonials from people around the world, that Prodigi has changed their lives; how easy it is now for them to read longer and enjoy reading again, how the natural text-to-speech is a great help, and how Diamond Edge is so crisp! Many of the comments in this review have been, or are being, addressed in ongoing development, for example: the Wi-Fi screen will be soon made fully accessible. Caption of highlighted text is being better synchronized. Our aim is to provide a smoother user experience, in live image panning as in reading. Some terminology such as word-wrap, will be revised. Also, errors in OCR text will be further digitally processed to improve reading. Similar enhancements will be brought to the Tablets image quality, to prevent blurring in movement. Although there is a tactile marker on the USB cable, effort will be made to visually identify it better. More videos, training-capsules will be done to help users gain complete independence. Consequently, to keep improving, all Prodigi owners will benefit from free and well-expected software updates; that will seamlessly improve image quality, feature-set and background intelligence, thus opening the door to infinite evolution. In this sense, Vision has been reinvented!

Sincerely,
HumanWare

Comment on this article.