Full Issue: AccessWorld September 2005

Letters to the Editor

Sorry in Zimbabwe

It was with great sadness that I read of the Telesensory Corporation's sudden bankruptcy in the July edition. How on earth could the corporate bosses of Telesensory treat their employees like that?

Anyway, the issue here is of one of the leading firms in the provision of assistive devices closing. The situation is indeed unbearable. We thought that with the advent of the new century, so would new firms open to provide a variety of products for people with low vision and blind people. In fact, here in Zimbabwe, just like any other third world country, we keep on hoping that firms like Freedom Scientific would become multinational entities that can spread their wings to every part of the globe. To us, the closure of Telesensory is an omen. We hope this is the first and the last of its kind to happen.

Otherwise, thank you for providing detailed product evaluation and ratings in AccessWorld magazine. We also wish that all other firms may not follow in the way of Telesensory. Thank you once again.

With sorrow,

Ishe Chinyoka
Harare, Zimbabwe

Product Ratings

Product Ratings

Product Ratings

Return to article, or use your browser's "back" button.

Editor's Page

In this issue, Deborah Kendrick interviews Curtis Chong, longtime president of the National Federation of the Blind (NFB) Computer Science division. Chong discusses his 30-year career in the technology field, as well as his leadership in advocacy for people who are blind or visually impaired. Read about Chong's advocacy efforts as Director of Technology in NFB's International Braille and Technology Center in Baltimore, Maryland, and how he has become one of the most respected people in the field of assistive technology.

Gerald Weichbrodt, Senior Project Engineer at General Motors in Detroit, defines and demystifies key terms in device connectivity. These terms are used regularly in reference to personal digital assistants (PDAs), computers, and other devices. What is the difference between Bluetooth and Wi-Fi? Is infrared good for other things besides television remotes? What is Wimax? This article answers these questions and helps you get familiar with the wonderful world of wireless.

I review VoiceOver, the new screen reader for the Macintosh OS X operating system from Apple. VoiceOver is installed on every Apple computer shipped after April 30, 2005, as well as being a part of software upgrades. This could make VoiceOver the most widely available screen reader in the world. Unfortunately, VoiceOver is currently not up to the job, as it does not include the functionality that users have come to expect from a screen reader. Read about the program's shortcomings.

Dr. Carol Farrenkopf, Coordinator of Toronto District School Board Vision Services, discusses how to buy a closed-circuit television (CCTV). Of course, cost is a major consideration. However, this article highlights other factors to be considered, whether you are purchasing a CCTV for yourself or assisting someone else. Find out what you should know to purchase the best CCTV to meet your needs or the needs of a client or family member.

Stephanie Bassler, vice-president of De Witt and Associates in New Jersey, shares some of her extensive knowledge about assistive technology training. She explains the difference between showing someone how to do something and teaching someone to perform a task. She then goes on to describe the steps involved in creating a lesson plan, testing a student's knowledge and discovering how well your student has learned.

Darren Burton of AFB's Technology and Employment Center in Huntington, West Virginia (AFB TECH), describes a new destination-based elevator control system developed by Otis, the world's largest manufacturer of elevators, escalators, and moving walkways. The system poses access problems for people who are blind or visually impaired. Burton goes on to explain the work done for Otis by AccessWorld Solutions, the consulting division of AFB, which helps corporations and government agencies to make their products and services accessible to people with vision loss.

Janet Ingber, author and music therapist, reviews the i.d. mate II from En-Vision America and the SCANACAN from Ferguson Enterprises, two bar code readers. A bar code is a series of printed stripes of various widths, in which each of the digits zero through nine are represented by a different pattern of bars that can be read by a laser scanner. Retailers use bar codes to record the prices of items. Find out how these readers can help you identify cans of soup, containers of yogurt, music CDs, and many other products.

Jim Denham, formerly of AFB's Technology and Employment Center in Huntington, West Virginia (AFB TECH), is now national sales manager for Dolphin Products for Optelec USA. Jim was a regular contributor to AccessWorld and a pleasure to work with. We wish him the best in his new job.

Jay Leventhal
Editor in Chief

Product Features

Product Features

Feature

i.d. mate II

SCANACAN for Windows Deluxe

Portability

Yes

No

Size of database

750,000 items in one database

146,480 in three databases

Ability to add or change information

Yes, by voice

Yes, by typing it into the SCANACAN program

Batteries

Rechargeable NiCad batteries

None

On-board help

Yes

No

Additional uses

Memo recorder

None

Return to article, or use your browser's "back" button.

Product Features

Product Features

Feature: i.d. mate II; SCANACAN for Windows Deluxe

Portability: i.d. mate II: Yes; SCANACAN for Windows Deluxe: No.

Size of database: i.d. mate II: 750,000 items in one database; SCANACAN for Windows Deluxe: 146,480 in three databases.

Ability to add or change information: i.d. mate II: Yes, by voice; SCANACAN for Windows Deluxe: Yes, by typing it into the SCANACAN program.

Batteries: i.d. mate II: Rechargeable NiCad batteries; SCANACAN for Windows Deluxe: None.

On-board help: i.d. mate II: Yes; SCANACAN for Windows Deluxe: No.

Additional uses: i.d. mate II: Memo recorder; SCANACAN for Windows Deluxe: None.

Return to article, or use your browser's "back" button.

Calendar

September 6-9, 2005

Assistive Technology from Virtuality to Reality: Association for the Advancement of Assistive Technology in Europe (AAATE) Eighth European Conference

Lille, France

Contact: Package Organisation, 5 Avenue de la Créativité, BP 356, 59650 Villeneuve D'Ascq, France; phone: +33-20-05-10-50; e-mail: <s.lopes@package.fr>; web site: <www.aaate2005.com>.

October 8, 2005

Virginia Murray Sowell Seventh Annual Distinguished Lecturer Series: Assistive Technology for Children with Visual Impairments

Lubbock, TX

Contact: Nora Griffin‐Shirley, Virginia Murray Sowell Center for Research and Education in Visual Impairment, College of Education, Texas Tech University,  P.O. Box 41071, Lubbock, TX 79409; phone: 806-742‐1997, extension 247; web site: <www.educ.ttu.edu/sowell>.

October 9‐10, 2005

The Seventh International ACM SIGACCESS (Association for Computing Machinery Special Interest Group on Accessible Computing) Conference on Computers and Accessibility

Baltimore, MD

Contact: Andrew Sears, Information Systems Department, University of Maryland, Baltimore County, 1000 Hilltop Drive, Baltimore, MD 21250; phone: 410-455-3883; e-mail: <asears@umbc.edu>; web site: <www.acm.org/sigaccess/assets05/>.

October 20-22, 2005

23rd Annual Closing the Gap Conference

Minneapolis, MN

Contact: Closing the Gap, P.O. Box 68, 526 Main Street, Henderson, MN 56044; phone: 507‐248‐3294; e‐mail: <info@closingthegap.com>; web site: <www.closingthegap.com>.

November 8-11, 2005

Eighth Annual Accessing Higher Ground: Assistive Technology and Accessible Media in Higher Education

Boulder, CO

Contact: Disability Services, University of Colorado, Willard Administrative Center 322, 107 UCB, Boulder, CO, 80309; phone: 303-492‐8671; e‐mail: <dsinfo@spot.colorado.edu>.

November 17, 2005

Assistive Technology: Improving Lives Daily

Warwick, RI

Contact: TechAccess of Rhode Island, 110 Jefferson Boulevard, Suite I, Warwick, RI 02888; phone: 401-463‐0202; e-mail: <techaccess@techaccess‐ri.org>; web site: <www.techaccess‐ri.org/index.htm>.

November 17-18, 2005

Royal National Institute of the Blind (RNIB) Techshare 2005

Birmingham, England, United Kingdom

Contact: Techshare, Royal National Institute of the Blind, 58-72 John Bright Street, Birmingham, B1 1BN, England, United Kingdom; phone: +44-121-665-4226; e-mail: <techshare@rnib.org.uk>; web site: <www.rnib.org.uk/techshare>.

December 1-2, 2005

Tactile Graphics 2005: Third International Conference on Tactile Diagrams, Maps, and Pictures

Birmingham, England, United Kingdom

Contact: National Centre for Tactile Diagrams, Royal National Institute of the Blind, 58‐72 John Bright Street, Birmingham, B1 1BN, England, United Kingdom; phone: +44-121-665-4257; e-mail: <info@nctd.org.uk>; web site: <www.nctd.org.uk/conference/conf2005>.

January 5‐8, 2006

2006 International Consumer Electronics Show

Las Vegas, NV

Contact: 2006 International Consumer Electronics Show, c/o ExpoExchange, P.O. Box 590, Frederick, MD 21705; phone: 866‐233‐7968 or 301‐694‐5124; e-mail: <cesinfo@ce.org>; web site: <www.cesweb.org>.

January 18-21, 2006

Assistive Technology Industry Association (ATIA) 2006 Conference

Orlando, FL

Contact: ATIA, 401 North Michigan Avenue, Chicago, IL 60611; phone: 877‐687‐2842 or 321-673‐6659; e‐mail: <info@atia.org>; web site: <www.atia.org>.

January 26-28, 2006

24th Annual Technology, Reading, and Learning Difficulties (TRLD) Conference

San Francisco, CA

Contact: TRLD, Don Johnston Incorporated, 26799 West Commerce Drive, Volo, IL 60073; phone: 800-999‐4660 or 847-740-0749; e-mail: <trld@donjohnston.com>; web site: <www.trld.com>.

March 20-25, 2006

California State University at Northridge (CSUN) Center on Disabilities' 21st Annual International Conference: Technology and Persons with Disabilities

Los Angeles, CA

Contact: Center on Disabilities, CSUN, 18111 Nordhoff Street, Building 11, Suite 103, Northridge, CA 91330; phone: 818‐677‐2578; e‐mail: <ctrdis@csun.edu>; web site: <www.csun.edu/cod/conf/index.htm>.

Product Ratings

Ratings Chart

Feature: i.d. mate II; SCANACAN for Windows Deluxe

Documentation: i.d. mate II: 4.5; SCANACAN for Windows Deluxe: 4.5.

Setup: i.d. mate II: 5.0; SCANACAN for Windows Deluxe: 3.5.

Scanning: i.d. mate II: 4.5; SCANACAN for Windows Deluxe: 4.0.

Making changes in the database: i.d. mate II: 5.0; SCANACAN for Windows Deluxe: 4.0.

Speech quality: i.d. mate II: 4.0; SCANACAN for Windows Deluxe: N.A.

Note: SCANACAN's speech quality cannot be rated since it is determined by the computer it is using.

Return to article, or use your browser's "back" button.

Breaking the Code: A Review of Two Portable Bar Code Scanners

Have you ever opened the wrong can or wanted to know what flavor yogurt was in your refrigerator? Maybe you have several shirts that feel similar and want to be able to tell them apart. One way to identify products is to make use of the label that's already on most of them: the universal product code (UPC), usually known as the bar code because it consists of stripes or bars of various widths, readable by a laser scanner, that represent a numeric code for each product. The i.d. mate II from En-Vision America and the SCANACAN from Ferguson Enterprises are portable bar code readers that can help you find out what those bar code stripes say.

Bar codes consist of a series of printed horizontal stripes of various widths, in which each of the digits zero through nine are represented by a different pattern of bars that can be read by a laser scanner. Retailers use bar codes to record the prices of items.

i.d. mate II

The original i.d. mate was reviewed in the November 2001 issue of AccessWorld. At that time, a significant drawback of the product was that there was no database in the unit, and all bar codes had to be named by the user. The i.d. mate II now comes with a preloaded database of over 750,000 products.

Physical Description

The i.d. mate II is portable. It consists of a handheld bar code scanner and a separate recorder that are connected by a cord. The entire unit in the carrying case measures 11 inches by 4 inches by 4 inches and weighs approximately 2 pounds. It ships with an AC to DC adapter, a 256 MB flash memory card, and additional bar code labels for items that do not already have bar codes on them. It runs on four NiCad rechargeable batteries, which are charged and already in the unit. A shoulder strap and a waist strap for the carrying case are included. Other items, such as additional labels, memory cards, and a jump-start backup cable, can be purchased separately.

Photo of i.d. mate II, a rectangular recorder connected by a cord to a scanner with a large, square head.

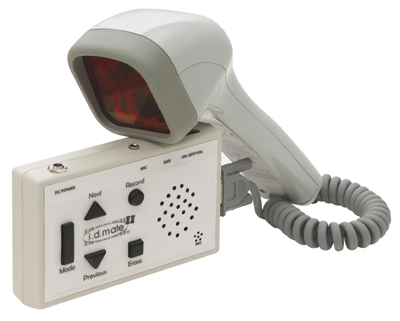
Caption: The i.d. mate II.

On top of the unit are jacks for the adapter, an external microphone, and earphones. To the right of the jacks is the On/Off/Volume dial. Next to the dial is a Velcro flap that can be pulled down to expose the lens of the scanner. This feature allows you to scan small items without removing the scanner from the carrying case.

There are five buttons on the front of the recorder. The rectangular Mode button on the left cycles between i.d. mate II's four modes: I.D., Memo, Memory, and Help. You can cycle through these modes only in one direction. Approximately one inch to the right of the Mode button are two triangle-shaped buttons. The top one, which feels like an upward pointing arrow, is the Next button, and the bottom one, which feels like a downward pointing arrow, is the Previous button. To the right of the Next button is the round Record button, and the small square button underneath the Record button is the Erase button. The unit's speaker is to the right of the buttons, and the built-in microphone is at the lower right corner of the speaker.

Getting Started, Getting Help

The i.d. mate II comes with a manual in regular print and on audiocassette. A PDF (portable document format) version is available on En-Vision America's web site. All versions of the manual have a reminder not to look directly into the laser and never to point it at any human or animal. The manual gives good descriptions of where different parts of the unit are located and how to operate the i.d. mate II. It took only about half an hour to become thoroughly familiar with the product. The onboard Help menu is easy to access, and there are 10 separate help topics, including descriptions of how each mode works, how to have i.d. mate II spell the words that it is saying, and how to change the rate and pitch of speech.

However, there were some discrepancies between the information in the manuals and the information on En-Vision America's web site. The audiocassette manual does not mention the size of the flash memory card. The PDF and print versions say that the card that ships with the unit is 128 megabytes, but En-Vision America's web site says that the unit ships with a 256-megabyte card, which was the size of the card in the test unit. The audiocassette version of the manual does not provide information about how to use the additional bar code labels, whereas the PDF and print manuals do. All versions of the manual provide some tips on locating bar codes and how to scan them. There is no mention of future database upgrades in any of the literature.

How It Works

The i.d. mate II uses an omnidirectional scanner to read bar codes. If the bar code is upside down, the scanner can still read it. For the most part, it was easier to take the scanner out of the carrying case to scan items than to use the small window in the case. The scanner can read a bar code from as far away as nine inches. The farther away an item is from the scanner's lens, the wider the area that can be scanned.

Turning It On

When the unit is turned on, it says "i.d. mate II by En-Vision America, 256-megabyte card with version 1.4 of the database." The unit always starts in i.d. mode. The speech is clear and easy to understand.

Modes

Scanning: I.D. Mode

To scan an item, hold the handle of the scanner and place the scanning head up to nine inches away from the item. You may need to turn the item or move the scanner around to locate the bar code. Once a bar code is found, the scanner will emit a beep and say, "Product," and whatever has been programmed into the database about that product. For example, when a can of soup was scanned, i.d. mate II said, "Product: Progresso Tomato Basil soup, 19 ounces." If you press the Previous button after the product has been identified, i.d. mate II will repeat what it just said.

Sometimes there is additional information about the product in the database. If so, i.d. mate II will sound a tone and say, "continued." For example, when a container of yogurt was scanned, i.d. mate II said, "Product: Dannon Light 'n Fit yogurt--strawberry, continued." To access the additional information, press the Next button. In the case of the yogurt, i.d. mate II added, "Product Description: 8 ounces." (The yogurt container was actually 6 ounces, but i.d. mate II gave additional nutrition information based on an 8-ounce serving. This type of yogurt no longer comes in an 8-ounce size.) After you hear the first extra-information segment, you will need to press the Next button to determine if there is still more information; you are not automatically informed after the first time. When all the additional information is given, i.d. mate II will again speak its initial product description. Nowhere in any of the product's documentation is this point mentioned. It took five more presses for i.d. mate II to also speak the yogurt's package information, nutrition information, and instructions.

The scanner has a Time Out feature; if no item is scanned for 45 seconds, the scanner will turn off to conserve battery power. Pressing any of the buttons on the front of the recorder will turn the scanner back on.

It is easy to add your own information about a product to the message. Once i.d. mate II is finished speaking about the product, hit the Record button once. You will be prompted to hold down the button and record your message. Your message will then be played back. (Although there is a jack for an external microphone, the built-in microphone worked well even with moderately loud music playing in the background.) The next time i.d. mate II encounters that bar code, it will speak the information in the database and the additional details that you recorded. All versions of the manuals said that your recorded message is played first and then i.d. mate II's message is played. However, the test unit spoke the information that was stored in the database first and then played the recorded message. You can record as many separate messages for that bar code as you wish. When the scanner reads the bar code, you can then cycle through your additional messages by using the Previous and Next buttons.

If a bar code is present but its information is not in the database, i.d. mate II will say, "Item not found; to record, press and hold the Record button." At this point, you can speak the name of the product and any additional information you want to add. Once you let go of the Record button, your message will be immediately played back. After that, any time the same bar code is encountered, the message you recorded will be played.

If you decide to change or erase a message, just press the Erase button after the message is played. Then i.d. mate II will ask if you are sure that you want to erase the message, and your message will be played again. If you want the message erased, press the Erase button again, and your message will be gone. This is an excellent safeguard against accidentally deleting an important message.

If no bar code is found, i.d. mate II will not say anything. In general, i.d. mate II can find a bar code within a few seconds, depending on the item's size and the location of the bar code.

Recording: Memo Mode

Memo mode allows you to record information that is not automatically replayed in association with a particular bar code. It is an ordinary memo recorder. If the Record button is pressed once, i.d. mate II will prompt you to hold down the button and record your message. You can move through your messages by using the Previous and Next buttons. If you want to erase a message, i.d. mate II will prompt you and play the message to ensure that you definitely want to do so.

Memory Mode

Memory mode lets you know how much memory is available on the flash card that comes with the unit or another flash memory card that has been inserted into the recorder. When you enter Memory mode, i.d. mate II will tell you the number of minutes that are available for recording on the flash card.

Help Mode

To cycle through the Help topics, use the Previous and Next buttons.

Labels

The i.d. mate II ships with three types of labels. Each label has a bar code on it, and information about the bar code is entered the same way as if the item was not found in the database. The first type of label is attached to a rubber band, which can be put on items such as containers, medicine bottles, and cans or jars. The original message on the label can be erased, and a new one can be entered, so that the labels are reusable. The second type is a stick-on label, which can be used for things like folders, CDs, and computer disks. Although the label is stuck to an item, the bar code message can be changed. The third type of label is ironed onto clothing. A test label that was ironed onto a shirt and put through a washer and dryer four times was then read with no difficulty.

Batteries

When the battery power is low, i.d. mate II will say, "batteries low, recharge now." Depending on the state of the batteries, charging will take about one to two hours. You can use i.d. mate II when it is plugged into the adapter for charging. The charger will turn off once the batteries have been recharged. Batteries should be replaced when they last an hour or less after a full charge.

The Bottom Line

i.d. mate II's portability and large database of products make it an excellent bar code reader. If a bar code is not in the database, it can be added by just pressing one button and speaking into the recorder. i.d. mate II consistently read the bar codes in its database and those added by voice. It is easy to learn to use the product, and all versions of the manual provide good descriptions. Since only one large database is used, there is no need to navigate between databases.

Most of the carrying case is taken up by the scanner. If the unit had a smaller handheld bar code scanner, the overall size would be reduced considerably.

SCANACAN for Windows Deluxe

SCANACAN for Windows Deluxe is a bar code scanner that connects to a PC via a USB cable. There is also a version that connects to the computer's keyboard port. No version is portable. SCANACAN has three databases: one with over 84,000 grocery-related items, a hardware database of 62,000 items, and a database of 480 foods from Schwan's (a frozen-food home delivery service). The system requirements are Windows 95 or higher, 500 MB of free hard disk space for the software and databases, a CD-ROM drive, a software synthesizer or a speech synthesizer, and a Windows screen reader.

Physical Description

SCANACAN's scanner has a coiled cord that is attached to one end of a USB cable, and the other end of the cable is plugged into the computer's USB port. The scanner can be used in the stand or by holding it. The unit ships with the scanner, a connecting USB cable, the stand, and 100 preprinted stick-on bar code labels.

Photo of the SCANACAN.

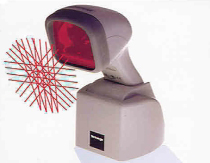
Caption: The SCANACAN.

Getting Started, Getting Help

The SCANACAN manual is on CD-ROM, in both text and MP3 format. The text version consists of 1 long file, and the MP3 version consists of 16 separate files. A regular print manual and a Quick Start guide discuss programming the scanner, but they do not relate directly to the SCANACAN unit. There is mention of future upgrades for the Schwan's database.

How It Works

The SCANACAN uses an omnidirectional scanner that is connected to a PC. To perform any operation, one must turn on the computer and open the SCANACAN for Windows program. The manual provides a detailed description of how to scan.

The unit's databases are stored on a computer's hard drive and can be viewed by using the Alt-V or View Inventory command in the SCANACAN program. It is possible to arrow through the database, but only one page can be loaded at a time. Each page of the database contains 30 items. If you are searching for a particular brand or item with the Windows or screen reader's Find command, the item must be on the particular page of the database that you are viewing; otherwise it cannot be found. The name of whichever database SCANACAN is using is located at the top of the opened SCANACAN program.

Turning It On

If the scanner is connected to the computer, it will beep as it boots. The scanner does not have an on/off switch. The scanner will not work correctly unless the SCANACAN for Windows program is open and a command is entered.

Scanning

To scan an item, the SCANACAN program must be open. Since SCANACAN comes with three databases, it will compare the bar code only with whichever database is open. Unless indicated, the 84,000-item grocery-related database will be discussed in this article. This is also the default database.

It is relatively easy to navigate within the SCANACAN program. Typing Alt and the first letter of the command will bring you to that command. For example: if you type Alt-A, you will be brought to the place where you can add records to the database. The manual provides a list of the Alt and one-letter commands. You can also tab through the choices or arrow to them.

By typing Alt-F for Fast Scan, you will be prompted to scan an item or enter a bar code number. The manual recommends rotating the product and keeping the scanner stationary. When SCANACAN finds a bar code that is in the open database, it will say "Description," followed by the name of the product and whatever else is in the description field. In the Fast Scan setting, items can be scanned one right after another, but it is not possible to add information to the item or check for additional information other than the item's description. If SCANACAN encounters a bar code that is not in the database, it will inform you of this fact and ask whether you want to continue in Fast Scan. When the same can of Progresso Tomato Basil soup was scanned, SCANACAN said, "Progresso soup, Tomato Basil." When the can was scanned using the hardware and Schwan's databases, the bar code was not recognized.

When the container of strawberry yogurt was scanned, SCANACAN said, "Dannon Light Strawberry." No other information was given--not even the word "yogurt." If a product is in the database, the Change Record option will let you enter additional information about a product by rescanning the product and then typing information into fields, including Description, Cost, and Instructions. All the fields do not have to be completed. The Description field can hold up to 60 characters. The number of calories was added to the description field, and the yogurt was rescanned. SCANACAN said, "Dannon Light Strawberry 90 calories." When this same yogurt was bought at a warehouse-type store, packaged with many other yogurts of the same brand, Scanacan only said, "Dannon Light." It didn't mention the yogurt's flavor. I.d. mate II read both types of packaging correctly.

If a product has something written in the Instructions field, SCANACAN will not automatically read it when in the Fast Scan setting. Therefore, the only way to find out if a product has additional instructions is to use the Read Instructions command. When an item is scanned using this command, the description of the item will be read. When you press Tab, the information in the Instructions field will also be read. SCANACAN will not say anything if there are no instructions. You can use up to 600 characters to enter information in the Instructions field.

If a bar code is present but is not in the database, SCANACAN will say "Item not found" and then ask if you want to continue scanning. The Add Record command will let you add new bar codes to the database. As with the Change Record command, you will be prompted to rescan the item and fill in several fields.

If no bar code is found, SCANACAN will not make any noises or say anything. In general, SCANACAN was able to locate a bar code in a few seconds, depending on the size of the item and the location of the bar code.

SCANACAN lets you back up databases and repair them. It is also possible to create your own database. A product's record can be viewed, inventory can be tracked, and lists of items can be printed.

Labels

SCANACAN ships with 100 stick-on bar code labels. A description can be assigned to the bar code using the Add Record command. Information that is contained in the bar code can be changed by using the Change Record command. These labels can be used on items like food containers, folders, and computer disks. However, they cannot be used in the laundry. According to SCANACAN's web site, clothing labels are available for purchase.

The Bottom Line

Since SCANACAN is not portable, the items that you want to scan must be brought to the computer. SCANACAN's database is considerably smaller than i.d. mate II's. SCANACAN has three different databases to navigate, rather than just one, so you have to be in the correct database. For example, if you are scanning a can of soup and you are in the hardware database, SCANACAN will not recognize the item. It is possible to view the contents of the databases, but it is difficult to search for a particular item without knowing which page of the database it is on.

Although the SCANACAN program is easy to navigate, any changes or additions to records must be typed into the program. SCANACAN does provide fields to enter the quantity and cost of an item, which may be helpful if you are tracking inventory or planning a menu.

What the Scanners Said–and Didn't Say

To compare the performance of the i.d. mate II and SCANACAN, a variety of items were scanned using both units. The items included typical groceries; drinks, including beer and wine; household cleaning products; some drug store items; and CDs and DVDs. In all, 46 products, excluding the yogurt and soup mentioned in the article, were scanned. I.d. mate II read 35 of these products, while SCANACAN read 17. Neither scanner recognized 11 of the products.

Conclusion

I.d. mate II recognized many more bar codes and provided more product details than SCANACAN did. All products that SCANACAN recognized were also recognized by I.d. mate II; many products recognized by i.d. mate II were not recognized by SCANACAN.

Although i.d. mate II is significantly more expensive, its portability, large database, and ease of use make it an excellent choice as a bar code reader. SCANACAN is a lower-cost option if you don't mind bringing everything to the computer, typing all additional information, and working with three separate databases that in total are significantly smaller than i.d. mate II's single database.

Manufacturers' Comments

En-Vision America

"Consumers interested in the i.d. mate II can be confident that this review has given them a comprehensive summary of the product, its benefits, and its many functions. While the i.d. mate II is a tool which increases accessibility to information, it is the information itself that is of the most value to our customers. This is why En-Vision America is constantly increasing both the number of products in the i.d. mate II database as well as the breadth of information associated with each product. The database is updated every six months. Customers receive their first update free and can receive a copy of the most recent database at any time after that for $50 per request. New versions of the written and audiocassette user's manuals were released in August 2005 and include the most current information and additional help, tips, and ideas for using the i.d. mate II. En-Vision America is continually looking into ways of making this device more compact and plans to address these issues in future versions of the product."

Ferguson Enterprises

"We are working on a new updated Schwan's database that will be provided free to all registered SCANACAN users. The printed manuals that are shipped with the SCANACAN for Windows Deluxe are only related to the bar code scanner, and not the SCANACAN for Windows program. The text version of the manual on the CD-ROM is the manual for the software, and may be printed."


****

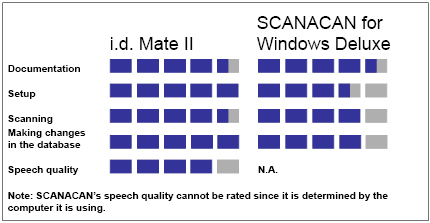
View the Product Features as a graphic

View the Product Features as text

****

View the Product Ratings as a graphic

View the Product Ratings as text

Product Information

Product: i.d. mate II.

Manufacturer: En-Vision America, 2012 West College Avenue, Suite 200, Normal, IL 61761; phone: 309-452-3088; 800-890-1180; e-mail: <envision@envisionamerica.com>; web site: <www.envisionamerica.com>.

Price: $1,599.

Product: SCANACAN for Windows Deluxe.

Manufacturer: Ferguson Enterprises, 205 Joliet Avenue Southeast, De Smet, SD 57231-2411; phone: 605-854-9280; e-mail: <sales@FergusonEnterprises.com>; web site: <www.SCANACAN.com>.

Distributor: Independent Living Aids, 200 Robbins Lane, Jericho, NY 11753; Phone: 800-537-2118 or 516-937-1848; e-mail: <can-do@independentliving.com>; web site: <www.independentliving.com>.

Price: $649.99.

Need a Lift? Accessibility and the New Elevator Control Systems

AccessWorld occasionally reports on the activities of AccessWorld Solutions, the consulting division of the American Foundation for the Blind, which works with corporations and governmental agencies to make their products and services accessible to people with vision loss. The following article is not a product evaluation, but reports on a recent project focusing on the Otis Elevator Company's new destination-based elevator system. It describes the efforts of a producer of mainstream products to make those products more accessible and usable for people who are blind or visually impaired.

Elevator manufacturers have recently been developing new so-called "destination-based" control systems that are designed to expedite the way that elevators are dispatched in tall buildings with multiple elevator cars. With these new systems, instead of pressing an "up" or "down" button to call an elevator, a passenger enters his or her destination floor on an entry device in the hallway or elevator lobby. The system then chooses the elevator car that will most efficiently take the passenger to his or her chosen floor, and the entry device directs the passenger to that particular car. For these new systems to be usable by people who are blind or have low vision, both the input and the output portions of the interface must be accessible. A person must be able to choose his or her destination floor on the entry device independently, and all the output that directs passengers must be conveyed through both easy-to-understand speech and visual displays that are easily viewed by people with low vision.

To ensure the accessibility and usability of its destination-based elevator control system for passengers who have disabilities, the Otis Elevator Company engaged AccessWorld Solutions (AWS), the consulting division of the American Foundation for the Blind (AFB). Otis is the world's largest manufacturer of elevators, escalators, and moving walkways. Elisha Graves Otis introduced the world's first safety elevator in Yonkers, New York, in 1853, permitting architects to design taller buildings that could reach beyond the limitations of stairways. In 2004, Otis asked AWS to evaluate the accessibility features of its new elevator control system and to provide recommendations for making this system more usable for people with disabilities. This article discusses the accessibility features of one destination-based elevator system and the process of collaboration between the manufacturer and AFB's consulting group to make the system accessible.

The Interface

Otis designed two new entry devices for passengers to use to call elevators. One is a keypad-style interface that would be located on the wall near the elevator doors where the "up" and "down" buttons would traditionally be. The other is a kiosk-style touch-screen interface that could be placed elsewhere in the lobby, which could also call the elevator and would have additional functionality, such as a directory. When this system is installed the interior of the elevators would have the standard Open Door and Close Door buttons and the various emergency buttons, but would not have the familiar grid of buttons to press that we currently use to direct an elevator.

The Keypad Interface

The keypad interface features speech-output functionality and has been designed to be accessible to people who are blind or have low vision. It features a telephone-style keypad with 12 keys arranged in the familiar 3-by-4 grid. The keys are large 0.8-inch-square buttons that are amply spaced 0.4 inches apart and that protrude 0.2 inches from the panel. The large 0.7-inch black labels contrast well with the shiny silver background of the buttons. The labels are etched into the buttons to give a slight tactile indication, and there is a substantial nib on the 5 key for orientation purposes. The star key has no function at this time, but the key where a pound key would usually be located is labeled with a dash, or negative sign, and is used to enter negative numbers for floors that are below the main, or ground, level. Below these buttons is a long horizontal Accessibility Function key that passengers who are blind or have low vision can press to enable the speech-output functionality of the system. This key, which measures 3.4 inches wide by 0.8 inches high, is labeled with the image of a person in a wheelchair, the international symbol of accessibility. It also has three substantial nibs in the center that are arranged in a triangle for tactile identification purposes.

Photo of a hand pressing the accessibility button on a keypad mounted in a suitcase.

Caption: Pressing the accessibility button on the keyboard interface in a demonstration unit.

Directly above the keys is the speaker for the audio output, and above the speaker is a small-screen visual display measuring 3 inches wide by 2.3 inches high. The text and numbers that appear on the screen are very large, ranging from a 36-point font to a high of 1.3 inches tall, and they contrast well with the background, alternating from black on white to white on black, depending on the information that is being displayed.

Typically, a passenger who is blind or has low vision first locates a keypad on the wall adjacent to an elevator and presses the Accessibility Function key to activate the speech output of the system. The system responds by saying "Please enter destination floor." The passenger then enters the numbers for his or her destination floor. For example, if the passenger wants to go to the 25th floor, he or she presses the 2 key and then the 5 key. The system responds, saying, "Floor 25." It then announces the car that has been assigned to serve the 25th floor and directs the passenger orally to the car's location. For example, it may say, "Proceed to Car E, to the left rear." All the spoken information is also shown on the display screen in large text, with arrows pointing in the general direction of the chosen elevator. When Car E arrives, an in-car oral enunciator, audible from the lobby area, announces its arrival. The passenger then enters the car, the doors close, and when the car reaches the 25th floor, the in-car oral enunciator says, "Floor 25."

The Touch-Screen Interface

Although the touch-screen interface was not designed to be accessible to passengers who are blind, it does have visual characteristics that make it usable by many people who have low vision. Instead of having mechanical buttons that can be identified tactilely, the touch screen is a flat-panel LCD display with images of the buttons that have to be located visually. Passengers press the area of the panel that corresponds to the image of the button they want to activate. The active area of the touch screen measures 6.3 inches tall by 8.4 inches wide and features contrasting colors with large text in fonts ranging from 24 points to 72 points. The main screen has an image of a telephone-style grid of pressure-sensitive buttons that passengers can press to enter their destination floor. It is similar to the layout of the keypad interface, with large 72-point dark blue numbers on a white background.

Photo of a touch screen with buttons along the left side labeled Lobby, Observation, Gym, and Cafe. A finger is touching the button labeled Gym, which is highlighted.

Caption: The touch-screen interface, with "quick" buttons along the side.

The typical scenario with this touch-screen interface is the same as with the keypad interface, except that all feedback from the system is visual, not oral. The touch-screen display can also be customized to fit the building, with "quick" buttons added for destinations, such as the lobby, gymnasium, restaurant, or observation deck. It can also be equipped with an optional directory button, which, when pressed, allows the passenger to enter his or her destination by selecting a building tenant from a drop-down listing. So, a passenger who wants to visit Dr. Hassenfeffer could simply press the directory button, scroll through the list, and select the doctor's name, and a car will be sent to serve the floor where the doctor's office is located.

Photo of touch-screen directory listing with entries including Abigail's Automobile Associates 3; Abysmal Service Credit Enforcers 4; Architect's-R-Us 5; Billy Bob's Best Bucking Broncos 6.

Caption: The touch-screen interface, with a drop-down directory along the side.

Evaluating Accessibility

The Otis engineers designed this system to move a large number of passengers quickly and more efficiently to their destinations, but they also wanted to ensure that it would be accessible to as many people as possible. In meeting this challenge, Otis sought to develop a system that not only would meet the intent of the accessibility codes set forth by the American National Standards Institute, but would be intuitive and easy to use by passengers with disabilities. The Otis design team spent numerous hours testing various scenarios and making cost and performance trade-offs. Once a preliminary design was finalized, Otis brought in consultants from AWS to test it and to get feedback from end users. One blind accessibility expert and one sighted accessibility expert from AWS traveled to the Otis test facility in Bristol, Connecticut, and conducted a complete review, along with the Otis design team. The AWS consultants were able to use the hardware and to test several scenarios using a functioning elevator in the Otis test tower. They tested numerous variations of the scenarios to evaluate the real-life practicality and usability of the system.

Photo of a woman pressing the accessibility button of a keypad mounted on the inside of a suitcase. The touch screen is mounted on the other side of the suitcase.

Caption: Testing the keypad accessibility on a demonstration unit.

Keypad Interface Accessibility

The keypad interface is essentially accessible and usable, providing easy-to-understand recorded human speech for oral output and clear and effective directions. However, the AWS consultants did suggest some enhancements that could be incorporated to improve the overall usability of the keypad interface, such as these:

  • When the Accessibility Function key was pressed, users had 10 seconds to enter the destination floor before the system timed out and speech output was canceled. The AWS and Otis teams found this time to be too short for a passenger who may need more time to orient himself or herself to the keypad or for a person with a mobility or dexterity disability. So, Otis extended the time limit to 20 seconds.
  • After entering the first digit of a two-digit number for a destination floor, passengers had only 1.5 seconds to enter the second digit before the system timed out. So, if a person who wanted to go to the 29th floor pressed the 2 key and took longer than 1.5 seconds to locate and press the 9 key, the system would log the destination floor as the 2nd floor instead of the 29th floor. Otis extended this time to 3 seconds.
  • When the system orally directed passengers to the appropriate elevator car, it did not noticeably pause between words when giving multidirectional cues. For example, it might string the words left and rear together and say, "Proceed to Car E to the leftrear." Otis enhanced the system to insert the appropriate pause, so the directions are spoken more clearly.
  • When a car arrives to take the passenger to his or her chosen destination floor, it announces only its own name, such as, "Car E." The AWS consultants suggested that the car should also say the floor that it is serving, such as, "Car E, serving Floor 20." They also suggested that the system should alert passengers with the addition of a "Doors Closing" announcement.

Otis will evaluate these suggestions for implementation in the future.

Other suggestions for possible improvements for the keypad interface were the following:

  • If there is a great deal of background noise in the elevator lobby, a passenger may misunderstand the oral instructions produced at the keypad. The addition of a "Repeat" button would allow passengers to replay oral instructions. The unused "star" key could serve that purpose, and adding the braille letter R on that key might also help.
  • Information on how to use the systems could be made available at the lobby or security desks of the building.
  • The voice could announce, or echo, each digit as it is entered.
  • The elevator could have the capability of speaking in multiple languages, possibly using a smart card system in which a passenger would swipe a smart card through a slot in the interface to activate the appropriate language for him or her.

Touch-Screen Interface Accessibility

As was stated earlier, the touch-screen interface was not designed to be accessible to passengers who are blind, and the Otis and AWS teams agreed that this is the most important issue that Otis must address. Although, as noted earlier, there will always be an accessible keypad interface in addition to the kiosk-style touch-screen units, both systems should be accessible, especially since some of the features that are available through the touch screen, such as the directory and the quick buttons, are not available through the keypad interface.

The sighted AWS consultant noticed no problems with glare or the lack of backlighting, but he did make the following suggestions for improving the visual properties and usability of the touch-screen display:

  • Although the colors that are used for text and icons on the display contrast well with the background of the display, there were some instances in which this contrast could be improved, especially on the directory screens.
  • The same time-out issues that were identified with the keypad interface are also present in the touch-screen interface.
  • The AWS consultants suggested adding the instruction "Select destination" to the directory screen and emphasizing the Select and Scroll buttons visually.
  • Although the system beeps to confirm that users have successfully pressed buttons on the main screen, AWS suggested that the beeps should be added to the directory screen as well.

Photo of a touch screen with the display window showing an arrow pointing to approximately 11 o'clock followed by a large letter F with a small number 5 positioned directly above it.

Caption: The touch-screen interface showing car F at the left rear going to the 5th floor.

Other suggestions for possible improvements in the touch-screen interface include these:

  • The touch screen has good contrast, but the display uses a shadowed font that makes the contrast less clear. The shadow bordering the text and numerical characters is small, but removing it should greatly improve the quality of the contrast.
  • The directory button should be made larger and moved slightly on the display, as it was too close to another control. It was only half an inch in diameter and only one-eighth of an inch away from the other control.

Essentially, the keypad interface makes Otis's destination-based elevator system accessible for a passenger who is blind or has low vision. However, some of the tweaks and enhancements that were mentioned in this article could certainly improve the overall usability of the system.

Of course, the major enhancement that is necessary is to redesign the touch-screen interface to be accessible, so that passengers who are blind or have low vision can use both interfaces and take advantage of the extra functionality that is found only with the touch screen. Beyond these enhancements, awareness is the other real major issue. As long as a passenger who is blind or has low vision is aware of the process of calling an elevator with this system, there will be no major problems.

A problem may arise if a person walks into a building that is equipped with a destination-based system without being aware of how to use it. A person who is looking for the familiar control pad with an "up" button and a "down" button will be confused to find the Otis keypad interface instead. In addition, if an individual in the elevator lobby of a destination-based system heard the familiar "ding" followed by the sound of the elevator doors sliding open, stepped into the elevator, and felt around for the traditional buttons to choose a destination floor, he or she would be out of luck because those buttons wouldn't be there. AccessWorld Solutions suggested that a Help button with a braille label be added to the interior of the car which would produce a verbal message telling passengers to exit and use the keypad in the lobby to enter a destination floor.

These new scenarios may be confusing for a while. However, it is easy to imagine the confusion that must have occurred a few decades ago when the once-commonplace human elevator operator was replaced by buttons that automatically called and directed elevators. It no doubt took some time for the general public to get used to the change then, and it will likely take some time for passengers to get used to this new system as well.

Tools of the Trade: Tips That Can Make You a Better Trainer Right Now

So you are ready to go out and start training end users in how to use assistive technology (AT). Of course, you know AT backward and forward. It should be easy to impart that knowledge, right?

Maybe. There is a big difference between showing a person how to do something and teaching him or her how to do something. When you show someone, you take him or her through the steps that are needed to accomplish the task, and then you are done. When you teach someone, you introduce the idea, take the person through the steps, assess whether the person has understood the information, and adjust your training depending on the results of the assessment.

Unfortunately, when it comes to technology training, most of us show, rather than teach. So how do you bring your training skills up to the level of teaching?

Lesson Plans

First, have a plan. Whether you teach one student or a group, you need to have a well-thought-out plan. In the field of education, this is called a lesson plan. A lesson plan helps guide you throughout the lesson, keeps you from going off on a tangent, provides a framework for you, reminds you of materials that you need to bring, and provides a framework for assessing your students' work.

Second, test your student's knowledge. This is often the most overlooked step in training AT users, but it is one of the most important. Testing a student's knowledge provides several important benefits:

  1. It lets the teacher know if the student has understood and actually learned what was taught.
  2. It helps the student retain more information. When students are tested on skills, they remember more than if they are not tested.
  3. It provides the teacher with an objective measure of what the student has accomplished.
  4. It is easy to document what the student has learned and how well the student has learned it.

Third, repeat yourself. Behavioral and educational researchers have confirmed that repetition is necessary for retention. Even though the student seems to remember the skill the moment you teach it, without repetition, the skill will not move from the student's short-term memory to the student's long-term memory.

How to Write a Lesson Plan

There are five elements in a good lesson plan: objectives, materials, procedure, assessment, and review.

Objectives

In this section of the lesson plan, you clearly state what the objective of the lesson is. For example, if you want to teach a student how to save and print in this lesson, the objective may be, "Upon completion of this lesson, the student should be able to save a file to the My Documents folder and print the contents on a printer."

Share the objectives with the student before you begin to teach. Good teaching means that students know what they are attempting to achieve and what is expected of them in the class. By providing the objectives to a student in advance, you give the student a framework of expectation that helps him or her learn and retain information better.

Materials

It is always a good idea to include a list of materials with every lesson plan. This list can serve as a quick guide to help you remember to bring important materials and sample files. The materials may include a vocabulary list, a hot-key list, sample files, software, and hardware.

Always try to have at least one handout for your students to work with. People learn best when they receive the information in more than one way. A good lesson includes oral instruction, hands-on experimentation, and documentation for the student to read.

Procedure

The procedure should be a plan for what, exactly, you want the student to do to learn the stated objectives. It should outline what steps the student will need to take. For example, you should provide sample files for the student to use, so that the student does not have to waste a great deal of time typing just to learn to cut and paste. Try to have your lessons incorporate skills that the student learned in previous lessons as a way to reinforce these skills.

You also need to be on the lookout as you write your procedure for any new terms that you will be introducing and any keystrokes that are important for the lesson. You should review these terms and keystrokes with the student before you start the lesson. Doing so helps the student understand the "language" of computers, so when you start talking, it will not all sound like gibberish.

Assessment

In an assessment, you test both the student's knowledge and your ability to teach. The assessment should be a planned activity that the student performs on his or her own using his or her notes. Make sure that the activity does not require skills that you have not covered yet. You should plan how you are going to grade the assessment. I find that it is easiest to use a scale of 0–4. Zero means that the student could not do the activity at all and could not even remember having learned it; 1 means that the student can do it with a lot of help from the instructor; 2 means that the student can do it with a little help from the instructor; 3 means that the student can do it by referring to notes; and 4 means the student has totally mastered the skill.

During the assessment, you will also get the opportunity to see what part of your lesson plan works and what part does not. If your students consistently do not score well on the assessment, this is a clue that you need to review the procedure you are using. If only one or two students seem to have a problem, you may want to look for an alternative way to teach the skill to them.

The results of the assessment should be written down, so you can refer to them later, if necessary. Keeping a record of the results also helps if, for some reason, another instructor is asked to work with the same student. With a record, the other instructor will know exactly what the student learned and where to pick up the training session.

Review

Once a lesson is complete, you are not finished teaching the skill. In each additional session, always go back and review the previous session with the student. This review will help the student retain the information over the long term. Spend at least 10 minutes at the beginning of each session going over what you covered the last time you met. It also helps to incorporate skills that were learned in the previous lesson into the current lesson to reinforce these skills. For example, if last week the student worked on printing and saving and this week he or she will work on formatting, ask the student to print and save the newly formatted document.

Getting It All Together

You may think that you simply do not have time to create a lesson plan for every skill that you teach. The easy way to implement the use of lesson plans is to do it gradually and to share the task with other trainers whom you know and trust.

If you just commit to putting one lesson per week on paper as a lesson plan, you will have 52 lessons completed by the end of the year. Work together with a partner, and that number will double to 104 lessons.

Save your lessons and materials in a large loose-leaf binder or create a folder of lessons on your notetaker or computer. Eventually, you will have a selection of lessons to choose from, and your students will thank you for it.

How to Buy a CCTV

Buying a portable or desktop closed-circuit television (CCTV) is a costly venture for most people. Although the prices of various CCTVs are generally comparable, users should be prepared to do their own price and product comparisons before they purchase a CCTV. Costs aside, there are several factors that you should consider before you purchase a CCTV, whether for yourself or if you are assisting another person to purchase one.

First, it is essential to undergo a comprehensive clinical low vision evaluation to determine your visual functioning. During this assessment, the vision specialist (an optometrist, ophthalmologist, or another professional with expertise in visual impairment) can determine how your visual functioning can be enhanced through the use of optical devices (such as hand or stand magnifiers and prescriptive lenses) and nonoptical devices. Some low vision clinics also conduct adaptive technology assessments, including assessments of the use of CCTVs.

Aside from the obvious personal benefits of having your vision thoroughly evaluated, an assessment is also an opportunity to experiment with several low vision devices that may otherwise be unavailable to you. It is important to try out various devices because what appears to be a good product is sometimes not as good as you thought it might be before you tried it. In this "how to" article, you will discover what you need to know to purchase the best CCTV to meet your (or your client's) needs.

Understanding the Eye Condition

It is essential to understand your eye condition. Most users expect to be able to use a device for several years. Therefore, the CCTV that you purchase should be able to meet all your visual needs, whether your vision will worsen over time or remain stable or if secondary complications arise.

  • If you have a progressive eye condition, consider a desktop CCTV that is able to magnify up to at least 20X or 30X magnification to meet your need for larger letters as the condition worsens. This magnification should serve your needs until you reach a near visual acuity of approximately 20/600 or greater. However, if extreme magnification is needed, you may wish to consider an alternative reading medium to print, such as braille, speech output, audiotape, or DAISY-formatted reading materials.
  • If you are sensitive to light, consider CCTVs that have a dimming feature and a reverse polarity feature (the majority of CCTVs have both these features).
  • If you are unable to perceive color, then purchasing a color CCTV is a waste of money because color CCTVs are usually more expensive than are black-and-white CCTVs.
  • If you have poor eye muscle function, purchasing a CCTV that can manipulate the text in a way that requires only limited movement of the eyes (such as single-line continuous text movement across or down the center of the screen) would be appropriate.
  • If you are extremely sensitive to glare, an LCD (liquid crystal display) panel or monitor will likely have less glare reflecting off it than a monitor that has a glass covering. Also, if the monitor can be angled differently, you can manually manipulate the amount of glare that is reflected off the screen by tilting the monitor. Tube monitors typically cannot be tilted, whereas LCD panels typically can be tilted much more easily.

Intended Uses

How and where you plan to use the CCTV will influence the type of CCTV that should be purchased. The majority of persons with low vision use CCTVs for accessing print materials at work or at school and for leisure reading. The general rule of thumb for prolonged reading tasks is to use a desktop CCTV with a large monitor, so you can see several words and lines of print on the monitor at one time. For short-term reading tasks like reading a menu or looking up a telephone number, a portable CCTV is sufficient.

  • If you intend to engage in prolonged reading tasks, it is better to buy a desktop CCTV, so more text is visible on the screen at one time. Also, a larger monitor can help reduce eye fatigue and strain by enabling you to focus on several enlarged words at the same time, rather than to read a word letter by letter on a portable CCTV with a much smaller screen.
  • If you intend to use one location as a reading-and-writing station, a desktop CCTV is suitable. With a desktop CCTV, you bring reading materials to the CCTV, rather than bring the CCTV to where the reading material is. For example, in schools, students tend to have their desktop CCTVs in a resource room or library--they leave their classes and bring the reading material to the CCTVs to complete their reading tasks. Similarly, adults with low vision who are in the workforce usually keep their desktop CCTVs in their work spaces, closest to where they are required to do most of their reading and writing. At home, many elderly people with low vision keep their CCTVs in the living room, family room, or study because these locations are usually where they engage in leisure reading activities.
  • If you need to move from one location to another (at school or in the workplace) to complete reading and writing tasks, then a portable CCTV may be the most suitable in any setting.
  • If you want to connect the CCTV camera to a computer (for example, to obtain split-screen viewing of a book or manual while you are working on the computer), the CCTV that you need to purchase must include a video cable that can be connected to your computer system. Not all CCTVs have this capability, and most portable CCTVs do not.
  • If you are an elderly person who wants to be able to perform only simple literacy tasks (such as reading an issue of TV Guide or checking labels on medicine bottles), an elaborate CCTV that has lots of control switches and the ability to connect to a computer, for example, may not be necessary. A desktop CCTV that simply enlarges print material is likely to be all that you will need.
  • For young children with low vision, a CCTV must be able to stand up to impatient hands. An LCD panel may not be the best monitor for young children because young children tend to want to touch or poke at the monitor. A tube monitor may hold up better than an LCD panel to intentional or unintentional misuse. However, a large-tube CCTV monitor can be dangerous if a child accidentally knocks it off a table or a desk.

Individual Preferences and Differences

All people have preferences for how far away they sit from a monitor, what type of chair they like to sit in, how they position their feet when they are reading or writing, how large the desktop or table is, and what sort of lighting they like to have when reading or writing with a CCTV. These preferences will influence whether they use the CCTV efficiently and comfortably. In some cases, the monitor may be too high or the X-Y table may be too low if users are unwilling or unable to modify their surroundings (by, for example, changing the height of the desk or chair).

  • If you prefer a rigid chair or a table that does not adjust in height, the CCTV must be positioned in a way that will enable you to view the monitor comfortably. If your head is tilted upward to see a monitor that is positioned on a desk or table that is too high, neck strain will result. Consequently, a higher chair may be needed to bring your body into better alignment with the monitor. Similarly, if the monitor is too low, neck strain will also occur; in this case, a lower chair may be needed.
  • If you sit in a wheelchair, an LCD monitor that is separate from the camera and X-Y table could be placed on the wheelchair's tray table. You can then see the monitor from a reasonable distance while your hand manipulates the X-Y table on a different work surface to the side of the wheelchair. However, good manual dexterity and physical strength are needed for such a system to work effectively. In some cases, another person may have to manipulate the reading material under the camera so you can concentrate on reading what is on the CCTV monitor. A tube monitor is far too large and heavy to be placed on a wheelchair tray.
  • For young children whose feet dangle from the chair because of their small stature, it is important to ensure that the table and chair are at the correct height for the placement of a CCTV monitor. Also, providing a footrest or footstool upon which a child can place his or her feet will "ground" the child and give him or her a sense of security in that position. However, most desktop CCTVs are too tall for young users. LCD panels that have a tilting feature can be angled so that small children are better able to see the monitor more comfortably.
  • For users who are young, elderly, or cognitively challenged, elaborate CCTVs with lots of buttons and switches can impede their ability to use them independently. Sometimes, simple is better, especially if an individual is used to a certain type of CCTV.

Reading Needs

When you use a CCTV for reading, it is important to think about how much reading you will do with the device and the type of reading tasks that you typically undertake. Where the majority of the reading tasks take place is also important because environmental factors, such as lighting conditions, the height of the table and chair, and the availability of space can affect how well the CCTV works for you.

  • If you intend to use a CCTV for prolonged reading tasks, it is best to purchase a desktop CCTV. As was mentioned earlier, a large-monitor (tube or LCD panel) desktop CCTV can display more words at one time than can a portable CCTV with a smaller display. Given comfortable seating and a table or desk of a suitable height, you can generally use a CCTV for prolonged reading tasks (such as more than 30 minutes at a time) with minimal visual discomfort. However, using a portable CCTV for prolonged reading tasks will likely result in visual fatigue because typically (depending on the level of magnification) only one or two words are visible on the display at a time, which forces you to work harder to keep focused on the line of print and to maintain your place on the page.
  • If you intend to use a CCTV primarily for short reading tasks, a portable CCTV will be sufficient. Many portable CCTVs are now small enough and light enough to fit in a shirt pocket or purse with ease. Filling in forms, reading labels on files, and checking an address in an address book are examples of daily living tasks that can be accomplished by using a portable CCTV. It is important to note that a handheld magnifier can also be used to complete these tasks if the magnifier enlarges print to the necessary size. A magnifier may therefore be a better and cheaper alternative to a portable CCTV. However, they do not have the ability to reverse the polarity of print (such as from black print on white paper to white print on a black background). The ability to reverse the polarity of print may be a feature that users need to read comfortably and efficiently--a portable CCTV can change the foreground and background colors, thereby making it a better choice than a magnifier for some users.

Writing Needs

When you purchase a CCTV, it is important to remember your writing needs, as well as your reading needs. Having ample clearance between the camera and the writing surface is important in both portable and desktop CCTVs. If you have the opportunity to test several CCTVs, it is imperative that you try to write under the CCTV. It may turn out that the CCTV in question is great for reading tasks but awful for writing tasks.

  • If you intend to write for a prolonged period, a desktop CCTV with ample clearance between the X-Y table and the monitor and/or camera mount is preferable. How the CCTV is positioned is also important, since one component of the task is often sacrificed for the comfort of the other. That is, depending on the type of CCTV being used, if the monitor is placed at eye level, the X-Y table may be too low to write comfortably. If you adjust the height of the table to make writing more comfortable, then the monitor may be too high. Finding a desktop CCTV that includes a height-adjustable monitor will solve this problem.
  • If you intend to write for short periods in various locations, a portable CCTV is suitable. However, since many portable CCTVs are not designed to provide clear magnification when writing, you need to try out various models before you purchase one. Given that you must hold the portable CCTV in one hand while writing with the other hand, the task can be difficult if you want to write several lines; for example, the paper may slip, and you may not be able to keep the camera focused on the tip of the pen.

Size and Weight of the CCTV

Many styles of desktop and portable CCTVs are on the market. The introduction of LCD panels has changed the overall look and design of CCTVs because the monitors are much thinner and lighter than the traditional tube monitors. Before you decide which type of CCTV to buy, you need to consider the size and weight of the device. For example, not all apartments, classrooms, and offices have enough room for a 21-inch tube monitor, and not all portable CCTVs are small enough to fit into a purse.

  • If the amount of space that is available for a CCTV is limited, consider purchasing a CCTV with an LCD monitor.
  • If you anticipate having to move the desktop CCTV from one location to another every so often, consider buying a lightweight CCTV. Again, CCTVs with LCD panels tend to be lighter than those with tube monitors.
  • If you need a portable CCTV, make sure that it is light enough to be carried in a purse, backpack, briefcase, or pocket. Although there are many types of portable CCTVs, some are more portable than others.

The Bottom Line

Many factors need to be taken into account when you decide which CCTV to purchase. It is important to understand your or your client's visual functioning and needs, as well as how you or the client intends to use the CCTV. If possible, persons with low vision should try out several CCTVs, both portable and desktop, so they can make informed choices. Weighing the benefits and drawbacks of the devices according to the factors discussed in this article should help them make a wise decision.

Not What the Doctor Ordered: A Review of Apple's VoiceOver Screen Reader

This article reviews VoiceOver, the new screen reader for the Macintosh OS X operating system from Apple. Apple released version 10.4 of the Macintosh operating system, named Tiger, on April 30, 2005. VoiceOver is now installed on every Apple computer that is shipped and is included in software upgrades. This fact will eventually make VoiceOver the most widely available screen reader in the world.

Apple began to develop VoiceOver after ALVA discontinued outSPOKEN, the only previously available screen reader for the Macintosh, in June 2003. VoiceOver was tested on a Powermac g4 laptop computer with 512 DRAM (dynamic random access memory).

The Apple Keyboard

Most of the keyboard on an Apple computer is the same as a keyboard on a PC, but there are some important differences. On the laptop that was used for this article, the bottom row of the keyboard consisted of the following keys from left to right: the Function key, the Control key, the Option key, a Command key (with the well-known Apple logo, a picture of an Apple with a bite taken out of it), the space bar, another Command key, and the Enter key. Apple keyboard commands often include the Command key, such as Command-Q, to quit an application. The Control key is also used; for example, Control-F2 is the menu command.

VoiceOver commands involve holding down the Control and Option keys and pressing another key or two at the same time. Control-Option-Shift-? opens VoiceOver help, for instance.

Getting Started and Getting Help

The only documentation that is currently available for VoiceOver is on the Macintosh computer itself, and there is a list of commands in a partially accessible PDF (portable document format) document on Apple's web site. Thus, it is difficult for a beginner or someone who is not familiar with the Apple keyboard to get started. Apple says that every computer that includes VoiceOver will come up talking the first time you turn it on. This did not happen with the computer I received, and there are a number of reasons why you cannot count on it doing so. The volume on the machine could be turned down, for example, or a key could be hit inadvertently as the computer boots. I was not able to start to use VoiceOver until I found someone who knew how to use the program. The current arrangement is not acceptable. Some sort of Quick Start guide must be available both on Apple's web site and by request from Apple in an accessible format.

The current online help provides snippets of information. I was not able to find a manual to read.

The equivalent of the Windows desktop on Apple computers is the Dock. You get to the Dock with VoiceOver by pressing Control-Option-D. Then you can arrow through the available applications. VoiceOver tells you when you arrow to an application that is running currently. You launch a new application by pressing Enter on it.

Text Edit

Text Edit is the simple word processor that comes on all Macintosh computers. This is the application in which VoiceOver performed best. It is possible to write and edit documents, cut and paste text, and save documents as files in rich text format. This editor does not include a spell checker or other advanced word-processing functions.

Browsing the Web

The Macintosh browser is called Safari. It is not easy to use Safari with VoiceOver. When you first get online and open the browser, you are on Apple's web site. However, this fact is not apparent to VoiceOver users. As you read down the page, you hear a list of web sites, such as Google, Yahoo, and CNN. If you press Enter on one of these web sites, the computer loads that site and sounds a musical chord, indicating that the site has loaded. If you scroll down the page with VoiceOver, however, you hear the same list of web sites. You would never know that you were on a new page if you did not know what you must do next.

The way actually to access a web page is to navigate to the line that says "HTML content." Then, rather than continuing to scroll down the page by pressing Control-Option-Down Arrow, you press Control-Option-Shift-Down Arrow. VoiceOver says "interact with HTML content." You can now move around on the default home page <www.apple.com> or a web page that you have chosen to visit.

You can type in a web address by pressing Command-O. You can also bring up a list of the links on a page and then type the first letters of the link that you want. The cursor will jump to that link, and you can press Enter.

Basic browsing on friendly, accessible sites, such as AFB's web site <www.afb.org>, was tedious with VoiceOver. Visiting less friendly sites was frustrating and difficult. VoiceOver has none of the bells and whistles that users of Windows screen readers are used to. There is no simple command to read an entire block of text, such as a newspaper article. You cannot press a letter and jump to a heading, frame, or link. You cannot search for a text string. You must browse by hand, constantly pressing the Control and Option keys, along with arrows. This procedure quickly gets tiring.

The Bottom Line

Using VoiceOver was disappointing and frustrating. The product was apparently rushed onto the market and is not ready for prime time. VoiceOver has none of the tools that users of screen readers have come to expect. A person who is blind or has low vision cannot expect to perform daily tasks fast enough or accurately enough to keep up with his or her sighted colleagues or even enjoy using a computer. Apple must make major improvements in documentation and usability before VoiceOver can be considered a viable product.

Manufacturer's Comments

"Apple ships documentation for Macintosh in the form of online help and provides additional information on its web site. For VoiceOver, Apple also includes a unique Quick Start built into the setup assistant software that runs the first time you turn on a new computer. Since the release of Mac OS X Tiger, and based on customer requests, Apple has released a stand-alone application called VoiceOver Quick Start that allows you to replay the VoiceOver tutorial contained in the Setup Assistant application. This application can be used to revisit the material as often as you'd like, and can also be used by instructors as a teaching tool. The information contained in the tutorial introduces a new user to important VoiceOver concepts, the Macintosh keyboard, basic navigation, and commands that will enable the user to set up their computer and use the online help system to learn more. The VoiceOver Quick Start and manual can be downloaded from <www.apple.com/accessibility/voiceover>.

"Tiger introduces a new feature called Spotlight that can also be used to open applications (press Command-Space to activate it). Spotlight is able to find items by name, content, or keyword. It only takes a second or two to search large multi-gigabyte hard drives, and many Macintosh users find Spotlight to be the fastest way to find and open an application or document no matter where it's stored on the computer. Because Spotlight is text-based, many VoiceOver users find it to be more convenient than the Finder for locating and opening documents, folders, and applications on the Mac.

"You can have VoiceOver read an entire web page (press Control-Option-A when you hear 'HTML content,') or read the current 'article' (press Control-Option-W while you're interacting with the HTML area). You can also change the navigation mode using the VoiceOver utility, so that related areas on the page are grouped together for faster navigation. When you find a group of interest, you can navigate into the group (Control-Option-Shift-Down) to interact with and read its contents. There's also a link list menu so you can move the VoiceOver cursor quickly to any link on a page (press Control-Option-U when you hear 'HTML content') and then click the link to go there (press Control-Option-Space while on the link)."


Product Information

Product: VoiceOver.

Manufacturer: Apple Computer, 1 Infinite Loop, Cupertino, CA 95014; web site: <www.apple.com/accessibility/voiceover>.

Price: Included in Mac OS X, which costs $129.

Untangling the Wireless World

These are certainly the days of portability. Cell phones, laptop computers, personal digital assistants (PDAs), and MP3 players are all battery-powered devices that we can carry around with us to provide productivity and entertainment on the go. Many of these devices are able to communicate with other equipment, frequently without the need for wires. Wireless connectivity is all the rage, but the variety of wireless technologies can easily overwhelm you. Just what is Bluetooth good for? Do I need an infrared port on my PDA? How can I connect to the Internet without wires? The answers to all these questions can help you to select a portable computer, cell phone, or other device, but it can be difficult to sort out the pieces of the connectivity puzzle. This article removes some of the mystery from the strange-sounding names in the connectivity game. I begin by discussing infrared, a technology that has been in existence since the advent of modern television remote controls and has proved surprisingly useful in moving data between pieces of computer equipment. Then I explain Bluetooth, Wi-Fi, and Wimax, all of which use high-frequency radio waves to get the networking job done. Finally, I tell you a little about how to put the different technologies to use. Hang onto your keyboard. Here we go!

Infrared: The "Light" That Talks

Infrared wireless technology has been with us for many years. It is what permits your television remote control to turn your television on and off and to change channels. Infrared radiation is similar to visible light, but its wavelengths are too long for the human eye to see. The fact that infrared radiation is similar in wavelength to visible light means that it behaves much like visible light. Infrared tends to be "line of sight," which means that it does not transmit around corners well and does not pass through walls. This fact limits infrared's uses, but it also means that infrared signals are hard for someone at a distance to intercept.

Typically, a device that is capable of infrared communication will have a small lens that is located somewhere on its outer surface, in a place where it is fairly easy to aim the infrared port at other infrared-capable devices. Infrared ports usually have both a transmitter and a receiver, so that two gadgets can "talk" and "listen" at the same time.

So what is infrared used for in the world of today's portable devices? Well, actually, there are a surprising number of situations in which line-of-sight connections between devices can get the job done. Laptop computers and PDAs can transmit files back and forth just by having their infrared ports pointed roughly at each other (and having the right commands given to the two devices to start the data transfer). E-mail and address books can be synchronized between a portable computer and your desktop. Electronic "business cards" can be exchanged between computers without the need for cables. There are also microphones, headsets, modems, and printers that can be connected using infrared links. Where the distances are relatively short and direct, infrared is a solid, reliable, and secure option for a variety of communications.

Bluetooth: The Networker from the North

Bluetooth was the nickname of a Viking king of the early 900s. King Bluetooth is famous for having unified the people of the Danish region of Europe. Bluetooth is now also the name of a short-range wireless technology that is intended to "unify" (or, at least, connect) electronic devices into little networks that cooperate automatically.

Bluetooth is amazing for its flexibility and ease of use. Put a Bluetooth headset near a Bluetooth cell phone, and the two will strike up a conversation, allowing the headset to act as the mouth- and earpiece for the cell phone--all with no wires and low transmitter power, as little as a milliwatt. Put a Bluetooth computer near a Bluetooth printer, and the two will recognize each other and know how to handle printing your latest novel. Bluetooth devices cooperate by forming little networks of from two to eight devices, with one network member acting as the main controller or "master." This master invites other Bluetooth devices in the area to join the network as "slaves." Again, all this happens automatically, with minimal setup on the user's part. Clearly, Bluetooth permits equipment to connect for a wide variety of purposes. As the newer and faster Bluetooth version 2.0 standard becomes widespread, it is likely that more audio components and household appliances will be able to work together wirelessly over Bluetooth.

You Talk Too Much

The downside of Bluetooth, ironically, is also its greatest strength: its readiness to strike up a conversation with any other Bluetooth device in the area. Go to a crowded place with your Bluetooth-equipped cell phone, and you may find that someone else's headset is suddenly connected to your phone. Of course, you, too, could find your own Bluetooth equipment unexpectedly connecting to someone else's equipment as well. This is radio, after all, and radio signals do not always do what you expect.

Wi-Fi: Networking Without Wires

Wi-Fi stands for "wireless fidelity." Wi-Fi is a set of high-frequency radio standards for networking computer equipment over distances of up to a few hundred feet. Wi-Fi has some similarities to Bluetooth in that it also uses high-frequency radio signals to connect devices. However, Wi-Fi is used more specifically to create local area networks (LANs), such as are used in offices, or to permit home computers to share files, printers, or Internet connections. Where network cables or telephone lines have traditionally been used to connect a computer to a LAN or the Internet, Wi-Fi offers a more flexible option. Wi-Fi has become so popular as a way to get on the Internet that many businesses and communities have set up Wi-Fi connection points, known as "hot spots," as a service to their customers and visitors. The term Wi-Fi was coined by an organization called the Wi-Fi Alliance, which certifies Wi-Fi products for their compliance with its standards. As Wi-Fi standards have evolved, several variations or "flavors" of Wi-Fi have developed. This is an important point because it affects whether a Wi-Fi device will be able to work on any particular Wi-Fi network.

Security Is Vital!

Many people use Wi-Fi to form their home computers into small networks. It is important to ensure the privacy of such a network by using one of the available privacy techniques, such as wired equivalent privacy (WEP) or Wi-Fi protected access (WPA). WEP is widely available, but it is significantly more vulnerable to eavesdropping than is the newer WPA. As you can imagine, the more you use your wireless connection, the more prone it is to eavesdropping. A newer refined encryption standard, known as IEEE 802.11i or WPA2, was ratified as a draft standard in June 2004. It uses improved encryption compared to WPA and was designed specifically to address the weaknesses of WEP. At this writing, however, it is difficult to find products that feature support for WPA2, so WPA seems to be the security standard of choice at present.

Wimax: Wireless Broadband in the Works

Wimax is a coalition of players in the wireless networking business. Like the Wi-Fi Alliance, this group has worked to advance standards in wireless networking, but in the case of Wimax, the intent is to develop standards for access to broadband networks over longer distances--up to 30 miles. Wimax is considered to be a particularly attractive option for providing Internet access to rural areas, where cable and other wired options may be hard to come by. However, Wimax products are only beginning to appear, and it remains to be seen just what role Wimax will play in the overall wireless networking game.

Making the Connection

I have described a number of types of wireless connectivity. Now I will discuss how a person may take advantage of these different networking options.

Infrared ports have been available on computers, especially laptops and, more recently, PDAs, for several years. They are usually built into a device and use a lens on the surface of the case to talk to other devices. Other infrared-compliant appliances generally have the infrared built in, and the devices generally need to point roughly toward one another to communicate. You should be able to tell if a piece of equipment includes an infrared port by reading the system's specifications. Infrared is used a lot to share files and contact information between computers. For example, businesspeople in a conference room will often pass documents to one another via their infrared ports. Infrared can offer a quick connection to a printer as well. An interesting application of infrared is the program being developed for the Freedom Scientific PAC Mate PDA that will allow it to act as a television remote control, taking us full circle to where infrared began, in a way.

Bluetooth is truly the no-muss, no-fuss option for connecting equipment that has a reason to work together. You could think of Bluetooth as being, for portable devices, what plug-and-play was supposed to be for the personal computer. Bluetooth-capable equipment, such as telephones and headsets, typically have the Bluetooth capability built in and included in the specifications. Add-on Bluetooth cards may or may not be needed to add Bluetooth to a computer. HumanWare's BrailleNote PK has Bluetooth capability built in, while Freedom Scientific's PAC Mate can have Bluetooth added by using a CompactFlash plug-in card.

If you want to build a network of computers without stringing wires, then Wi-Fi is the obvious choice. Wi-Fi is usually an optional add-on for computers. Several companies sell plug-in Wi-Fi cards. For home networking purposes, a device, such as a wireless router, is generally needed to connect to the Internet and to give the computer something to connect to. As I mentioned earlier, it is important to pay attention to what types of Wi-Fi are supported by a card or router. Read equipment specifications carefully to ensure that the devices that you want to communicate with each other are capable of the needed type of connection and wireless security protocol. This way, your connection will work effectively and will be protected from anyone in the vicinity who may want to listen in on your network.

Wimax is still a while off as an option for most of us, and it remains to be seen just how effective it will be as a long-distance networking option. Your best bet is probably to keep up with the news and the electronics catalogs and web sites to see what role Wimax will play in the years ahead.

Wireless connectivity is popular both in freeing us from our desks and in reducing the unsightly clutter of crisscrossing bundles of wires. As with older wireless media, such as radios and cell phones, we need to ensure that the connections we set up are effective and that we are avoiding unwanted eavesdropping and interference. One thing is sure: Wireless options will only increase in the years ahead.

For More Information

Here are some web sites with good information on wireless networking:

  • <www.whatis.com> contains definitions and background articles for all the wireless technologies discussed in this article.
  • <www.wi-fiplanet.com> contains business information and articles on Wi-Fi and Wimax.
  • <www.networkworld.com> contains late-breaking news and articles on networking technologies and concepts.
  • <www.wikipedia.org>, a user-edited, free-of-charge encyclopedia, contains remarkably in-depth articles on the different networking standards.

AccessWorld News

Web Classes on Book Port

The American Printing House for the Blind is offering seven webcasts on using their popular reading device, Book Port. Sessions began July 12, 2005, and will run every Tuesday at 1:00 p.m. EST through August 30. Each session focuses on a particular aspect of using the device--from sending and organizing files, to navigating text files, to note taking or recording, and more. Sessions run about 45 minutes in length. To participate, send an e-mail to Maria Delgato at <mdelgato@aph.org> no later than noon of the Monday prior to the session for which you wish to participate.

BrailleNote in a New House

HumanWare introduced its latest addition to the BrailleNote family of products in July at the National Federation of the Blind and American Council of the Blind conventions. Called the BrailleNote mPower, the unit looks and feels much like the earlier BrailleNotes, but has an entirely new and updated package of features. Among them are additional storage capacity, connectivity that now includes USB ports, Bluetooth, a media player that boasts excellent stereo sound, faster Internet connections, and even an onboard voice recorder. Like other products in the BrailleNote collection, mPower will be available in both 18- and 32-cell versions, as well as voice-only units. A special option is being offered to customers who would like to "transplant" existing BrailleNote displays into a new mPower for a significant price reduction. For more information, contact: HumanWare; phone: 800-722-3393 or 925 680 7100; web site: <www.humanware.com>; e-mail: <us.info@humanware.com>.

Enhanced Conversations for Deaf-Blind Pac Mate Users

With the release of Pac Mate 3.0, Freedom Scientific has announced new solutions to communication for deaf-blind users. The ability to incorporate messaging and TTY software with the Pac Mate's refreshable braille displays can make communication easier "in the classroom, over the Internet, via telephone, and face-to-face."

With the new release, all AOL Instant Messenger features will be accessible with braille only. All features in AIM (AOL Instant Messenger) version 2.0, including message review and managing the Buddy List, are now available. With a Pac Mate's braille display, a deaf-blind user can hold a conversation over the Internet or across the room with anyone typing over a wireless connection or can contact a telephone relay service and communicate as a sighted deaf person would using a telecommunications device for the deaf (TDD). For more information, contact: Freedom Scientific; phone: 800-444-4443 or 727-803-8000; web site: <www.freedomscientific.com>.

Technical File Available on FTP

The Smith-Kettlewell Technical File, a quarterly journal offering how-to and other information on technical and engineering topics for people who are blind or visually impaired, has been made available through an FTP site. Article topics include a series on soldering techniques, instructions for building basic electronics, information on integrated circuits, and other similar material. Eventually, the organization plans to put files in HTML (hypertext markup language) format for easier browsing, but says that the files are quite usable now-- if one takes time to read the readme.txt file. To access the files, go to: <ftp.ski.org/pub/Rehab/Fowle>. (Note that the address is case sensitive.) For more information or assistance in accessing these files, contact Tom Fowle at the Smith-Kettlewell Rehabilitation Engineering Center; phone: 415-345-2123; e-mail: <fowle@ski.org>.

PowerPoint Tutorial

The Iowa Department for the Blind's Project Assist has developed a tutorial for learning to use Microsoft's PowerPoint successfully with the JAWS for Windows screen-reading software. The tutorial provides JAWS keystrokes and step-by-step explanations for creating and running PowerPoint presentations, including such elements as how to insert sound and video clips, import data from Word or Excel files, make tables, create outlines and print handouts, and add text animation and slide transition effects. The tutorial promises to provide a comprehensive introduction to using this popular software for making professional, attractive presentations. For more information, contact: Project Assist, Iowa Department for the Blind; phone: 515-281-1305; TTY: 515-281-1355; e-mail: <ASSIST@blind.state.ia.us>; web site: <www.blind.state.ia.us/assist>.

Access Award Nominations

The American Foundation for the Blind is currently calling for nominations for the 2006 Access Awards. The Access Awards honor individuals, corporations, and organizations that are eliminating or substantially reducing inequities faced by people who are blind or visually impaired. Nominations are due by September 30, 2005. For more information visit <www.afb.org/AccessAwardguidelines.asp>.

Always Seeking Innovation: An Interview with Curtis Chong

I am sitting in the lobby of the Los Angeles Airport Marriott with Curtis Chong, beginning the second phase of the interviews that will become this article. He is relaxed and self-confident--the rare individual whose brilliance places him in high demand and whose engaging manner makes you feel that he has all the time in the world. Interruptions are inevitable, positioned as we are in the midst of a major assistive technology (AT) conference, but Chong handles them easily and slides back into our conversation.

A self-described bureaucrat who never thought he would be one, Chong has the kind of reputation in the field of AT for people who are blind that can be earned only with talent. In his 30-year career, in fact, he has technically been employed in the field of AT for only one five-year stint, but his roots in the field go deep, and his opinion is the one that is consistently sought.

 Photo of Curtis Chong speaking at a microphone.

Caption: Curtis Chong addressing a gathering during an NFB convention.

"I left one of our new units with Curtis," a top executive in one of the largest AT companies told me, and there is no question which Curtis he meant. "We're waiting to hear what ideas Curtis might have," another said a few days later, and again it was simply understood that anyone listening knew to whom he was referring. So who is this man who serves as an unofficial adviser to many of the leading developers and researchers in the field of AT, and why do people listen to him?

Lifelong Relationship with Technology

Curtis Chong was born in Honolulu, where he has fond memories of living near enough to the regional library for the blind that he could actually go there to select his braille books and Talking Books. He was an avid reader who excelled in math and read books on computer programming. "My grandfather typically drove me there," Chong recalls. "I stayed for hours, and by the time I was done, we filled up the back of his Volkswagen station wagon with my finds." He tried college, but found after a year that he had "no patience for it."

Chong landed a job with the Federal Aviation Administration (FAA) in 1972 and thus launched what has been an extremely successful relationship with technology. At the FAA, he said, his boss "gave me a lot of breaks," which enabled him to get a real on-the-job education. He learned about keypunching by reading a book about it and learned how to write a computer program when he was assigned the task. This was in 1972, when there were no talking computers, refreshable braille displays, or braille embossers, so Chong devised his own method (a piece of elastic affixed to an impact printer) for generating braille printouts of his work. That job, however, lasted only two years. Then, as he said, "I bummed around in California for a while and then in Minnesota."

When Chong could not get another programming job, he decided to enroll in a six-month course at the Brown Institute to earn their certification in computer programming. When the director of the Brown Institute saw that he was blind, he said, "We don't know what to do with you." Undaunted, Chong negotiated a plan: "I'll come in here and bring my stuff," he bargained. "The agency for the blind will pay my tuition--and if I don't make it after one month, I'll leave." Six months later, he graduated at the top of his class with a 98.6 grade point average.

Leaving a Mark on NFB

While Chong has held significant positions in the corporate sector--namely, a 17-year career as programmer analyst, team coordinator, and designer and consultant with Investors Diversified Services (which later became American Express Financial Advisors), what is most relevant to AccessWorld is the work that he has done in conjunction with the National Federation of the Blind (NFB). In 1984, Chong was elected president of NFB's Computer Science division, a volunteer position that he continues to fill. In 1997, he joined the organization's paid professional staff when he became the director of technology in NFB's International Braille and Technology Center in Baltimore, Maryland.

In addition to overseeing the procurement and installation for NFB's Technology Center of virtually every piece of AT that is designed for people who are blind that comes on the market, Chong left his mark on the center in other ways as well. When he arrived in 1997, the staff was still using dial-up modems for connecting to the Internet. When he left five years later, the center's Internet connections were high-speed ones, and every new employee was routinely given an e-mail account. It was under his direction that the fledgling Newsline for the Blind (a telephone-based reading system containing more than 150 newspapers and magazines) was expanded to a nationally based service with a toll-free number.

Perhaps Chong's most visible action while serving as NFB's technology director was to launch the suit against America Online for its (then) lack of attention to making its service accessible to customers who are blind. "I kept getting all these letters from blind people," Chong recalled, "who were frustrated that they couldn't use AOL, so I thought I should do something." When the company initially failed to respond, a discrimination suit was filed. Because of ensuing collaborative efforts, the suit was withdrawn, and today "AOL is pretty accessible for blind people who want to use it," Chong noted.

Becoming a "Bureaucrat"

In 2002, however, Chong and his wife Peggy returned to the Minnesota-Iowa region, where Chong assumed his present role as director of field operations and AT for the Iowa Department for the Blind. "This is one of the few agencies in the country I'd want to work for," Chong said, "and it's a great place to work." His responsibilities include the vocational rehabilitation programs, independent living programs, and Project Assist (the division that develops tutorials for blind and deaf-blind users of AT), and he serves as the agency's director of information technology. "I don't write programs any more," he quipped. "I'm a bureaucrat; I write letters."

Outside work, he devotes hours at home to his volunteer work with the NFB. He is passionate about encouraging other people who are blind to pursue computer careers and passionate about making the right tools available to people who are blind to do whatever jobs they choose to do.

His day job may involve policy making and paperwork, but his insights keep him connected to the arena of interactive kiosks, talking ATMs, and devices that are designed specifically for people who are blind. "Technology isn't our savior," Chong said. "It's one instrument among many that we have to deal with--and it can either help us or hurt us." Fortunately for other consumers who are blind, Chong's opinion is among those that are sought and valued by developers of AT who aim to make our technology better.