Full Issue: AccessWorld December 2012

More Information for the Holiday Season

Lee Huffman

Dear AccessWorld readers,

Last month AccessWorld served up its best holiday gift-giving ideas for people with vision loss. In the November issue, J.J. Meddaugh gave some great ideas in the AccessWorld Holiday Gift Guide 2012, and Janet Ingber provided information on popular shopping websites in her article 'Tis the Season: Navigating Online Shopping Websites with a Screen Reader. There is still time to get the shopping done, so if you missed these articles, you can follow these links or you can always select the "Back Issues" button to check out any past online issue of AccessWorld.

If you happen to be doing some cooking this time of year, you may want to take a look back at Deborah Kendrick's November 2010 review of the Directions for Me website entitled Website Evaluation: Directions for Me, a Gift to People Who Can't Read the Box. This article may help take the guesswork out of preparing those holiday meals by having package directions available at your fingertips.

The current issue has important information for this time of year as well, including an evaluation of the new iBill currency identifier as well as an evaluation of the new Nest Thermostat, and for all those who may be fortunate to receive an iDevice during the holidays, you will find a guide to using iTunes with a screen reader.

The AccessWorld team wishes you a happy and healthy holiday season.

Best regards,

Lee Huffman,

AccessWorld Editor-in-Chief

Some Still Want Basic Cell Phones

Dear AccessWorld Editor,

I just read "An Accessibility Evaluation of the Samsung Gusto 2 from Verizon Wireless" by Jacob Roberts and Aaron Preece, published in the September 2012 issue of AccessWorld. All I can say is, unless I go to a smart phone, I think I will stay with my Haven from Verizon until its battery is unusable.

By the way, that was an excellent evaluation of the Samsung Gusto 2.

Thanks,

Dan

Dear AccessWorld Editor,

I just read Tis the Season: Navigating Online Shopping Websites with a Screen Reader by Janet Ingber from the November issue of AccessWorld. I want to say that it is an excellent access overview. This article has me curious to check out some of these websites, especially since I have two grandsons (one who just turned one and the other almost three) who will want toys for Christmas.

I'm curious what you and some of the other techies out there think of the accessibility and usability of the Best Buy website. Today it has 370+ links, and I typically get lost on it. It almost seemed too big and cluttered to use successfully.

Best regards,

Charlie

AccessWorld News

Perkins School for the Blind, Helen Keller National Center, and FableVision will Lead the iCanConnect Campaign

Many thousands of Americans who have combined loss of hearing and vision may soon connect with family, friends, and community thanks to the National Deaf-Blind Equipment Distribution Program. Mandated by the 21st Century Communications and Video Accessibility Act (CVAA), the Federal Communications Commission (FCC) established this new program to provide support for the local distribution of a wide array of accessible communications technology.

The FCC is also funding a national outreach campaign to educate the public about this new program. The iCanConnect campaign will be conducted jointly by Perkins School for the Blind in Watertown, MA, the Helen Keller National Center in New York City, NY, and FableVision of Boston, MA. iCanConnect will seek to ensure that everyone knows about the free communications technology and training that is now available to low-income individuals with combined hearing and vision loss. From screen enlargement software and video phones to off-the-shelf products that are accessible or adaptable, this technology can vastly improve quality of life for this population.

iCanConnect seeks to increase awareness about the availability of communications technology for this underserved population, so people who are deaf-blind and have limited income can remain safe and healthy, hold jobs, manage their households, and contribute to the economy and the community.

Information about the new equipment distribution program is available online at the iCanConnect website or by phone at 800-825-4595. Additional information is available through the online FCC Encyclopedia.

"With the right technology, people with disabilities can link to information and ideas, be productive, and move ahead," said Steven Rothstein, President of Perkins. "Perkins' most famous student, Helen Keller, exemplified the potential of a person who is deaf-blind. We are proud to have a role in this transformational program."

The CVAA, championed in Washington, DC by Congressman Edward J. Markey of Massachusetts and Senator Mark Pryor of Arkansas, acknowledges that advances in technology can revolutionize lives. Nearly one million people in the United States have some combination of vision and hearing loss. People with combined loss of vision and hearing as defined by the Helen Keller National Center Act whose income does not exceed 400 percent of the Federal Poverty Guidelines are eligible to participate in the new program.

"The mission of the Helen Keller National Center is to enable each person who is deaf-blind to live and work in his or her community of choice," explains Executive Director Joe McNulty, adding, "This critical technology access program accelerates those efforts but only if people know about the resources. iCanConnect is poised to get the word out, coast to coast."

"FableVision's mission is to help ALL learners reach their full potential," said Paul Reynolds, CEO of FableVision Studios. "With this program we advance that mission, helping spread the word about equal access to tools that offer those with hearing and vision loss the transformational power of technology." Reynolds adds, "Now everyone is invited to the technology promise powering the human network."

New! Physical Education and Sports for People with Visual Impairments and Deafblindness: Foundations of Instruction

An important new resource from AFB Press gives you and the professionals you work with techniques, strategies, and information that will help individuals with visual impairments and deafblindness be full and active participants in sports and physical activities of all kinds!

Physical Education and Sports for People with Visual Impairments and Deafblindness: Foundations of Instruction, written by Lauren J. Lieberman, Paul E. Ponchillia, and Susan V. Ponchillia, promises to be the field's indispensable text on adaptive physical education, providing teachers, therapists, and other professionals with the necessary guidelines and strategies to integrate fitness and sports activities into educational and recreational programs.

Physical activity directly benefits everyone's health and fitness and also helps improve students' self-esteem, feelings of competence, and relationship skills. It is part of the expanded core curriculum that includes skills essential for students who are visually impaired. Three prominent educators and athletes have created this important new sourcebook on teaching the skills that will enable children and adults with visual impairments and deafblindness to be fully included in physical education, recreation, sports, and lifelong health and fitness activities.

Physical Education and Sports provides you with this essential information:

  • Methods of modifying physical skills instruction;
  • Techniques for adapting sports and other physical activities;
  • Teaching methods and curriculum points for physical skills instruction throughout the lifespan;
  • Information about sports and related activities, providing rules, adaptations, and information about competition options.

This is the ideal manual for physical educators, adapted physical education specialists, teachers of students with visual impairments, orientation and mobility specialists, occupational and recreational therapists, and anyone else interested in sports and recreation for persons who are visually impaired or deafblind.

Follow this link to order Physical Education and Sports.

Learning Ally Transforms Website, Launches New Services for People with Dyslexia and Visual Disabilities

Learning Ally, a nonprofit organization serving 300,000 children and adults across the US who have visual, learning, and reading-based disabilities, has transformed its website and launched new features and services to further benefit its members as well as parents and teachers.

The newly redesigned website offers distinct sections tailored for students, parents, educators, adult learners, and volunteers. It is more streamlined and user-friendly, making it easier than ever for members to access the organization's online library of more than 75,000 human-narrated audiobooks, including the world's largest library of audio textbooks. New features include the following:

  • Improved browse and search functionality, enabling members to filter the audiobook library by subject, grade level, and title popularity as well as by author and title.
  • The Parent Resource Center, a rich hub of information for families of children facing reading and learning challenges. Here, parents will find guidance addressing every stage of their journey — whether they are just beginning to explore the possibility of a learning difference or if their child has already been diagnosed and they are seeking accommodations and information about different learning styles. A comprehensive array of articles and fact sheets cover topics ranging from how to detect early signs of a learning disability, understanding a child's rights in the public school system, and much more.
  • The Resource Locator, a national database of professional specialists who can provide parents with formal diagnosis and appropriate certification required for their children's accommodations.
  • Free app and software, including the latest release of the Learning Ally Audio app for accessing audiobooks on iPhone, iPad, and iPod touch, and ReadHear software for Mac and PC.
  • VOICEtext, providing sentence-by-sentence highlighting of text on the screen in sync with audio narration. In its initial stages, this feature is being incorporated into a limited selection of titles in Learning Ally's library, will expand into more titles over time, and will benefit individuals for whom a multi-sensory approach to reading is recommended.

In conjunction with the new website launch, Learning Ally is also introducing a Web-based tool for educators to individualize instruction for students with print disabilities. Teacher Ally will enable special education teachers to easily assign audiobook reading materials to individual students or an entire class, provide individualized instruction, monitor student progress, generate detailed reports on the number of pages completed and time spent reading, and collaborate more effectively with parents.

ZoomReader is now available on the iPad, iPad Mini, and iPod Touch

ZoomReader is Ai Squared's OCR app for iOS devices. To use it, you snap a picture of anything with text, and ZoomReader turns that paper into electronic text and reads it aloud. This works well for grocery store signs, menus, handouts, newspaper articles, and magazines. Ai Squared still supports the iPhone (4, 4S and 5) as well. If you've already purchased ZoomReader for your phone and want it on your other devices, you can sync them with iTunes, and ZoomReader will appear as an app.

ZoomReader is available in the iTunes App Store for $19.99.

You can read more about it on AI Squared's mobile site, or watch this video.

The National Federation of the Blind Travel and Tourism Division Offers a Group Trip to Las Vegas and Some of the Great National Parks

Dates of the trip: October 9–13, 2013.

Pricing per person does not include round-trip transportation to Las Vegas, NV, but can be arranged. Should you want to arrive a day prior to the trip or stay an additional day after the trip ends, it can be arranged, and pricing will vary. Also, travel insurance is offered. Please ask pricing upon booking your trip.

If you are totally blind and are worried about not enjoying the trip because it might be too visual for you, we are working with Scenic Tours, which is willing to work with us to make sure everyone enjoys the trip. We will enjoy using all of our senses: touching, tasting, hearing, smelling, laughing, and so much more.

This trip is for everyone. If you know someone that is not part of NFB and would like to go, please pass this along to them (the more the merrier), and remember, October is "meet the blind month." What a better way to do this!

Pricing includes the following: tour bus, tour guide, hotels, all meals, entrance fees to the parks, taxes, and fees. The only thing not included is the tip to the tour guide at the end of the trip.

Payment structure: 20% of trip due at booking, full deposit due August 1, 2013, and final payment due September 1,2013. Once 20% of the trip has been paid, NFB is offering payment plans.

Single Occupancy: $860 per person ($172 per person due at booking)

Double Occupancy: $721 per person ($145 per person due at booking)

Triple Occupancy: $625 per person ($120 per person due at booking)

For more information and to book your trip, please contact Cheryl Echevarria, President of NFB Travel and Tourism Division and Owner of Echevarria Travel, at 631-456-5394 or reservations@echevarriatravel.com, or contact Maurice Shackelford, Vice President of the NFB Travel and Tourism Division and owner of peachtreetravel.net at 770-280-5029 or reservations@peachtreetravel.net.

Joint Statement by Creative Mobile Technologies and Lighthouse International Commending City Council Passage of Accessibility Measures for Blind and Visually Impaired Taxi Passengers

New York City's visually-impaired community recently gained a new measure of autonomy, independence, and security thanks to the passage of legislation, Intro 599, by the New York City Council requiring taxicabs to be accessible to people with visual impairments.

Creative Mobile Technologies (CMT), the nation's leading provider of in-taxi media and payment technologies, and Lighthouse International, a leading advocate for the blind and visually impaired, are proud to have worked hand-in-hand with the Chair of the Council Transportation Committee, James Vacca, to bring long-lasting benefits to New York City's visually impaired community. Earlier this year, CMT rolled out adaptive software that allows blind or visually impaired taxi passengers to hear the fare changing during the trip and to use payment functions through large easy-to-navigate sections on the media screen.

This groundbreaking initiative was the result of a truly cooperative effort on the part of industry, advocates, and government and will ensure that the nearly 400,000 people who are blind or visually impaired in New York will be a part of a community that benefits from independent payment and other technology in the city's iconic yellow taxicabs.

We would like to applaud Chairman Vacca and City Council Speaker Christine Quinn for their leadership.

The AFB Small Visual Display Project: The SVD Database

AFB Tech has launched the Small Visual Display (SVD) Database, which contains the data collected using the AFB Tech optics lab for over 200 products. This accomplishment marks the successful completion of the project's three-year grant from the Department of Education. In the future, AFB Tech will continue to seek funding to expand the optics lab's functionality, add new products to the database, and enhance the usability of the data collected for both consumers and industry.

Navigation Features

The SVD Database is an extension to the existing AFB Product Database, so if you have had any experience with the existing product database, the SVD Database will feel very familiar. The following link points to the homepage of the SVD Database, which has links to the different ways you can browse through the whole AFB Product Database: </not-found?url=http%3A//www.afb.org/prodmain.asp>. If you're interested only in the products with data from the SVD products, select the "Browse Products by Small Visual Display" link. After activating that link, you will be given a list of categories that contain SVD products. At this time, that list consists of the following categories:

  • Mobile Phones and Related Software (both smart phones and feature phones),
  • Personal Health Products (blood glucose meters, blood pressure monitors, heart rate monitors, etc.),
  • E-Book Readers/Players (Amazon Kindle, Barnes and Noble Nook, etc.),
  • Personal Media Players (mp3 players, iPod Touch, etc.),
  • Home Appliances (microwaves, alarm clocks, GPS devices),
  • Office Equipment (copiers, calculators, VOIP phones),
  • and Digital Cameras.

Each category name is a link that will take you to a page with a list of products within that category, which I will call the category view.

Category View

This page contains a table of all of the devices with SVDs in a selected category. The top of the page contains a description of the category followed by the number of products it contains. Below the category description is the product table for the selected category, which is the easiest way to compare products in a category. The table contains the product name, which is also a link to the product profile view for that product (to be explained in the next section), and a list of important specifications about the device. These specifications include the following:

  • Color Display: This indicates whether or not the display can produce different colors.
  • Darkroom Contrast: For backlit or emissive displays, this is the contrast in a completely dark room. This is important for determining the highest possible contrast the display will have for the information it is displaying.
  • Display Technology: Examples include Liquid Crystal Display (LCD) (the most common type), Light Emitting Diode (LED), Organic LED (OLED), or E-Paper.
  • Main Font Height: This is the size of the font representing the information that we consider to be the most important on the display based on the device's purpose. For example, on a blood pressure monitor, this number would be the height of the blood pressure reading.
  • Office Room Lighting Contrast, no Glare: This is a very important contrast measurement because it represents the amount of contrast that a display exhibits in typical office lighting conditions when there are no specular (or mirror-like) reflections. For purely reflective displays (displays that don't emit their own light), this number will be the same across all no-glare conditions.
  • SVD Manufacturer: This is the company that designs and manufactures the device.

These columns in the table are sortable if you have JavaScript turned on. To sort the table, click the column headers to toggle between sorting by ascending or descending order for that column. If you're using Window Eyes or an older screen reader, you may need to use the link on the page for Window Eyes Users. This will open a list of links outside of the table that you can use to sort the table. If you still have issues with the table, there is a link to totally disable JavaScript in the table, but the table will no longer be sortable.

Product Profile View

Clicking on the name of the product in the table will take you to the product profile view for that product. This is a very simple page which lists all of the specifications available in the database for that particular product. In addition to the fields in the category view table, the product profile view also contains the following fields:

  • Adjustable Brightness: This field reads "Yes" if a device can adjust the level of brightness output by the display.
  • Reversible Polarity: This field reads "Yes" if a device can display a negative of the colors on screen or swap the color scheme from dark characters on a light background to light characters on a dark background.
  • Touch Screen: This field reads "Yes" if the device has a touch screen interface.
  • Display Height/Width: These two fields are the dimensions of the visible display (not the whole device) measured in inches.

Additionally, there is a set of contrast values corresponding to dim lighting, office room lighting, and sunlight conditions for both glare (specular included) and no glare (specular excluded) conditions. These values are to help give you an idea of how the display will perform in different lighting conditions. For example, if you have a mobile phone with 99% contrast in a dimly lit room but only 20% contrast in sunlight conditions, then it's safe to assume that the phone will be easy to read indoors and difficult to read outdoors.

Future additions

AFB Tech hopes to keep improving the database to make the information more relevant and easier to understand. There are plans to add photographs to the product profile pages, and there will continue to be updates as the optics lab develops new measurements.

Rating Scale

One particularly important piece of data that will be added to the database is a rating scale that the optics lab has developed and is currently testing. This rating scale, which will initially be applied only to blood glucose meters, will condense the contrast, reflection, and text size data collected into one (or possibly two) easy to understand ratings. These ratings will be closer to a holistic evaluation of a display's quality and performance instead of a series of complicated contrast values. Ideally, once the lab has finalized how the rating scale will work, the rating will be a number (potentially from 1 to 10) that represents how readable a display is for most people.

Disclaimer

These measurement methods have been developed using industry standards and tested extensively. The optics lab uses several methods of reducing errors in the measurements, such as the use of the replica-mask method to mitigate veiling glare errors within the instrumentation. We do acknowledge, however, that it is possible for mistakes to be made during the measurement process that can result in inaccurate measurements. Therefore, if you see a measurement that doesn't make sense or that you think is wrong, please let us know, and we will review the case. It is also possible that some data (font size information, for example) may be missing for some devices until we are able input that information into the database.

If you represent a company that makes a product in the database and are interested in how we did the measurements of your device(s), please contact us.

If you have any comments about the database, suggestions on how to make it better, or issues accessing the information, please e-mail William Reuschel (wreuschel@afb.net).

Comment on this article.

Using iTunes on a PC With iOS Devices

Whether you receive an iPhone, iPad, or iPod Touch as a gift or purchase one yourself, you will need to use iTunes on a computer to manage your device's content. Apple has significantly improved the accessibility of iTunes and iOS devices. All iOS devices and Apple computers now come with their own screen reader, VoiceOver, already installed, which is activated by triple clicking the "Home" button. However, your computer's screen reader, not VoiceOver, is used to navigate and use iTunes. iTunes does not come installed on a PC, but it can be easily downloaded at the iTunes website.

This article will discuss how to perform common tasks in iTunes, such as adding music, making playlists, syncing a device with iTunes, and managing content. For this demonstration, I am using Window-Eyes 7.5.2 as my screen reader and the newly released iTunes 11.

(Author's Note: On November 29th Apple released version 11 of iTunes, which looks very different than previous versions. Although there are several ways to navigate iTunes, the instructions presented will make iTunes look and work much like previous versions.)

Getting Started with iTunes

Once the new version of iTunes is installed, you can format the program so that it looks like previous versions by typing either Ctrl + S or Alt + V and, then, arrow down to "Sidebar" and press "Enter." Even though the format will be the same as older versions, there have been some changes in the iTunes menus, so take time to explore them.

When iTunes starts, the cursor is in the Source list. The first item in the list is the Music Library playlist, which is where all music is stored. By using the up and down arrow keys, you can locate additional categories, such as movies and apps. The iTunes store is also in the Source list. When it is selected, information is automatically presented about purchasing from the store. Before purchasing anything, you will need to set up an Apple ID (an e-mail address) and password.

To control what is displayed in the Source list, either go to Preferences in the Edit menu or type Ctrl + Dash and, then, use the General tab to choose whatever you want to be in the list. Some options are TV shows, podcasts, and iTunes U, and you make your choices through checkboxes. The Preference dialogue box also contains options for handling CDs, setting up a portable device (such as an iPhone or iPad), and other controls.

On the PC, iTunes has a standard menu bar with options including File, Edit, and View. If the screen reader is set to read the navigation keys, they will be spoken. However, just pressing the alt key does not make the menus speak. Use arrows to navigate the menus until you learn the short cuts. A complete list of keyboard commands is in the Help section.

It is possible to use Tab and Shift + Tab to navigate through iTunes, but there's an easier way to navigate the Source list entries. Type the first letter of the section you want to locate (for example, "b" for books). To get to the top of the Source list (which is always the Music Library), press the "Home" key. With the cursor on any item in the Source list, typing F6 will move to the content section. For example, if the cursor is on the Music Library playlist, typing F6 brings the user to the list of all the songs in the library. The next F6 key stroke will tell how many items are in the category, and typing F6 again will bring the user to a search box. To search for a song album or artist, type the information into the edit box and press "Enter." There aren't any form controls to use. Next, press F6 twice as the first time will bring up the Music Library playlist while the second time will bring up the search results. Typing F6 a third time will display how many results there are. To clear the search box, type F6 once more and hit Tab twice. This will bring up the "clear text" button.

Adding Content

It's possible to add music that is already on your computer into iTunes, but you can also buy selections directly from the iTunes Store. CDs can be ripped directly into iTunes as well.

Adding Music from Your Computer

iTunes can play a variety of file formats, including MP3 and non-protected WMA files as well as its own M4A protected format. When adding a non-protected WMA file, iTunes will prompt whether to convert it to its own format or not add the file.

To add a single song to iTunes, type Ctrl + O and a standard Windows dialogue will open requesting the location of the file. Locate the file and press "Enter." Several seconds later, iTunes will make a three note sound indicating that the file has been successfully added. To add an entire folder, type Alt + F + D, which opens a standard dialogue box. Locate the folder and press "Enter." Once you hear the three note sound, the music has been added. If a large folder is added, the sound might play quickly, but files may still be in the process of being added. When new music is added from your computer, it will usually be at the end of your list of songs in iTunes.

Labeling Content

Although you may have had your music labeled with the artist and the title (for example: Taylor Swift — "I Knew You Were Trouble"), iTunes will read it as though the artist's name is part of the title. To change this, type Ctrl + I. In the dialogue box that opens, right arrow once to Info and fill in the edit boxes. The first edit box is for the title of the song, and the second edit box is for the artist. Other available fields include composer, year, and genre. There are additional tabs in the dialogue box, including Video and Options.

iTunes lets the user choose which information is presented for each song. In the View menu, select View Options or type Ctrl + J, which provides many options including song title, artist, genre, time, and much more. The View menu is where the user can set how iTunes is to be displayed. The first option is to have iTunes presented as a list, which works well with screen readers.

Adding a CD

In the general section of the Preferences dialogue is a box to choose how iTunes handles CDs. Two of the options are "Begin Playing" and "Ask to Import CD." While playing or ripping the CD, its content will appear in iTunes as a Source list entry. If the CD is an album, iTunes might recognize the tracks and label them correctly. If it is a homemade CD, you will have to do the labeling.

Making Playlists

A very useful feature in iTunes is the ability to make playlists. These lists are handy if you have more music than can fit on your device or if you want to listen to a specific artist or type of music. If you type Ctrl + N, a dialogue box will open for you to enter a title. Once the title is created, locate the song to be added, and type Shift + F10 or right click on it. Type the letter "a" for "Add to Playlist." Then, right arrow once to open the list of playlists, locate the name of the playlist, and press "Enter." All created playlists will show up in the Source list after the iTunes default categories, which include "Recently Added" and "Recently Played." You can either type the first letter of a playlist or use arrow keys to get to it. Deleting a song from a particular playlist will still keep it in your iTunes library.

The iTunes Store

The iTunes store has music, movies, television shows, ring tones, and more available for purchase. Locate the store in the Source list and press F6 to get to the search box. Enter search criteria (such as an artist, television show, or movie) and, then, press the "Enter" key. After a few seconds, type F6 again, and search results will be listed. On the results screen, there are links to narrow your results, including by media type and artists with similar names. Once you select a song, the title is listed with the artist's name under it and a button that says "Buy," which also includes the price of the song. Pressing "Enter" on the button does not do anything. Instead, you must locate the button with mouse hot keys. Once the button to buy the song is activated, you are prompted to enter your Apple I.D. and password. The first time your I.D. and password are used on a new computer or device, payment information must be entered. Once the purchase is made, the item downloads to the computer and is available to be synced with your Apple device.

Adding a Device

Before using an iPhone, iPod Touch, or iPad, it needs to be synced with iTunes on your computer. A device can only be synced with one computer at a time. The device will come with a USB charger, which is used to connect it to a computer. Your screen reader should speak all the information about the setup process.

The first part of the setup process is to register your device. There is a prompt to enter an Apple I.D. and password or create an account. Additional information, such as your name, address, and phone number, needs to be added. The setup dialogue can be navigated by using the Tab and Shift + Tab keys.

Next is a series of radio buttons for setting different parameters for your device. Navigation is done by checking a radio button and, then, tabbing through the dialogue to decide how your device is to interact with the computer. This part can be confusing since the user must tab through all the radio buttons before coming to specifics for the selected radio button. For example, the "Summary" radio button controls how iTunes backs up the device, whether iTunes automatically opens when the device is connected, when the computer checks for updates, and more.

After checking the "Summary" radio button, tab past the other radio buttons, including "Info," "Music," and "Apps." Eventually, information relating to the "Summary" radio button will be displayed. Most choices in this series of controls are made through checkboxes. Once selections in each area have been made, activate the "Apply" button. (If you make a mistake, it can easily be undone.) Next, tab past the "Summary" button, and the next control is the "Info" button. Controls when this button is checked effect how the device and computer synchronize e-mail, contacts, etc. Repeat the process with the other radio buttons.

Once the device is registered, it will show up in the Source list. To locate it, type the letter "d" and down arrow until the device's name is spoken. It should say your name and the type of device. For example, when I locate my iPhone in the Source list, Window-Eyes says, "Janet's iPhone." Another way to get to the device is to type the first letter of your name. Hitting the Tab key three times from this location begins the same dialogue box with the radio buttons for your device to interact with the computer. If the device is closed, using the right arrow once will open the content on the device. This does not affect the device, but it does allow for viewing what content is on it.

The iTunes Store on an iOS Device

In order to use the iTunes Store, your device needs to be connected to the Internet either through Wi-Fi or a cellular connection. The store opens with a series of tabs at the bottom of the screen. These tabs include Music, Movies, and Search. Activating the More tab brings up additional options, including Tones and Audio Books. The Search tab brings up a standard edit box with a "Search" button. Results are clearly listed with the title, artist, price, and a button to play a clip. The price is presented as a button, and activating it brings up a dialogue box to enter a password. Your Apple I.D. should already be automatically entered. Once the necessary information is entered, the item will download to your device. In order to get the content from your device into iTunes on your computer, type Alt + F + T or activate the File menu and arrow down to Transfer Purchases.

Conclusion

iTunes is very usable with a screen reader on a Windows based PC. It takes time to learn everything, but with some practice and patience it can be done. At this point, iTunes isn't 100 percent accessible with a Windows based screen reader, but it's close. Apple's onboard screen reader, VoiceOver, makes the devices extremely user friendly for people who use a screen reader.

Resources

Apple Accessibility:
(877) 204-3930

AppleVis Website:
This website contains a great deal of information for VoiceOver users. There are podcasts about different apps, ratings for apps, and a forum for asking questions.

Comment on this article.

FCC Pushes Back on Gaming Industry Accessibility Waiver Request, Consumer Voices Tip the Scales

Representatives of the software and hardware gaming technology industry petitioned the Federal Communications Commission (FCC) for a free pass to avoid any responsibilities to ensure the accessibility of their offerings that might otherwise be required by the landmark Twenty-First Century Communications and Video Accessibility Act (CVAA). Under the CVAA, so-called advanced communications services, such as electronic messaging, must be made accessible unless doing so is not achievable. The law recognizes that some technologies are not primarily designed and marketed to offer such communications, and the providers of such mixed-function devices or services are permitted to ask the FCC for a waiver of the CVAA communications mandates.

In requesting that the FCC shield the gaming industry from CVAA obligations through at least 2021 (an eternity in technology development), the industry effectively asked for a permanent waiver of any expectation that the communications functions offered via gaming need ever be made accessible. AFB invited the consumer community to respond to this unreasonable position, and the community voiced its opposition with enthusiasm. Calling on the FCC to push back on the industry's demand to let gaming completely off the relatively modest accessibility hooks stated in the CVAA, dozens of individual advocates who are blind or visually impaired and their families and friends wrote to the FCC explaining how important gaming has become for social interaction, education, and even the fostering of professional and intimate relationships. Unless people with disabilities have greater access to these fun and useful technologies, they argued, inequities will persist.

The FCC was clearly impressed by the outpouring of concern, and the normally dry prose of FCC official statements enlivened significantly in the formal FCC ruling on the gaming industry waiver request, which quoted extensively from heartfelt consumer comments. While the FCC did ultimately decide to give the gaming industry some additional time to comply with CVAA requirements, the industry has only been given two additional years in which to ramp up its accessibility efforts.

What all of this means is that consumer involvement still makes a big difference, and as the CVAA continues to be implemented over the next few years and beyond, we should begin to see greater accessibility in the mobile device, video technology, and, yes, gaming industries. No, the CVAA does not mean that popular online and other games will be totally usable by people with vision loss, but the CVAA is a precedent-setting law that takes much needed steps toward greater accessibility of the communications elements of gaming, the elements that the FCC has jurisdiction to reach.

Keep up-to-date on issues involving the CVAA and other legislative issues by signing up for AFB's public policy newsletter, AFB DirectConnect.

Comment on this article.

Zooming in on Magnification: An Evaluation of the CANDY and CANDY Grip Hand-held Video Magnifiers from HIMS Inc.

Portable, handheld, video magnifiers sometimes called closed-circuit televisions (CCTVs), with display screens have become highly sought-after devices by people with low vision who want to access print materials independently while on the go. Quick access to price tags in stores, restaurant menus, travel tickets, sales receipts, and other types of printed text is now more accessible. In response to the increasing demand for these products, more manufacturers of low vision products are offering their versions of handheld video magnifiers, with prices ranging from approximately $600 to $850. With the increase in choices in this product category, AccessWorld is receiving more questions about them. To provide you with more information, let's take another look at this growing product category.

This article reviews two handheld video magnifiers that are fairly new to the market: the CANDY and CANDY Grip from HIMS Inc. Both video magnifiers have 5-inch-LCD (liquid crystal display) screens which is larger than many versions on the market, 5 high-contrast color modes, adjustable magnification and brightness levels, freeze image capability, built-in rechargeable batteries, and weigh less than 10 ounces. This article examines the features of each product to help you decide if one of them may be the best choice for you.

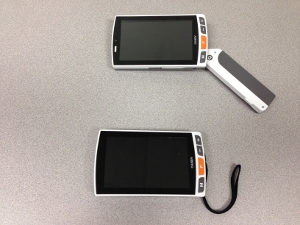
These two electronic magnifiers are almost identical with the exception that the CANDY Grip has an adjustable, 3position handle and a Mirror View feature which allows for self-viewing. These two features will be discussed later in the article. All other aspects of these two products are the same and are discussed below.

Photo of the CANDY Grip and CANDY electronic magnifiers.

Caption: The CANDY Grip and CANDY electronic magnifiers.

These two handheld video magnifiers are reviewed in three areas: documentation, physical design and features, and how well each displays different types of text. To evaluate these magnifiers, I used them in real-world situations--taking them to stores to read price tags and food labels and to restaurants to read menus and meal receipts and using them at home to look at various objects--including a telephone book, newspapers, magazines, and photographs.

Documentation

These magnifiers come with a 30 page user manual printed in 12 and 14 point fonts. While this is larger than most mainstream user manuals, it does not meet the American Printing House for the Blind's recommendation of 18 point font for an audience with low vision. It is important for all manufacturers of low vision access devices to keep in mind the intended user should be able to access its products' documentation independently. Thus, it is necessary to have larger fonts and pictures that people with low vision can more easily read.

The User Manual does, however, provide easy-to-understand information, troubleshooting tips, and warranty information. It would, however, be valuable to have more instructions on how to use the adjustable legs that fold out from underneath the device. For example, there could be more detailed information or even suggestions for when using the longer legs would be more advantageous than using the shorter ones. There could also be discussion to address if it is ever better to use only one set of legs and not both, essentially placing the display screen at an angle.

Physical Design and Features

The CANDY and CANDY Grip measure approximately 5.7inches long, 3.3 inches wide, and 0.7 inches high, and weigh less than 10 ounces. The camera is located under the center of the display screen, and it is designed to be positioned directly above the text or object to be magnified.

The CANDY and CANDY Grip have tactile controls to change their settings and come with a carrying bag, wrist strap, cleaning cloth, and power supply adapter. The magnifiers have an internal, rechargeable battery with a charging time of approximately three hours.

Magnification

The magnification is adjusted by pressing and holding down the "+" or "−" button located in the upper right corner. The magnification range for these units is approximately 1.5× to 22×. Unlike many similar electronic magnifiers on the market, the CANDY and CANDY Grip have a completely adjustable magnification range. You are not locked into three or four pre-set magnification levels.

Color Viewing Modes

The CANDY and CANDY Grip have five color viewing modes that are adjusted by pressing the " M" button, which is located at the bottom right corner of each unit. The five color viewing modes are: Natural Color, White on Black, Black on White, Yellow on Blue, and Reverse Grayscale.

Freeze Image Feature

The Freeze Image feature takes a temporary picture of an image. It enables you to take a picture of an image and bring it closer to get a better look, take the image to another location to view it in a better environment, or to show it to someone else. The "Freeze" button is located on the side of the LCD screen of the CANDY, while the CANDY Grip has an additional "Freeze Image" button on its handle.

Image Focus

By default, the CANDY and CANDY Grip's camera is set to Auto Focus mode; however, you can switch to Manual Focus mode if you prefer, by holding down the "F" button for two seconds. While looking at irregularly shaped objects or reading text on glossy paper or round items like cans, you may need to refocus the camera which can be done by pressing the "F" button. Pressing the "F" button will refocus the camera whether you are in Auto Focus or Manual Focus mode.

LCD Brightness Control

You can adjust the brightness of the display to better suit your visual preferences. By simultaneously pressing the "Zoom Up" button and the "Freeze Image" button. Pressing these buttons will cycle you through the three brightness choices to find the one that best suits your needs.

LED Lights Control Modes

The CANDY and CANDY Grip have two LED lights, one on either side of the camera. There lights can be set to one of three different modes: Auto, Always On, or Always Off. When in the Auto mode, the LED lights will turn off when the magnifier is lifted away from the reading material and will turn back on when placed near the reading material again. This is to prevent the lights from shining into someone's eyes.

Power Saving Mode

In order to conserve battery power, both magnifiers have a power saving mode which turns off the devices' LCD screen when they have not been used for two minutes. When the devices have not been used for three minutes, they completely power off automatically.

Beep Tones

Each button is assigned a beep tone that will sound to alert the user that the button has been successfully pressed. Beep tones can be turned on or off depending on the preference of the user by pressing the "Color Mode" button and the "Freeze Image" button simultaneously.

Checking Battery Status

You can check the battery level of either device by pressing the "Freeze Image" button and the "Zoom Down" button simultaneously. When these buttons are pressed, a battery level indicator icon will appear in the corner of the LCD screen.

Legs

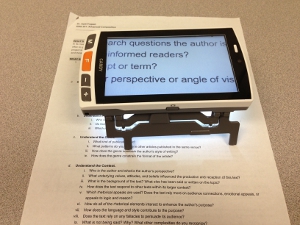
On the underside of the CANDY and CANDY Grip, there are two sets of legs that fold out to create a reading stand. These legs can be folded or unfolded independently. When using both shorter legs which measure 20 mm in height, the minimum magnification level is 5.6×. When using both longer legs which measure 40 mm in length, the minimum magnification level is 2.8×.

Photo of the CANDY Grip resting on its 40mmlegs magnifying text on paper.

Caption: The CANDY Grip resting on the 40mm legs.

The CANDY Grip has two features not available on the CANDY model: a three-position handle and a Mirror View feature. The ergonomic, folding handle can be used or folded underneath the magnifiers screen. The three position folding handle makes holding the magnifier easy for right and left handed users, and it clicks securely into place. The "Camera Selection" button is located on the opposite side of the magnifier from the handle. Pressing this button turns on the front facing Mirror View camera and provides a self-viewing feature. While in the Mirror View mode, you can still increase and decrease magnification and use the "Freeze Image" feature.

Reading Text

For these specific tests I used a sampling of items that people would read with a handheld CCTV, including a local newspaper, telephone book yellow pages, glossy catalog pages, personal photographs, a can of furniture polish, and the black-and-white text of a paperback novel.

When I held the magnifiers still, directly over the top of the printed material, they did a good job of displaying the different types of materials in the various viewing modes. The one exception to this is when reading text on a shiny round can. In instances such as this, using natural or reverse gray scale worked much better than other high-contrast modes.

Overall, these magnifiers provide a bright, clear view with high contrast between the text and its background. I found that the natural color Image mode worked best for reading text on a colored background such as in magazines and that using the lowest magnification setting in the natural color Image mode provided the best view for looking at photographs.

When I moved these magnifiers to read text, there was a ghosting of the letters; as I moved the unit more quickly, the ghosting increased. This is typical for most hand-held video magnifiers. With the CANDY and CANDY Grip the ghosting is most evident when using the lowest magnification setting with the 40mm legs. This finding reinforces the fact that hand-held video magnifiers, regardless of manufacturer, are best for spot reading, not for reading books or long passages of text. That said, spot reading is still critically important , and these types of hand-held video magnifiers absolutely have a place in our "tool chest" of devices for accessing text for people with low vision.

What Would Make Them Better

The CANDY and CANDY Grip could be made more usable for people with low vision by addressing the following:

  1. As stated previously, increasing the fonts in the user manuals to a larger size would make the product information more accessible to its intended audience. In addition, the documentation could be improved by providing additional instructions for using the folding legs that create the reading stand.
  2. Adding rubberized strips along the sides of the magnifiers would enable users to more securely hold the devices, especially for the CANDY model. I always recommend that people use the wrist strap to ensure they do not accidently drop the device. In the case of the CANDY and CANDY Grip the wrist strap does not come already attached, the user must attach the strap him or herself. Doing so can be a challenge for people with low vision. It would be better if the magnifier came with the wrist strap already attached.
  3. In order to change some of the settings on the CANDY and CANDY Grip, such as the brightness level, button combinations must be pressed. It is difficult to remember all the button combinations for the various features, and it would be simpler to use these features if only one button press was needed.
  4. The battery level indicator icon is small and may be difficult for many users to see clearly, and making the icon display in a larger format would be an improvement.

The Bottom Line

All things considered, both products do what they are made to do: magnify text to make it more readable for people with low vision. The CANDY is priced at $699, and the CANDY Grip is priced $50 higher at $749. I am not sure if I would use the Mirror View feature of the CANDY Grip myself, and I am not sure it would be a feature most people would use often, but the added versatility and convenience provided by the three position handle justifies the additional cost. Though, either would be a valid choice for those who want a portable solution to their magnification needs.

Product Information

Product Name: Lifestyle CANDY: $699 and Lifestyle CANDY Grip: $749
Manufacturer: HIMS Inc
Website: www.hims-inc.com
Telephone: 1 (888) 520- 4467

Manufacturer's Comments

First, thank you and AFB for scheduling the review and write-up of the CANDY portable video magnifier and CANDY GRIP handheld video magnifier. Also, we appreciate the opportunity to share our feedback with you and the readers of AccessWorld.

We agree and will consider implementing a few of the recommendations mentioned in this review in the near future.

  • Revising the User Manual for a larger font size and explaining the 20mm, 40mm and single leg stand operation in more detail.
  • We will discuss with our engineering staff options to enlarge the battery status icon or change the color to a higher contrast color.

Users may want to know that the built-in lithium battery lasts for up to 4.5 hour of run time on a full charge.

Also, CANDY and CANDY GRIP are now shipping with an attractive protective leatherette carrying case featuring a shoulder strap and belt loop.

Once again, thank you for sharing your review of the CANDY and CANDY GRIP from HIMS with readers of AccessWorld.

Happy Holidays to you and all at AFB and AccessWorld.

Best Regards,

James McCarthy, President

HIMS, Inc.

Comment on this article.

Control Your Thermostat from Almost Anywhere? There's an App for That: An Evaluation of the Nest Thermostat

Only a few years ago, the prospect of pairing some mainstream products together that would allow a person who is blind or visually impaired to control the temperature of their home from virtually anywhere in the world using a smart phone would probably sound like little more than wishful thinking. Today, with the proliferation of smartphones and more than half a million apps available for download, accessible solutions such as this have very quickly become a reality. Mainstream apps for navigation using GPS, illuminated magnification, and barcode reading solutions, just to name a few, are now common place.

A number of accessible home thermostats created specifically for people who are blind or visually impaired already exist on today's market, including the Kelvin Voice Interactive Talking Thermostat, The Round Easy-To-See Thermostat, and the VIP3000 Talking Thermostat. A company out of Palo Alto, California, simply called Nest, has developed the Nest Thermostat, a self-learning thermostat controlled through an app that can be loaded onto any iOS device, such as an iPhone, iPod Touch, or iPad, and on the Android platform. In fact, the Nest Thermostat's inception and creation is largely a result of two highly regarded former Apple employees. This may help to explain the inspiration of its design that integrates a very sophisticated piece of technology with a seemingly intuitive and straightforward user interface.

Another familiarly Apple-esque aspect of the Nest Thermostat is the way that it is being marketed. The "new and improved" second-generation Nest has just been released in October 2012, less than a year after the first-generation Nest made its debut. CNET, the popular tech media website, recently gave the Nest Thermostat five out of five stars. The review of the Nest reads, "Second-gen Nest zeros in on perfection." Retailing for $249, the Nest represents one of the most sophisticated and innovative thermostats on the market today. Although this is not a product specifically designed for people with vision loss, its level of accessibility, usability, and convenience when paired with an iOS device makes it a product worthy of a closer look.
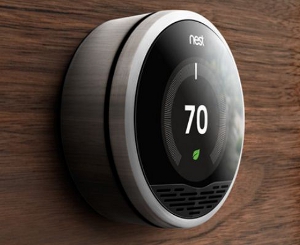
Screen shot of wall-mounted 2nd Generation Nest Thermostat

Caption: 2nd Generation Nest Thermostat

Installation and Setup

Included with the Nest Thermostat is a small screwdriver with four bits, an assortment of necessary screws to mount the unit, three different size plates for various mounting configurations, and instructional materials. As with any thermostat, the initial installation and setup is the most challenging part. No particular attention has been given to making the manual accessible for a person with low vision. Most of it is printed in 8 point font. The diagrams within the manual are equally as challenging to see. Although it doesn't negate the fact that providing the manual in larger font size to meet a broader audience is good business practice, it is worthwhile to note that the Nest Thermostat is a mainstream product. A series of videos and instructions describing the installation process are also made available on the Nest website.

The Nest Thermostat works with most conventional home heating and cooling systems, but it is a good idea to verify the wattage of your heating and cooling system to ensure that it's compatible. The company suggests that you remove the cover of your current thermostat, take a photo of it, and e-mail it to support@nest.com so that the Nest Support Team can determine if your current wiring configuration is compatible with the Nest Thermostat. Unless you are comfortable working with screwdrivers, circuit breakers, and electrical wiring, you may elect to have the initial installation and setup done by a qualified contractor. The Nest Thermostat can be purchased from Nest online as well as the Apple Store. Nest also offers an installation fee of $119. Lowe's carries the Nest Thermostat as well and will provide a contractor to install the unit for you if needed.

Setup of Remote Access via Wi-Fi and the Nest Account

Setting up the Nest Thermostat so it can be accessed and controlled via the Nest Mobile app or the Internet is optional (although this is one of the greatest selling features of the unit). In order to access the Nest Thermostat remotely, the thermostat itself will need to be within range of a Wi-Fi connection. Just like with any device that relies on Wi-Fi, the required connection and its password need to be entered using the thermostat. A user account also needs to be established online at the Nest website. If you are able to read high contrast lettering at approximately 9 point font, the setup should be fairly straightforward. Otherwise, it may be necessary to seek sighted assistance. Fortunately, this initial setup only needs to be done once. In order to use the Nest app, setting up a nest account is required. This process only needs to be done once as well. The Nest website is readily accessible if you are using screen magnification programs such as MAGic, ZoomText, or Magnifier in the Windows OS, but unfortunately, it is not entirely accessible via a screen reader.

Physical Description

The Nest Thermostat is a smart looking unit. Its coloring is a combination of black, polished finish, and brushed stainless steel. It's circular in shape, measuring three and a quarter inches across.
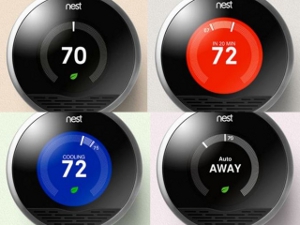
Screen shot of the Nest Thermostat displayed in black, dark orange, and dark blue backgrounds with the foreground colors in white

Caption: Color Schemes of the Nest Thermostat

The outer ring of the Nest Thermostat can be turned clockwise to increase the temperature or counter-clockwise to decrease the temperature. The background colors are displayed in black, dark blue, or dark orange, depending on the mode of the thermostat, while the temperature is displayed in a bold, white font measuring approximately 48 point font size. The thermostat background turns dark orange when heating, dark blue when cooling, and black when at rest. The display also dims completely after a few moments of it being set. When the temperature is manually changed using the ring, it emits an audible clicking sound at each temperature increment, similar to the clicking sound of a computer mouse.

Pressing the ring displays a number of additional options, including Heat/Cool Mode, Schedule, Energy, Settings, Away, and Done. These options are displayed in a much smaller font size (roughly 11 point font) but are all capitalized in bold, white letters on a black background.

In Cases of Wi-Fi Disconnections and Power Outages

The Nest Thermostat is equipped with a self-recharging lithium-ion battery, which maintains a charge via the low voltage wires on your heating and cooling system. If there is an extended power outage and the battery level gets low, the thermostat will disable its Wi-Fi connection in order to conserve power. Once the battery maintains a full charge again, the Wi-Fi will reconnect automatically. The company states that the lifetime of the battery is approximately 7–10 years and comes with a 5 year warranty. A glaring omission, however, is that neither the manual nor the website states exactly how long the battery will last if an extended power outage occurs.

The Nest App

The Nest app is available for both Apple and Android devices. This evaluation focuses specifically on the level of accessibility of the Nest app using iOS devices. It was tested using the built-in Zoom (screen magnification) and Voiceover (screen reader) features found on the iPhone, iPod Touch, and iPad.
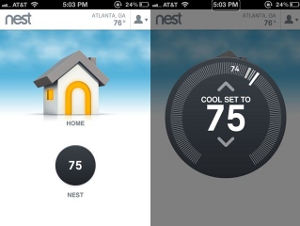
Screenshot of Nest app main screen and thermostat control screen side by side

Caption: Nest app main screen and thermostat control screen side by side

An iPhone 4 and iPad 2 were used to test the Nest app using VoiceOver and Zoom. After downloading the Nest app from the App Store, you are required to enter the e-mail address and password linked to your Nest account. Although the Nest Thermostat relies on Wi-Fi to be accessed remotely, you will be able to control the thermostat with your iOS device using either the Wi-Fi or your data plan.

Signing in with the app is straightforward and completely accessible using VoiceOver. After signing into your account, the next screen that appears, which will be referred to as the main screen, contains several buttons. The first button with the focus of attention includes your city and state. The next button is the "Account" button, which, when accessed, contains legal documentation on privacy issues, product update options, your Nest usage, and alerts if issues arise. These items can all be accessed using VoiceOver, but it is not possible to know if three of the listed checkboxes pertaining to e-mails from Nest are checked or unchecked using VoiceOver alone. These inaccessible options include the following: "Send me product update emails,"" Contact me about my Nest usage," and "Let me know if there's an issue."

The next button on the main screen states the current temperature in your particular zip code. The next item is the "Home" button, located beneath an image of a small house in the center of the screen. This button does not seem to activate anything with or without Voiceover. The button immediately after "Home" provides you with the temperature to which the thermostat is set. Accessing this button places you on a screen that displays your thermostat's current temperature in the middle of the screen. The font size, level of contrast, and brightness used to display the set temperature is impressive. On the iPhone 4, the temperature is displayed in a bold 40 point font size, and with an iPad, this increases to roughly 48 point font. The temperature within your home is also displayed on this same screen but at a much smaller size of approximately 8 point font. It is worth noting that Zoom, the built-in screen magnification program available with iOS devices, allows easy access to this smaller number and works seamlessly within the app itself on both the iPhone and iPad.

This screen also allows you to select the state of the thermostat: Heating, Cooling, or Away. You are able to control the exact temperature of the thermostat by selecting the buttons called "Diamond Up" to increase the thermostat's temperature or "Diamond Down" to decrease the temperature. On a couple of occasions during testing, VoiceOver seemed to get hung up on this screen and was not able to cycle through the buttons with the typical single-finger swipe. However, this is easily rectified by tapping anywhere near or around the center of the screen. The glitch of VoiceOver occasionally losing focus and the erroneous labeling of the buttons on the screen leaves room for improvement of the app itself. For example, "Diamond Up" and "Diamond Down" would be more easily understood if they were labeled as "Increase Temperature" and "Decrease Temperature," respectively.

The LEAF feature is a green leaf that appears when you have adjusted Nest to an energy saving temperature. This "leaf" appears visually on both the app as well as the thermostat. The Leaf is fairly visible in both size and contrast, but unfortunately, it is not accessible with VoiceOver. The company places considerable focus on the Leaf, presumably to help convince consumers that the energy savings of the Nest will eventually offset its initial cost.

Beyond the Basics

The whole premise behind the Nest Thermostat is for it to do a lot of the programing work for you by adjusting to your schedule and lifestyle. For those who are inclined to have more control of the thermostat remotely, the Nest Mobile App also contains an array of additional options. Many of these controls are accessible via VoiceOver, but some are not. In order to access these options, the setting for the portrait and landscape mode needs to be unlocked on your iOS device, since these additional options only appear in landscape mode. After doing so, three additional buttons appear: "Energy," "Schedule," and "Settings."

The "Energy" button displays a screen that gives the energy used over the last 10 days. VoiceOver effectively reads the total number of minutes or hours that heating and/or energy was consumed for each day. However, VoiceOver does not distinguish whether the energy consumption is derived from the heating or cooling system, which is color coded. This would typically not be an issue unless both the heating and cooling system both run on the same day since most people will be able to determine by the temperature whether their heating system or air conditioning was active on a particular day.

The "Schedule" button displays a screen that provides the range in temperature of the thermostat settings over a 10 day period using an X-Y axis. VoiceOver successfully reads the day of the week but is unable to interpret the temperatures that are graphically displayed.

The "Settings" button displays a screen with several additional options. Changing the displayed temperature to Fahrenheit or Celsius and enabling or disabling the Auto-Away, Auto-Schedule, and Early-On features are all accessible with VoiceOver. All of the technical information listed for the Nest, including the model number, serial number, and software version, are also easily accessible within the Settings screen.

Once again, there are some buttons and controls that are not accessible with VoiceOver, such as "Lock" (allowing only the person with a passcode to make changes), and setting the Auto-Away temperature itself. With some experimentation, it's possible for some VoiceOver users to determine the correct button to manually turn the fan of their heating/cooling system on or off, but the way this button is currently labeled makes it a little confusing.

There are definitely improvements that can be made to the app to increase the level of accessibility for VoiceOver users. However, a surprising number of features are accessible in light of the fact that this is a mainstream app that is not specifically designed for a person with vision loss.

The Artificial Intelligence of The Nest Thermostat

The Nest Thermostat is equipped with some sophisticated sensors that measure temperature, humidity, light, and movement in the home. With the aid of these sensors and the changes you make to the temperature of your home, the Nest Thermostat begins to recognize patterns in your daily and weekly routine and estimates your preferences throughout the week with a high degree of accuracy. At any point, you can easily override the unit's settings by adjusting the temperature either manually on the unit itself or by using the app with any iOS device. Your Nest account allows you to make changes via a computer and the Internet as well but only if you are accessing it visually since it is not entirely accessible with a screen reader.

The company makes a compelling argument that the energy savings the Nest Thermostat can save you will eventually offset the cost of the unit itself. This may be especially true if you tend to keep the settings of your thermostat the same because it is either too difficult or too frustrating to continually adjust it.

The Bottom Line

A number of features make the Nest Thermostat lend itself well to people who are visually impaired or blind. It's self-learning, meaning it adjusts to your specific lifestyle and, thereby, reduces the amount of time it takes to modify the settings. The temperature setting is displayed in large, high contrast font on the thermostat itself as well as the app, which makes it much easier for a person with low vision to use. Other than some erroneously labeled controls and a few graphically based features in the more advanced settings, the Nest Mobile app can be accessed using VoiceOver and Zoom with any iOS-based products. Accessing the thermostat using an iOS device also allows a person with low vision to position the iPad, iPhone, or iPod Touch to their own optimal focal point as opposed to crouching over the wall-mounted thermostat.

For a product that was not specifically designed for a person who is visually impaired, Nest seems to have serendipitously designed a product that is surprisingly accessible. Some obvious shortcomings include the very small size font and graphics used with the instruction manual, the inability of a person using a screen reader to effectively access all of the options available in the account settings, and the absence of speech output and larger size font on the thermostat during the setup of the device.

Having the ability to control your thermostat from almost anywhere on earth is not only very functional but can also be very cool or hot, whatever the case may be. At $295, it is one of the most expensive thermostats on the market today. If personal comfort, ease of use, savings in heating and cooling efficiency, and last but not least, the "coolness" factor outweigh the initial sticker shock price, then investing in the Nest Thermostat may be well worth considering.

Product Information

Product: The Nest Thermostat
Price: $249
Available From: Nest
Address: 900 Hansen Way, Palo Alto, CA 94304
Phone: (855) 469-6378
E-mail: info@nest.com

Comment on this article.

The iBill Second-Generation US Currency Identifier from Orbit Research: A Good Thing Made Better

Consider the following scenario:

You are in a checkout line for coffee or a few items at your favorite grocery store. The bill comes to $8.74. You quickly fish out a $20 bill from your wallet, hand it over, and accept your change. Focused on not holding up the line and inconveniencing other customers (not to mention the familiar desire of not wanting to attract unnecessary attention to yourself as the person with the white cane), you stuff the change in your pocket to sort out later.

Later comes, and you need your leftover change, which you of course never sorted, to pay a $5 taxi fare. You remember using the $20 bill, but what was your change? Two fives, a one, and change? A ten, a one, and some change? A five and six ones' Of course, with a little deductive reasoning, you can count your folded currency and make a guess, but then you need to go through the same process with trusting the taxi driver.

Identifying currency has been a long-time problem in the United States for people with a visual impairment, so much so that the American Council of the Blind filed and won a lawsuit against the US Department of the Treasury for not making currency accessible to those unable to see the denominations printed on it.

The American Council of the Blind won that suit, but the wheels of government are slow, indeed. The making of paper currency that can be identified by touch will not happen until the next generation of bills is developed. Meanwhile, blind people are still earning and spending cash, and needing ways to distinguish one bill from another.

In 2009, Orbit Research released a groundbreaking tool, the iBill, designed specifically to identify US currency. The original, reviewed in the May 2010 issue of AccessWorld, is small, accurate, and affordable.

Second-Generation

The first iBill was popular, but Orbit Research, a small company located in Delaware, listened to feedback from customers and became determined to make a good thing even better.

The new iBill is exactly the same size as the original model (3 by 1.6 by 0.7 inches, or slightly larger than a package of chewing gum) and is made of the same rugged plastic, but its look has been slightly redesigned in direct response to customer feedback.

The original model had a slot closed on all sides after the fashion of a compact disc player's slot. This slot was designed to match the exact size of the short end of a piece of American currency. Some customers felt that inserting bills exactly right in this kind of slot was difficult, so Orbit Research came up with a new plan.

The second-generation iBill offers a more open design for inserting currency that should be welcomed by those with eye-hand perceptual or dexterity difficulties. The new version's guide is an overlay with one piece of plastic on top of the large surface of the unit. Imagine placing one book on top of another, then sliding the top book slightly to the left and down a bit rather than lining all parallel edges up perfectly. That is how the new iBill's guide for inserting currency is positioned. With one large surface facing you, the iBill's guide is a piece of the same rugged plastic affixed to the body of the unit. This piece does not extend all the way to the right edge or top edge of the iBill, thus forming an open platform for sliding in the narrow end of a bill.

It takes about one second to align a bill properly and another second for the iBill to identify the bill.

Like the original product, the second-generation iBill has a button on each end, either of which can be pressed to activate identification. These buttons are textured for quick tactile location and are, now, also slightly recessed to prevent accidental activation while being carried in a purse or pocket.

The company has also added a tiny key ring for attaching the iBill to your keys or other lanyard. Best of all, the new version features a headphone jack, enabling the user to listen privately or simply to hear announcements more clearly in noisy environments. It warrants noting that this headphone jack is for a 2.5 mm plug and, due to its small size and somewhat unusual location, is extremely difficult to locate both visually and tactually. It is, in fact, almost at a corner of the unit (nearest the key ring); once discovered, it's easier to detect again.

How Does It Work?

To identify a bill, you simply slide one of the narrow ends under the guide and press one of the buttons on either end. The iBill will announce the single number of the bill's value in a clear female voice. The iBill will speak the single word "one", "two", "five", "ten", "twenty", "fifty", or "hundred." It takes about one second for the value to be spoken, and the unit's accuracy is promised to be 99.9 percent. If the bill has been inserted incorrectly or is so badly damaged that it cannot be identified, the iBill will say, "Error."

The iBill can announce its results through speech, tones, or vibrations. It offers three volume levels for the speech mode. To cycle through its options (tones, vibrations, and volume levels 1, 2, and 3), you simply hold in one of the unit's two buttons while quickly tapping on the other. Again, either of the iBill's two buttons can be pressed first to begin this rotation.

Results

I tested several bills of all denominations and read each of them with all three identification modes (speech, vibration, and tone). Many bills were crumpled and wrinkled (even beyond the point of feeling like currency), and the iBill had no difficulty identifying them. Inserting bills (always narrow end first) from every direction, I found the iBill to be consistently quick and accurate. If the "error" message is heard, usually simply pressing the narrow end flat and trying again will net positive results.

Conclusions

The new iBill is indeed a good thing made even better. While many customers found the original design more than acceptable, this new configuration will make insertion of bills easy for everyone. The vibration mode makes the unit accessible for deaf-blind customers as well as those who are blind or who have low vision. With the addition of the tiny metal ring at one end, many will find it convenient to attach the unit to keys or lanyards, and the addition of the earphone jack will be welcomed by those with hearing impairments or those who frequently need to identify currency privately or in noisy environments.

The unit ships with instructions both in print and on an audio CD. The required AAA battery is already installed and lasts about a year before it needs to be replaced. The unit is upgradable when new currency is developed.

One small criticism would be that, because the 2.5 mm headphone jack is less ubiquitous than its more common 3.5 mm cousin, including a compatible set of headphones with every purchase would be a good addition.

The second-generation iBill is easy to use, portable, affordable, and takes the mystery out of recognizing the cash in your pocket. It sells for $119 (a leather case accessory is available for an additional $20) and can be purchased from a variety of dealers or from Orbit Research directly. To order or for more information, visit the Orbit Research website or call (888) 606-7248.

Comment on this article.